Transform your crochet skills into wearable art with this playful and stylish bloomer shorts design. Effortlessly blend comfort and flair as each stitch creates a unique piece that's perfect for any season. Whether you're crafting for yourself or as a gift, this pattern brings a touch of fun and creativity to your wardrobe.

Crochet Bloomer Shorts
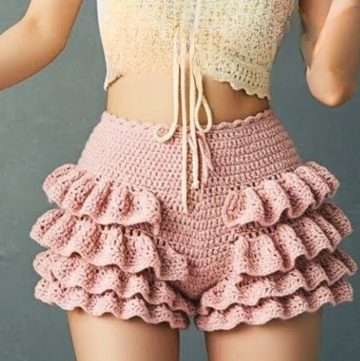
These crochet bloomer shorts stand out with their charming ruffle details, snug fitting waistband, and customizable length. The clever use of front post and back post stitches adds texture to the band, providing structure and flexibility. The ruffled edges create a whimsical touch, while the strap-tie waist enhances both fit and style. This pattern perfectly combines functionality and aesthetic, making it a true staple for your crochet projects.
Credit BRcrochet
Materials Needed
- Yarn - Your preferred color and type.
- Crochet Hook - 4.5mm.
- Scissors.
- Measuring Tape.

Step-by-Step Pattern
1. Making the Band (Foundation Chain + Bands)
- Start with a slip knot.
- Chain 3.
- Work into the first chain as follows:
- Yarn over, pull through (you should now have 3 loops).
- Pull through 2 loops, then pull through the last 2 loops. You now have your first stitch.
- Go underneath the first stitch, yarn over, and work as before: pull through 1 loop, then 2, then the final 2 loops.
- Continue this until you have your waist measurement minus 3 inches (this accounts for stretch).
- Example: If your waist is 28 inches, stop at 25 inches of crochet.
2. Joining the Band
- Once you've achieved the appropriate length, join the ends together with a slip stitch.
- Optionally, you can turn the work if it makes stitching easier.

3. Building Rows for the Waist
- Start Row 1 with a chain 3.
- Insert one double crochet into the same stitch.
- Work two stitches normally. For the third stitch, add two double crochets in the same space (increase).
- Repeat this pattern: 1 DC each in 3 stitches, then 2 DC in the next (increase).
- Continue until you complete the row.Note: If your hip measurement is larger, stop 2–3 inches smaller than the full hip before stretching.
4. Adding Straight Rows for the Shorts
- Chain 3 and make one double crochet in each stitch (no increases or decreases).
- Continue for 10 rows for one leg of the shorts.
- Add up to 12 straight rows if you want the shorts longer.

5. Making the Crotch
- Chain about 14 stitches for the crotch section.
- Divide your project into two equal halves by measuring or using a stitch marker.
- Join with a slip stitch to connect the crotch section.
- Work double crochets along the chain and continue through the body.
- Make 3 rounds of double crochet for the crotch area.
6. Creating the Second Leg
- After finishing the first leg, repeat the same process to build the second leg.
- Work inside the "opening" for the other leg of the shorts.
- Add 3 rounds of double crochet, just like the first leg.

Adding the Ruffles
1. Starting the Ruffled Rows
- Begin at the bottom of one leg.
- Attach yarn and chain 3.
- Add 4 double crochets into the same space.
- Chain 1, skip 1 stitch, and work into the next stitch: Add 4 double crochets.
- Repeat this pattern (skip 1, make 4 DCs in the next stitch) all around the leg opening.
- End the round by slip-stitching to the first 4-DC group you made.
2. Skipping Rows for Zigzag Ruffles
- To create zigzag ruffles:
- Skip one row of ruffles from the last round.
- Start the next ruffle row in the row below, working into the spaces between the ruffles.
- Add about 4 rounds of ruffles. You can adjust based on your desired fullness.Note: Each new round will alternate positioning slightly since you are skipping rows between.

Making the Waistband
- Use front post and back post double crochet for the waistband.
- Chain 2.
- Work front post double crochet on the first stitch.
- On the next stitch, work a back post double crochet.
- Alternate (front post, back post) all the way across the waist.
- Add 2–3 rows of this pattern for a nice, stretchy finish. Decrease as needed by joining stitches if the waistband feels too loose.
Adding the Strap
- For the strap, create a long chain (long enough to wrap around and tie with ease).
- Weave the strap through the waistband, ensuring even distribution.
- Finish by trimming any excess yarn.
Final Check
- Measure the shorts to confirm everything fits.
- Trim any loose threads and shape the shorts as needed.