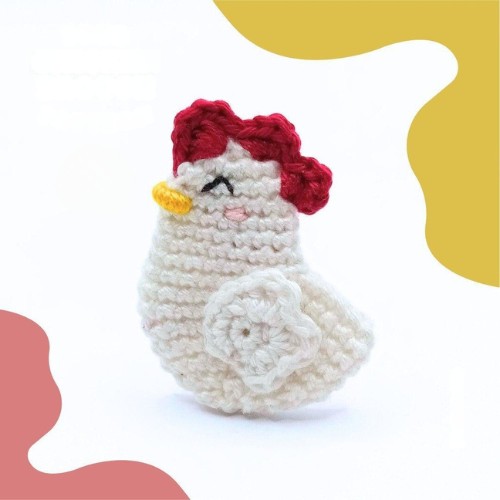
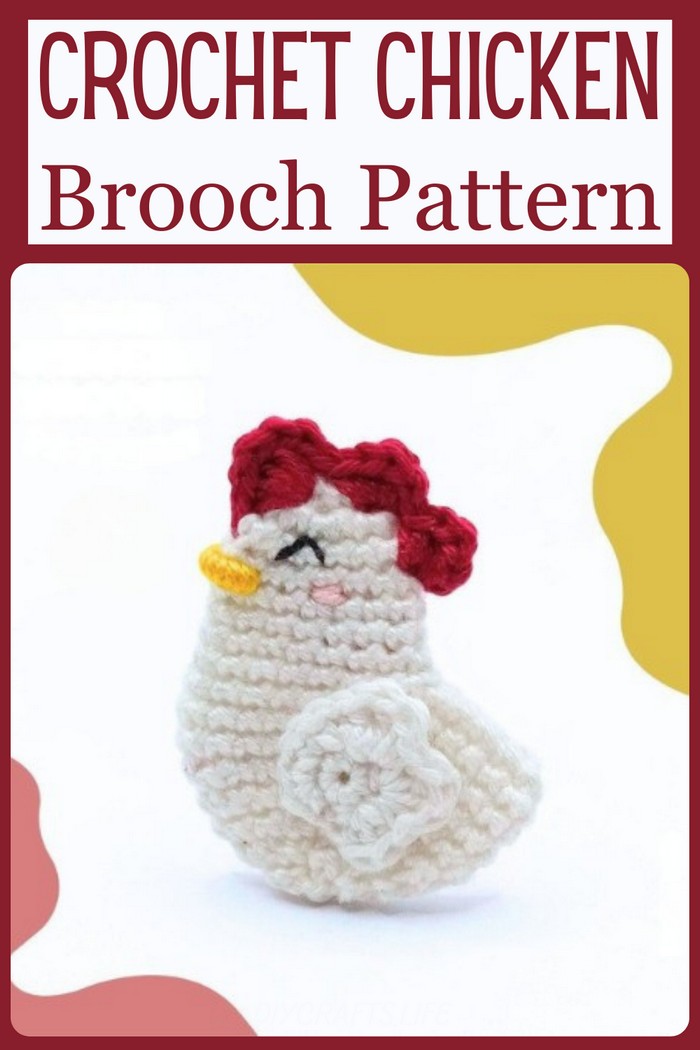
Now you can add a touch of farmhouse charm to your daily outfits with this adorable crochet chicken brooch. Imagine a small, cute chicken, crocheted in simple stitches, with a white body, a red comb on top, a tiny yellow beak, and black eyes that sparkle with joy. This little chicken wears a smile and has a hint of pink blush on its cheeks, giving it a cheerful look. Its body is round and sits snugly, but you can even crochet tiny claws to give it more character. Plus, this crochet chicken brooch is not only easy to make, and perfect for beginners, but it's also a versatile crochet accessory that can brighten up your jackets, bags, or hats with its delightful design.
Making The Crochet Chicken Brooch
Abbreviations:
(US terms)
- mr - magic ring
- st/sts stitch/stitches
- sc - single crochet
- hdc - half double crochet
- dc - double crochet
- inc - increase (2 sc in 1 st)
- dec - decrease (sc 2 sts together)
- ch - chain
- rnd/rnds - round/rounds
- [...] x... - repeat instructions within [ ] x ... times
- (...) total number of sts in this rnd
- FO - fasten off
Materials:
- 2 mm crochet hook or a size hook suitable for the yarn you will use.
- Any yarn you prefer in any colour combination. If however, you wish to use the colours I have used for this pattern you will need white, red and small amount of yellow, pink and black.
- Regular safety pin 2.5 - 3 cm long (you can also use a safe lock brooch pin if you have but the safety pin works just fine)
- Yarn needle
- Scissors
- Stitch marker/piece of yarn
Step by step Pattern
Notes:
- This pattern is worked in continuous rounds unless otherwise mentioned.
- The body and head are worked in one piece.
- It would be helpful to read the whole pattern before you start.
- Always stick to the same weight, if you don't use the same yarn brand, throughout the pattern.
- Use a stitch marker or a piece of yarn to mark the beginning of every round.
- This pattern does not contain crochet lessons. Basic crochet skills are required.
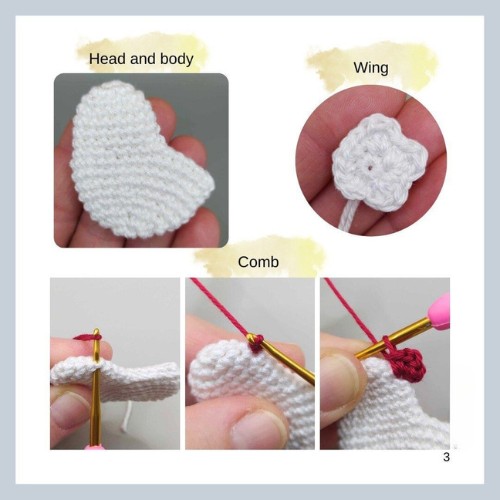
Head & body (with white) do not stuff
- Rnd 1. 6 sc in a mr (6)
- Rnd 2. [inc] x 6 (12)
- Rnd 3. [3 sc, inc] x 3 (15)
- Rnd 4-7. (4 rnds) 15 sc (15)
- Rnd 8. Sc, ch 7, starting from the 2nd ch from the hook make 6 sc, continue now crocheting in the round making 6 sc, inc, 7 sc (22)
- Rnd 9. Sc, start working on the other side of the ch and then around the rest sts of the rnd, make 6 sc on the ch, 12 sc, [inc] x 2, 7 sc around the rest sts to finish
- the rnd (30)
- Rnd 10. 30 sc (30)
- Rnd 11. [8 sc, dec] x 3 (27)
- Rnd 12. [7 sc, dec] x 3 (24)
- Rnd 13. [6 sc, dec] x 3 (21)
- Rnd 14. [5 sc, dec] x 3 (18)
- Rnd 15. [1 sc, dec] x 6 (12)
- Rnd 16. [dec] x 6 (6)
- FO, leave a long yarn tail to close the hole and sew the safety pin later.
Wing (with white)
- Rnd 1. 6 sc in a mr (6)
- Rnd 2. [sc, 2 dc, hdc] x 3, [inc] x 3
- Sl st into the first sc of the rnd
- FO and leave a long tail for sewing. Sew the wing approx. between rnds 7 and 15.
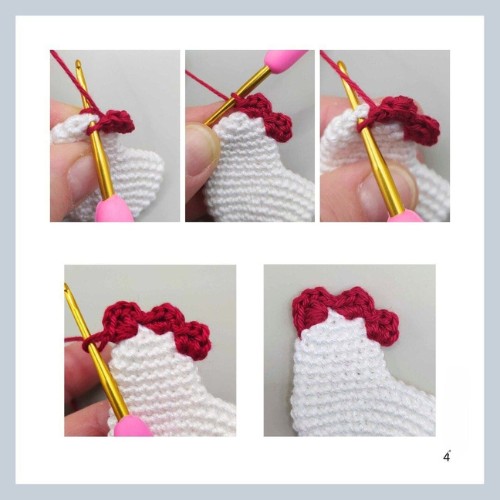
Comb (with red)
- With the chicken completely flat put your hook between rnds 3 and 4 at the back of the head and attach your yarn, ch 1 and in the same st you attached your
- yarn into work the following sts: sc, hdc, dc, hdc, sc. Put your hook between rnds 1 and 2 and in this st work the following sts: sc, hdc, dc, hdc, sc. Now put your
- hook between rnds 1 and 2 but this time at the front side of the head and in this st work the following sts: sc, hdc, 2 dc, hdc, sc. To finish go between rnds 3 and 4
- at the front side of the head and make a sl st.
- FO and hide the yarn tail inside your work.
Beak (with yellow)
- First embroider 2 horizontal sts at the front side of the head below the comb, between rnds 4 and 5, 4 sts long and then with the help of your needle wrap the
- yarn around those sts until they are covered from one side to the other.Eye (with black)
- Split your yarn in half to get a thinner thread and embroider an eye between rnds 2-4, 2 sts long.

Cheek (with pink)
- Embroider the cheek between rnds 4-5, 2 sts long.
- How to sew the safety pin
- To fix the safety pin at the back of the chicken make a few sts on the top and bottom of the pin.
- Then sew along the side of the safety pin, which always stays close
Designer: Thebluebobbin On Instagram