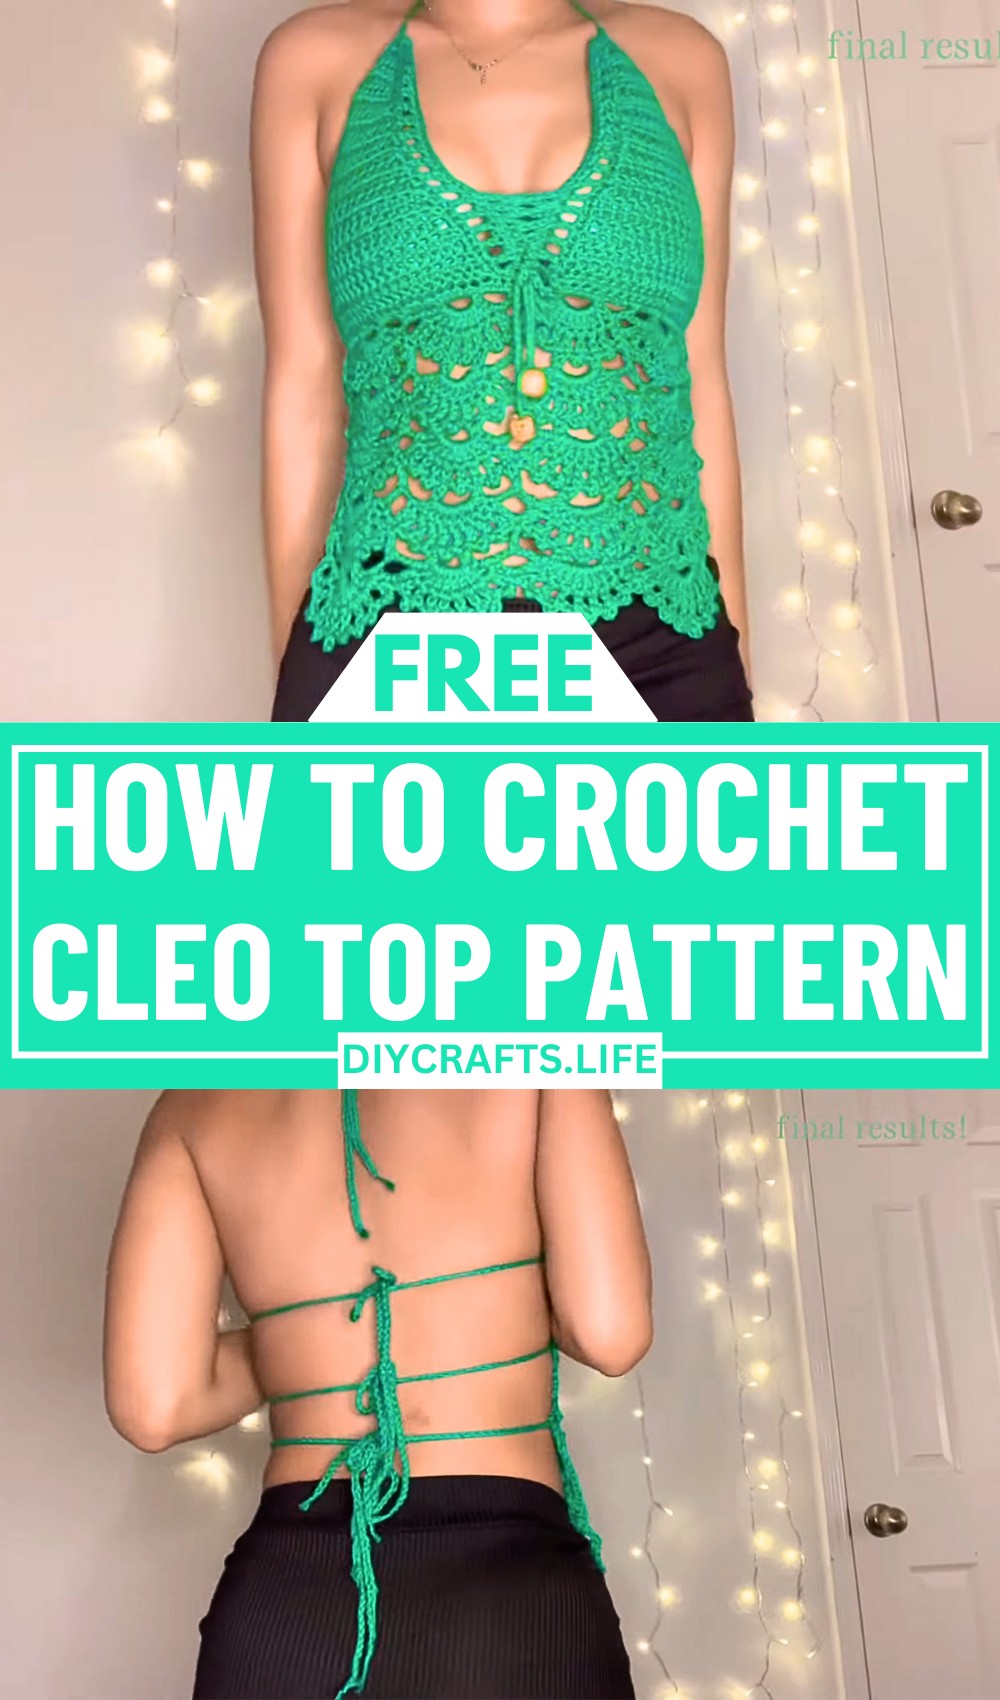
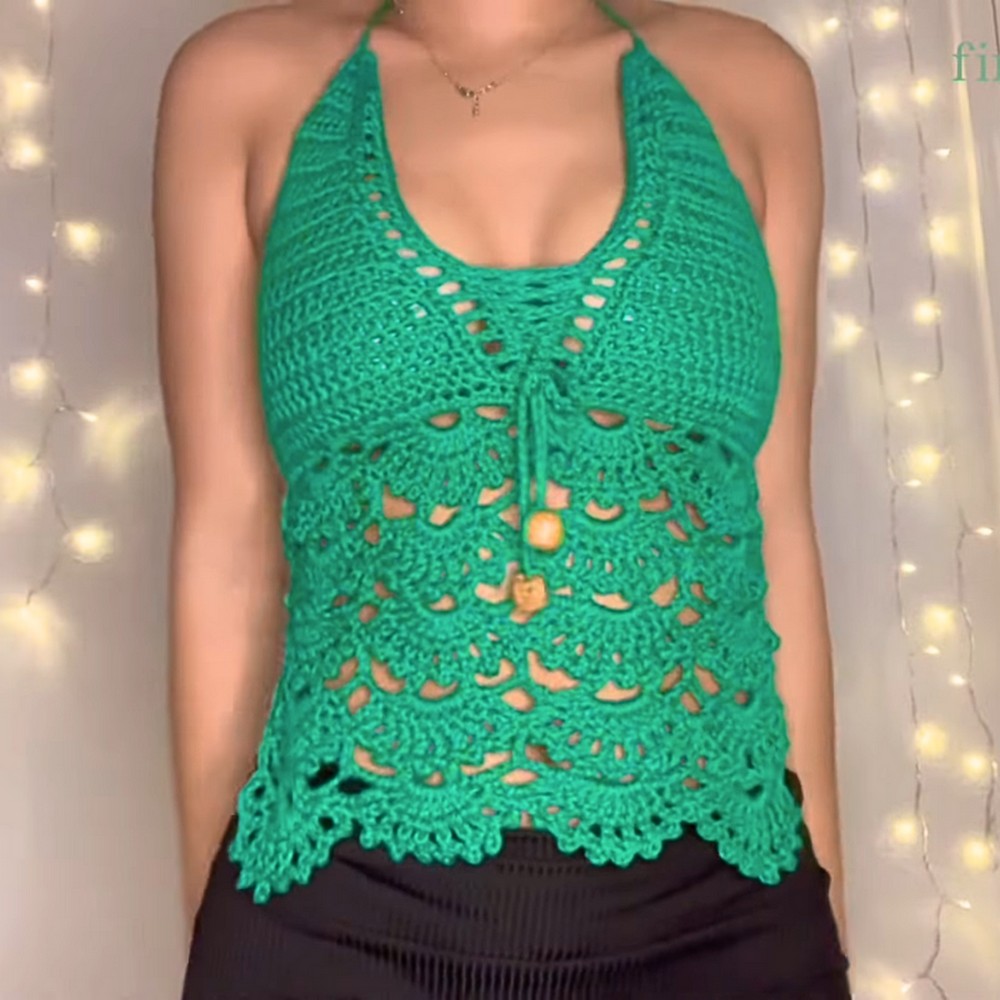
Step into bold and irresistible handcrafted fashion with the Crochet Cleo Top. This design captures attention effortlessly through its striking simplicity and stylish charm. Whether you're creating your own statement piece or adding flair to your wardrobe, this pattern exudes a modern vibe that’s perfect for any season or occasion.
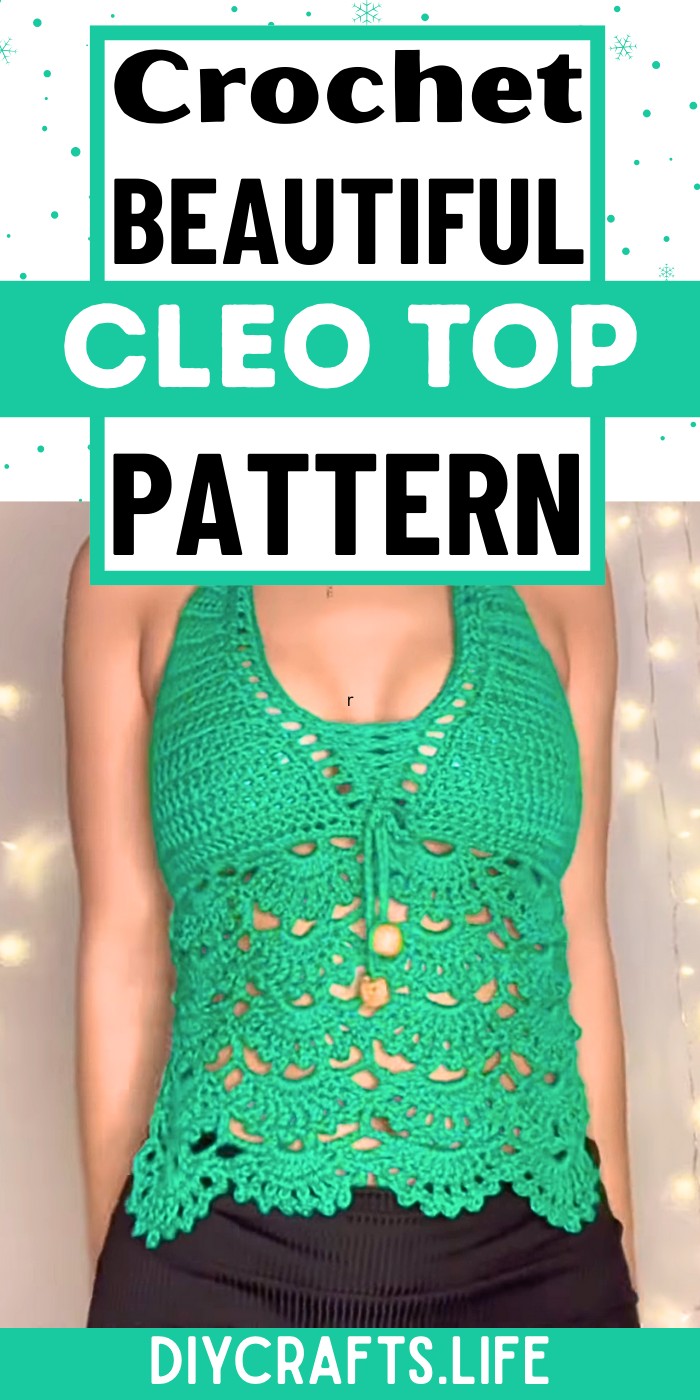
Crochet Cleo Top
The Cleo Top stands out with its sleek structure and elegant accents. Featuring timeless crochet techniques combined with contemporary appeal, it offers a versatile design that’s both comfortable and fashionable. Play with colors and textures to reflect your personality, making each piece truly one-of-a-kind. From casual outings to special events, this top embodies creativity while blending effortlessly with your favorite outfits.
Credit Kamryn Cain
Materials & Tools Needed
- Yarn: Cotton yarn preferred for better structure and durability. The creator uses "I Love This Cotton" yarn in the color "Bright Green" (from Hobby Lobby).
- Weight: Medium/Category 4.
- Approximately 100 grams or 180 yards for "A Cup" size.
- Hook:
- 2.5 mm crochet hook (or the size that works best for your gauge).
- Scissors: For cutting yarn ends neatly.
- Darning/Tapestry Needle: For weaving in ends.
- Optional: Beads for embellishments. These add decorative flair to your work. Attach them to strap ends or ties for a more polished look.
Finished Size & Customization Ideas
Finished Size:
- Sample made for A-cup size.
- Size is based on bust measurements and can be adjusted for other sizes by altering chain lengths at the beginning or lengthening/shortening straps.
| Size | Approx. Cup Length | Chain Length (Multiple of 12) |
|---|---|---|
| A | ~5 inches | 48 |
| B | ~6 inches | 60 |
| C | ~7 inches | 72 |
| D | ~8 inches | 84 |
Customization Ideas:
- Yarn Weight: You can use lighter or chunkier yarn for a different texture, but remember to adjust the hook size accordingly.
- Strap Adjustments: Lengthen or shorten straps as preferred for extra support or aesthetic. Add more straps for a halter or crisscross back style.
- Color Choice: Choose solid hues for a classic look or variegated yarn for interesting color transitions.
- Customize the Stitch: Use the creator’s stitch pattern (picot fans) or experiment with other decorative stitches to modify the design. The base allows for flexibility.
Pattern Abbreviations & Terminology
All instructions use US Crochet Terms:
- ch: Chain
- sc: Single Crochet
- dc: Double Crochet
- hdc: Half Double Crochet
- sl st: Slip Stitch
- sk: Skip
- sp: Space
- rep: Repeat
Step-by-Step Crochet Instructions
Part 1: Starting the Body Base
- Chain Base:
- Chain a multiple of 12 based on your bust size (e.g., 48 chains for A-cup).
- Add 1 extra chain for turning.
- First Row (Foundation Row):
- Sc into the 2nd chain from the hook.
- Chain 5, skip 3 stitches, and sc into the next.
- Repeat this pattern to the end of the row. This forms “arches” or gaps for the fan pattern base.
- You should end with 12 gaps if you chained 48 initially.
- Second Row (Fan Set-Up):
- Chain 5 (this counts as 1 dc and a ch-2). Turn your work.
- Sc into the first gap.
- In the next gap: work 8 dc.
- Sc into the following gap. Chain 5 and repeat: sc into the next gap, then work 8 dc into the next gap.
- Continue this pattern until the end, ending with 1 dc into the last sc of the row.
- Third Row (Picot Detail):
- Sc into the next gap.
- Work a picot stitch (dc into the first stitch, chain 3, sl st back into the 1st chain) across the tops of the fans. Create 7 picots on each fan.
- Repeat Rows 3–5 until you’ve completed your desired body length.
- Example: The creator worked 5 total rows of fans for full belly coverage. Add more rows for a longer top or fewer for a cropped style.
Part 2: Creating the Cups
- Mark Cup Placement:
- Once the base is complete, divide it into two equal sections for the cups. Attach your yarn at the starting edge of one section.
- Row 1 of Cup:
- Work HDC stitches evenly across the base section (e.g., 48 HDC if you chained 48).
- Chain 1, turn your work.
- Row Shaping:
- Work HDC decreases at the beginning and end of every 3rd row to create a triangular shape.
- Alternate rows: 2 regular HDC rows, followed by 1 decrease row.
- Final Rows:
- For A-cup, finish after approximately 20 rows of HDC.
- End the cup with only 1 HDC at the top point.
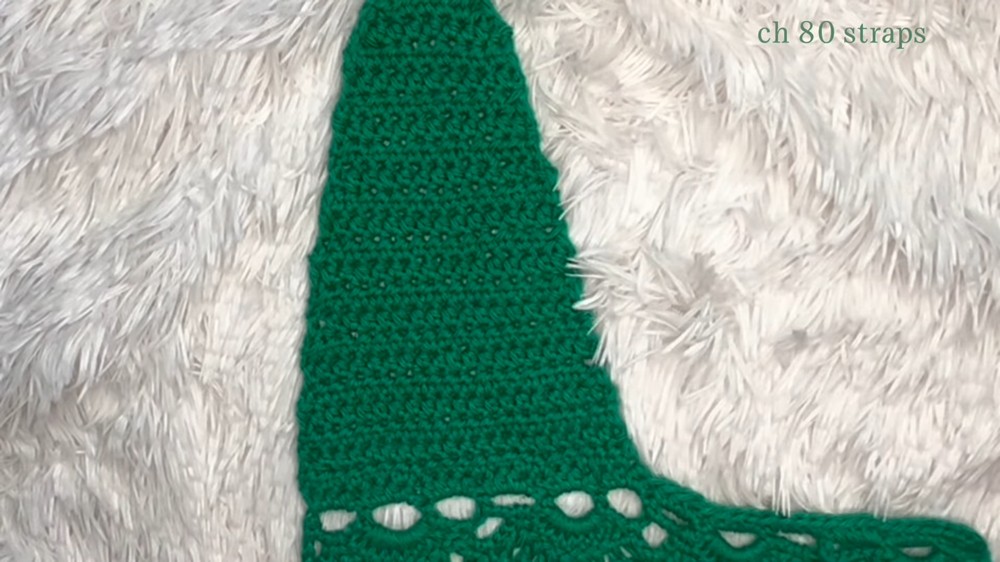
- Straps:
- Chain 80-100 stitches (or desired length) for straps at the top of each cup.
- Add two additional straps to the bottom sides of each cup for a secure fit.

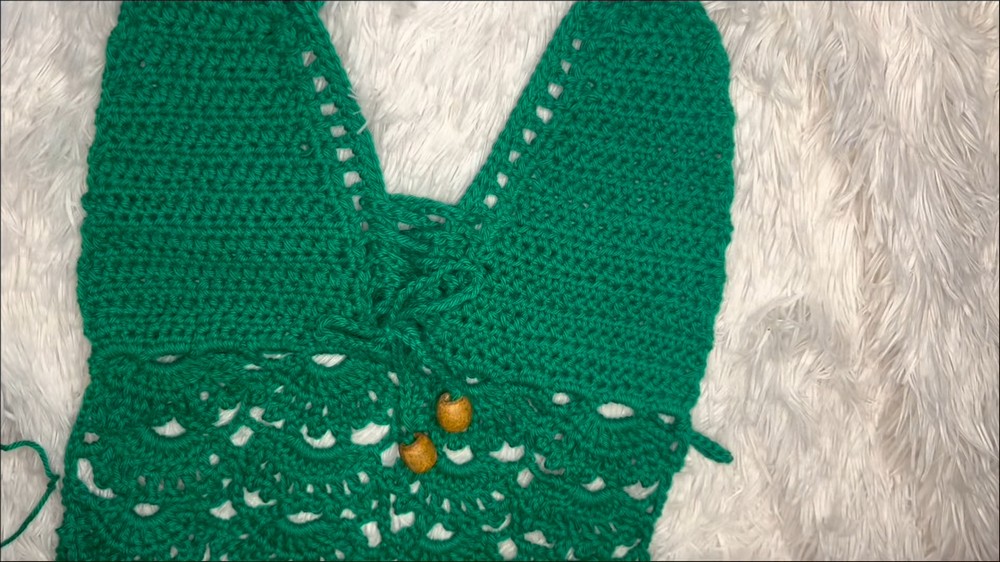
Part 3: Adding Middle Mesh
- Attach Mesh:
- Connect yarn at the inner cup edges (where the straps start).
- Work sc evenly along the edges and across the gap between cups.
- Mesh Rows:
- Chain 3, skip 2 sc, and work dc into the next stitch. Chain 1, and repeat across for a lacy effect.
- Finish Mesh:
- Add a single sc row along the edges of the mesh for extra stability.
Part 4: Adding Beads and Ties
- Neck & Back Ties:
- Add 80-100 chain-length ties at all strap points (top, bottom sides, and middle back).
- Embellishments:
- Optionally add beads by pulling yarn tails through a bead hole and knotting securely in place. Trim any excess yarn.
Finishing Touches
- Weaving in Ends: Use a darning needle to securely weave in any loose ends for a polished look.
- Block the Top: Lightly block your top if needed to shape properly.
Final Notes
- The "Cleo Top" is great for customization! Feel free to change stitches, experiment with colors, or modify the structure for a unique look.
- This project is great for intermediate beginners who are comfortable with different stitches and shaping techniques.