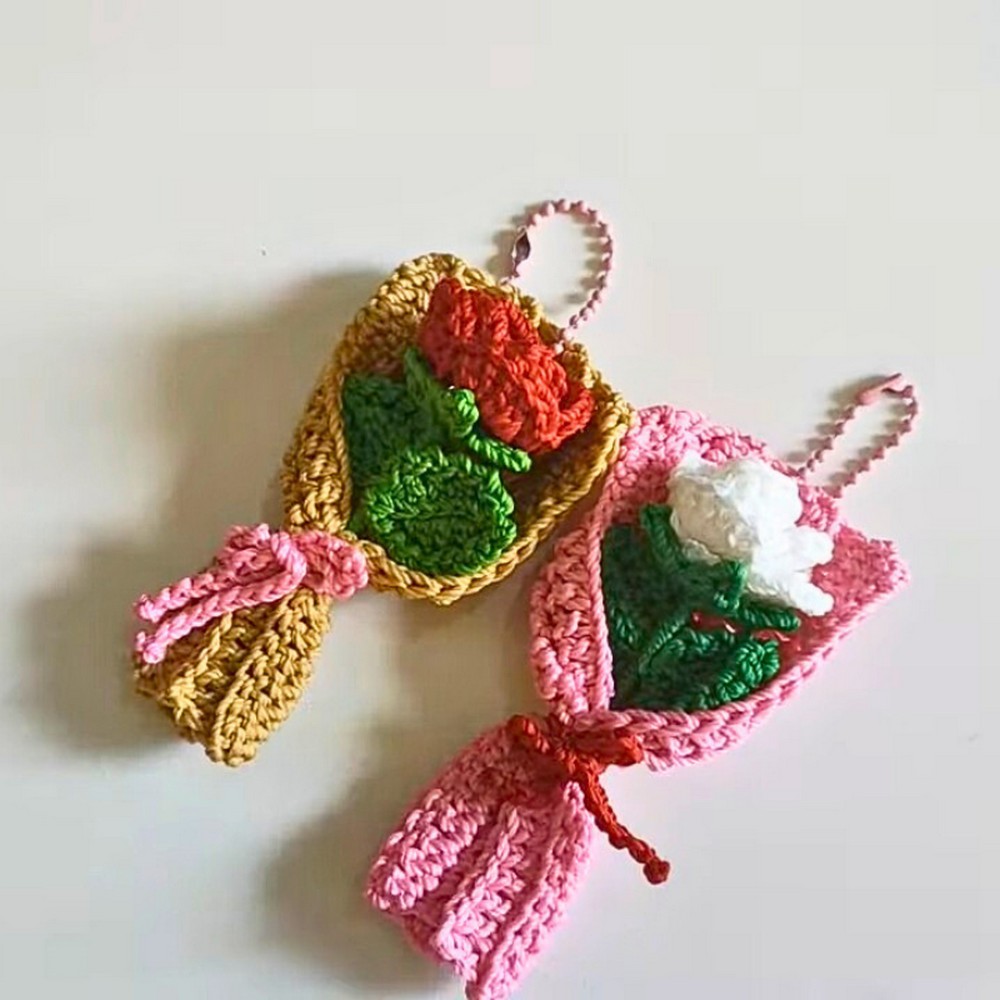
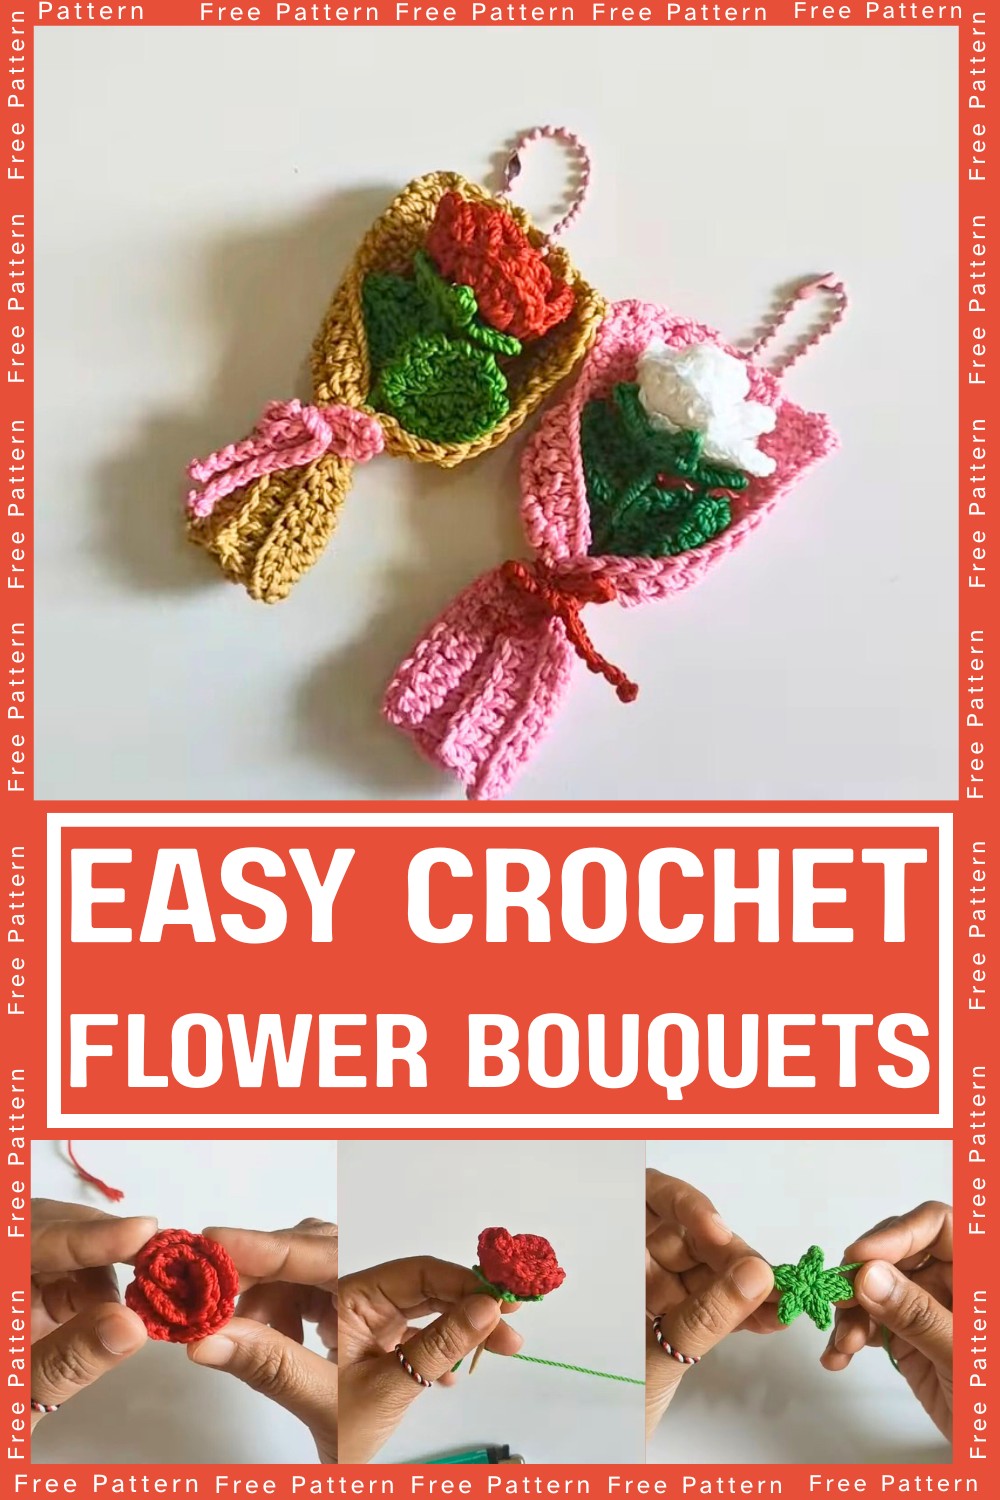
Create stunning crochet flower bouquets with this engaging project that combines beauty and function. Perfect for home decor or as a thoughtful gift, this bouquet of crochet roses offers both aesthetic appeal and versatility, sure to bring charm to any setting.
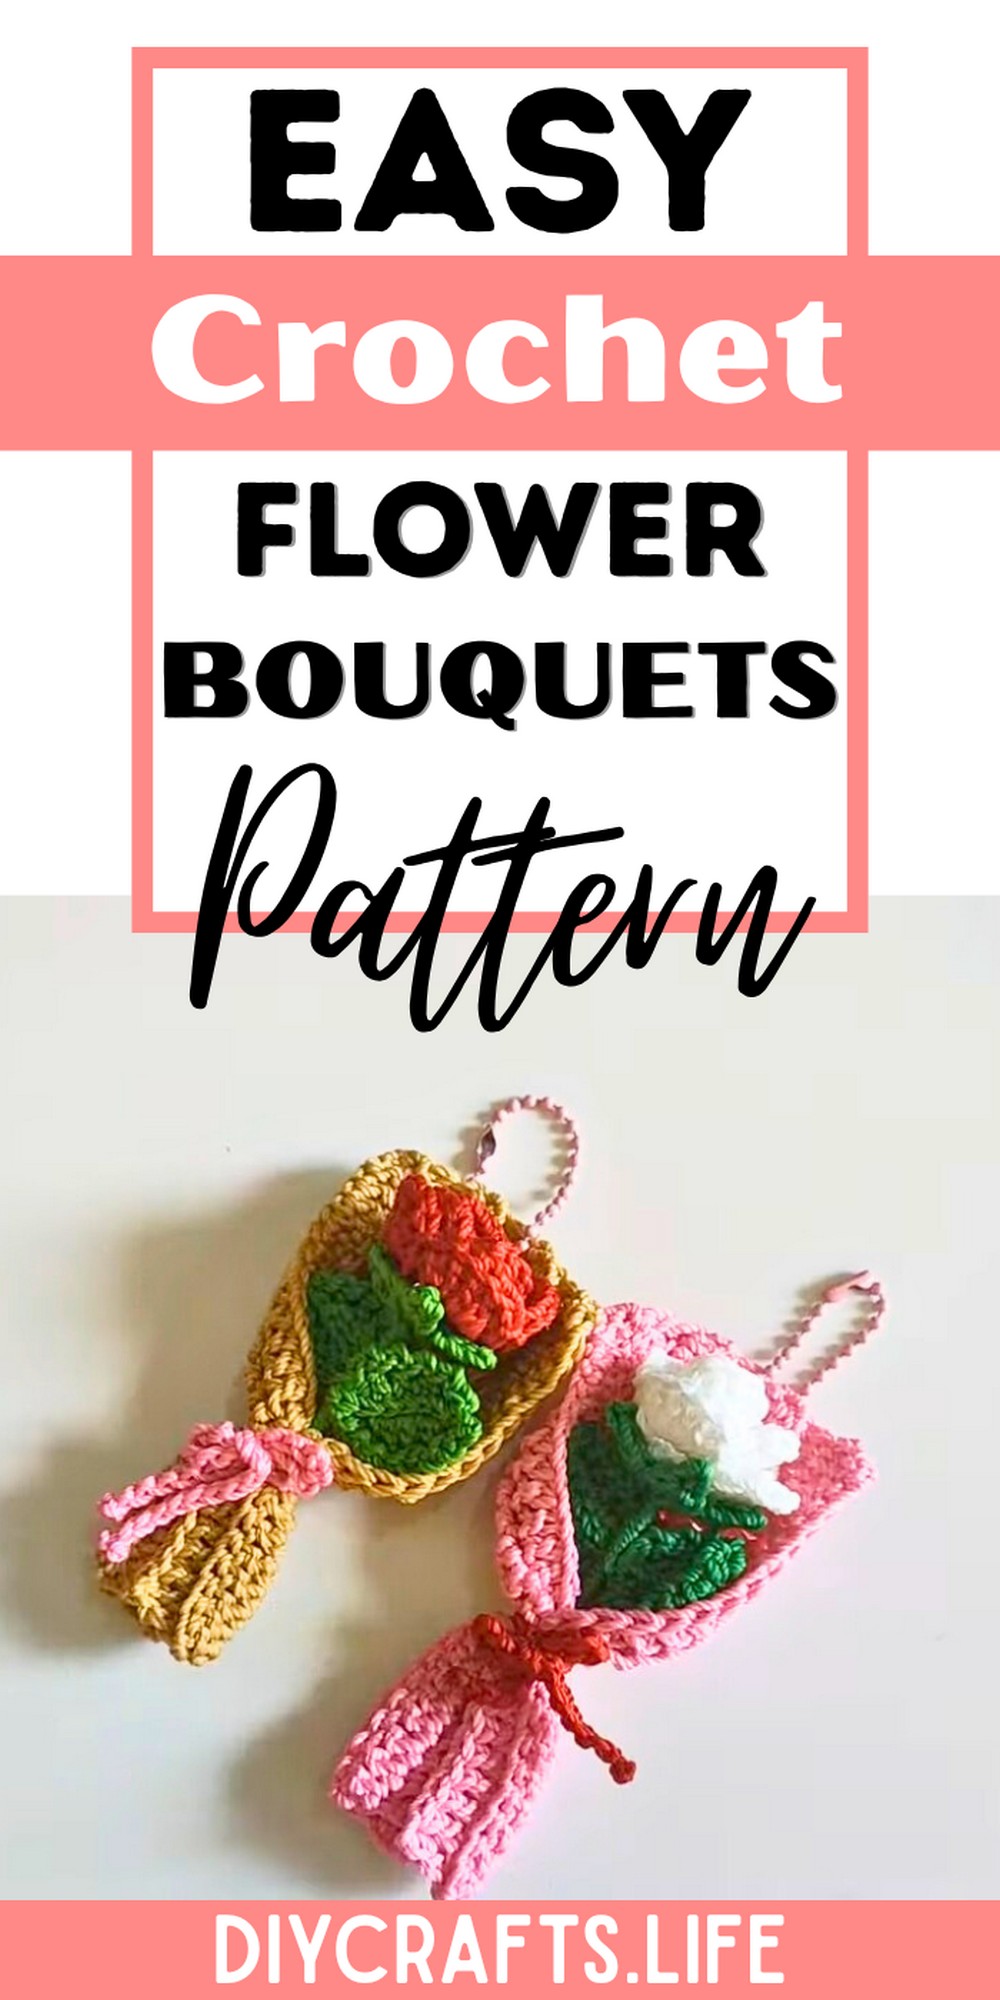
These crochet flower bouquets are durable and everlasting, bringing elegance to your space or serving as a unique gift. Their intricate design showcases skilled artistry, while the texture adds depth and visual interest. Easy to handle and maintain, they make a delightful and long-lasting accessory.
Crochet Flower Bouquets
Crafting these crochet flower bouquets is a delightful journey suitable for all skill levels. The project is customizable, allowing for creative expression in color and size. With simple stitches, even beginners can achieve stunning results and experience the joy of crafting personalized decor.
Materials and Preparation
Required Materials:
- Yarn: Polycherry thread from Tulip or any lightweight yarn (size #2) in your preferred colors for flowers, leaves, and stems.
- Crochet Hook: Size 4/0 (2.5mm).
- Additional Tools:
- Tapestry needle for sewing.
- Bamboo toothpicks (for flower stems).
- Glue (to secure flower crowns and stems).
- Scissors.
- Lighter (for finishing threads neatly).
Optional Materials:
- Ribbon for wrapping or bows.
- Decorative hanger for displaying the bouquet.
Abbreviations and Notes
Common Abbreviations:
- SC: Single Crochet
- HDC: Half Double Crochet
- DC: Double Crochet
- CH: Chain
- SL ST: Slip Stitch
- Picot: A decorative stitch often used for edging.
Notes:
- Patterns use U.S. crochet terms.
- Work each section (flowers, leaves, stems, and wrapper) individually before assembling the bouquet.
- Consistent tension is key to ensure even-sized petals and leaves.
Gauge, Approximate Size, and Pattern Notes
- Gauge: Not critical for this project; just ensure tight and even stitches for stability.
- Approximate Size: Finished flower bouquet depends on the number of flowers created and their arrangement but typically measures about 6–8 inches (15–20 cm) tall.
- Special Techniques:
- Magic Ring: Used to start the flower base.
- Rolling and sewing flower petals to form a crown.
- Wrapping threads around bamboo stems for detailing.
Gauge swatching is not necessary, as the sizing is flexible based on preference.
Step-by-Step Pattern
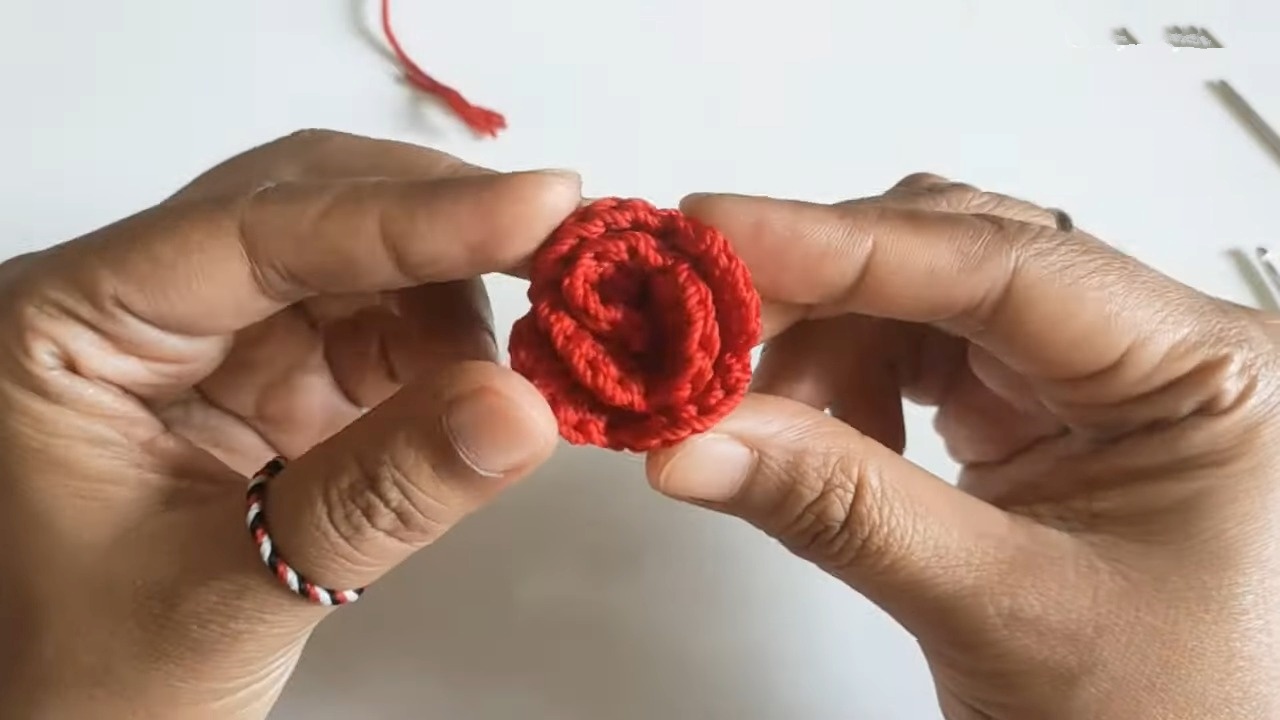
1. Crochet the Flower Petals
- Make the Petals:
- Start with a slip knot and CH 12.
- Skip 5 chains from the hook, and in the 6th chain, work a DC.
- In the next 6 chains, create 1 DC, then 2 CH, and 1 DC in the same stitch. Repeat this pattern until you have 7 "V" motifs.
- Turn your work.
- Create the Fan Motifs (Petals):
- CH 1, then work 5 DC in the center of each "V" motif.
- Between each "V" motif, make an SC. Continue across the row to create all flower petals.
- Finish Petals:
- At the end, make a SL ST, leaving a long tail for sewing. Break the thread cleanly using a lighter.
- Roll the completed petals into a spiral to form a flower crown. Sew securely with the remaining thread using a tapestry needle.
2. Crochet the Flower Base
- Create a Magic Ring:
- Into the ring, work the following:
- CH 2, 1 DC, CH 2, and a Picot (SL ST into the back loop of the first chain).
- CH 2, SL ST into the Magic Ring.
- This creates one petal. Repeat 5 times to make 5 petals for the flower base.
- Into the ring, work the following:
- Pull & Secure:
- Pull the short thread to close the Magic Ring tightly. Leave another long thread for wrapping around the stem.
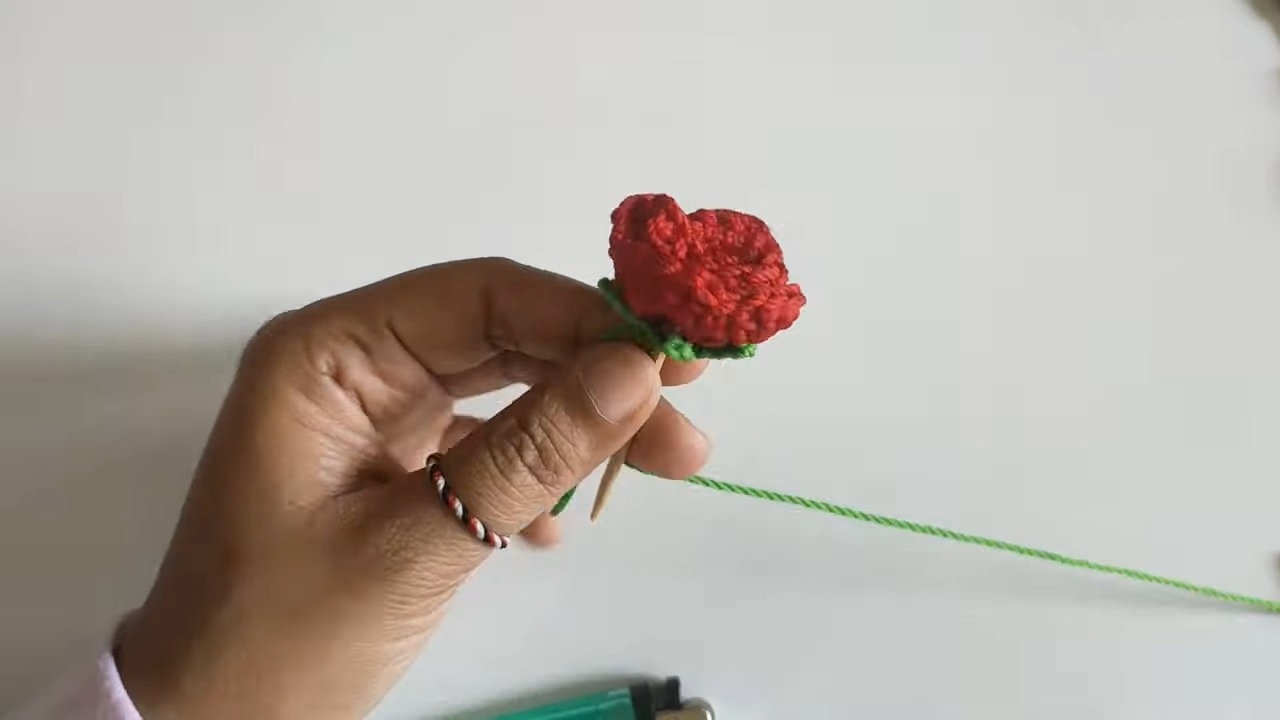
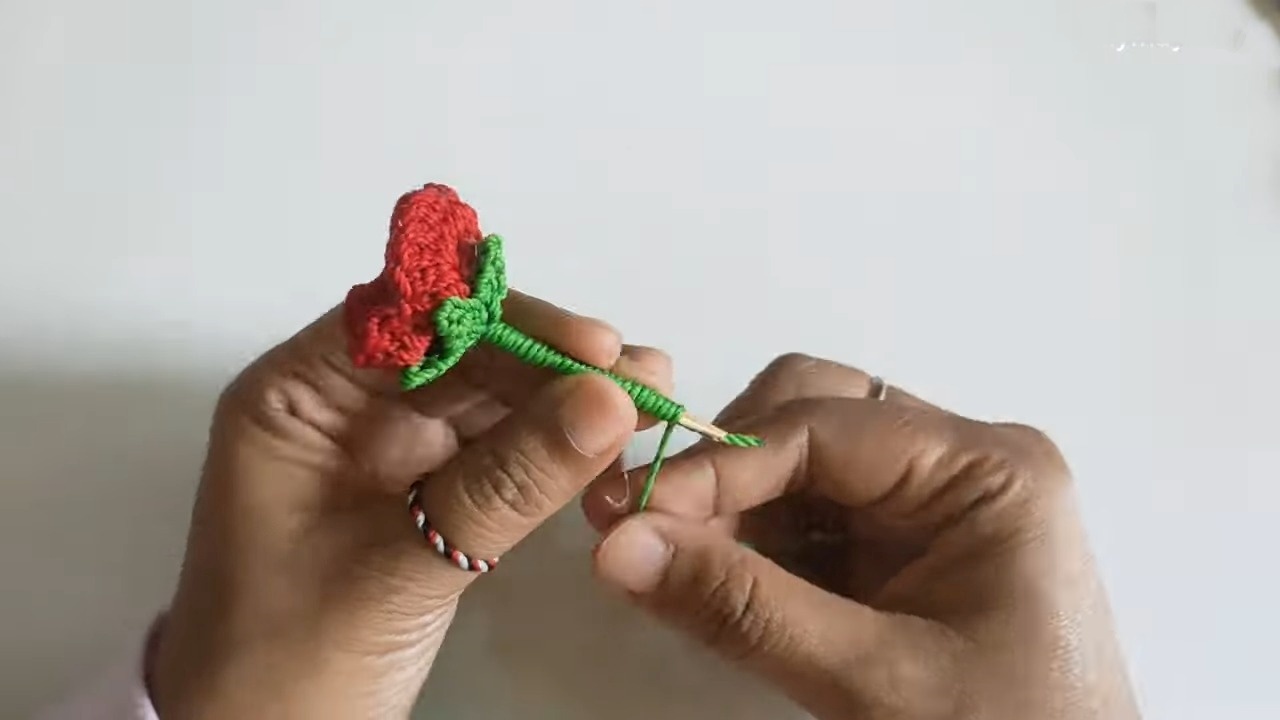
3. Assemble the Flower and Stem
- Prepare the Bamboo Stem:
- Trim the sharp ends of a bamboo toothpick.
- Apply glue to the top of the stem and attach the flower crown securely.
- Add the Base:
- Slide the flower base onto the toothpick below the flower crown and glue it in place.
- Use the long thread to wrap tightly around the stem, sealing with glue at the end.
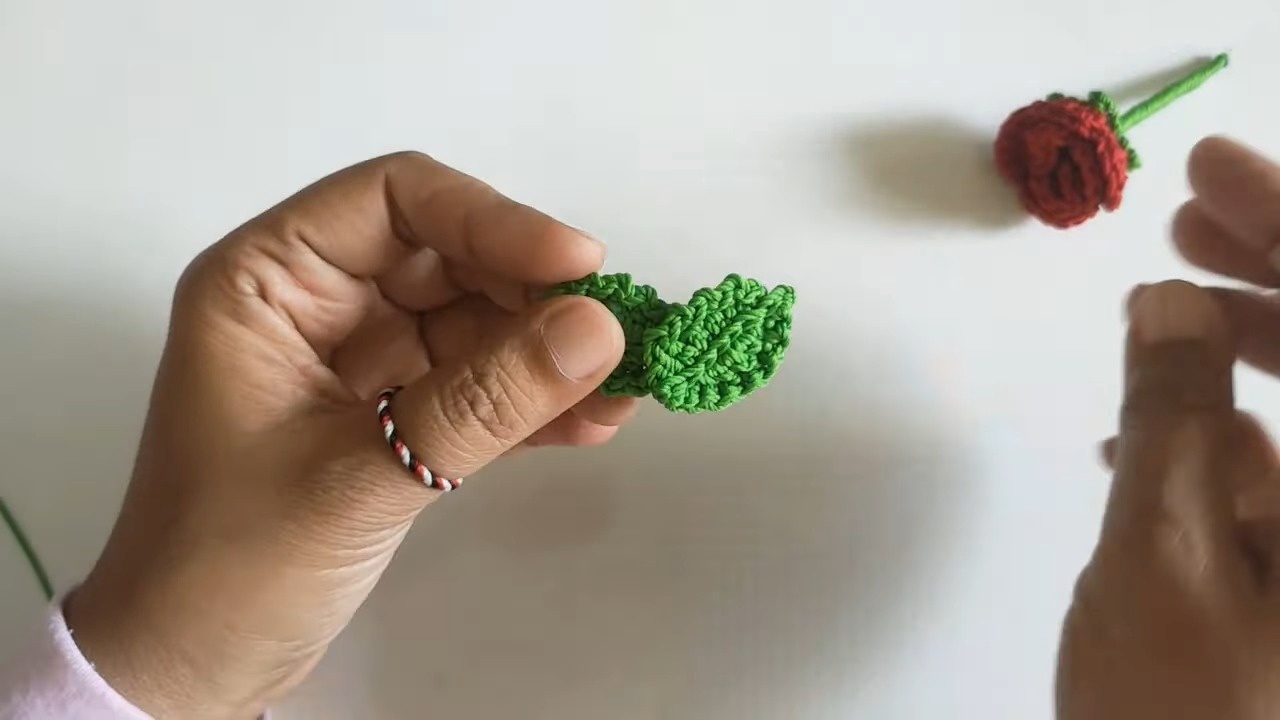
4. Crochet the Leaves
- Leaf Pattern:
- Begin with a slip knot, CH 6.
- Work the following into the chain:
- 1 SC, 1 HDC, 1 DC, 1 HDC, and 3 SC in the final chain.
- Continue down the chain's opposite side with: 1 HDC, 1 DC, 1 HDC, and 1 SC.
- Finish the round with a SL ST.
- Repeat for Additional Leaves:
- Add as many leaves as desired, attaching them to the stems or bouquet later.
5. Create the Flower Wrapper
- Crochet the Wrapper:
- CH 25, skipping the first 4 chains. In the next chain, make a DC.
- For rows 2–7, CH 2, and make 22 DC, working into the back loop only to create texture.
- Break the thread and finish neatly.
- Assemble the Bouquet:
- Place the flowers in the center of the wrapper and fold it around them.
- Tie securely at the bottom with a long piece of yarn or ribbon.
6. Finishing Touches
- Crochet a ribbon if desired: CH 50, then tie into a bow and attach.
- If you want to display your bouquet as a hanger, crochet a chain of "pepper seeds" to loop through the top.
Pattern Question:
Q: How can I ensure the flowers are securely attached to the stems?
A: To secure the flowers, use a tapestry needle to sew them with the leftover thread. Applying a small amount of glue at key points can enhance stability, ensuring your bouquet withstands handling and display.
Conclusion
Crocheting flower bouquets is a rewarding endeavor, offering both beauty and practicality. The joy of crafting each floral motif and assembling them into a cohesive arrangement makes this project both enjoyable and worthwhile. Perfect for gifting or personal decor, it's a project you’ll love to create.


