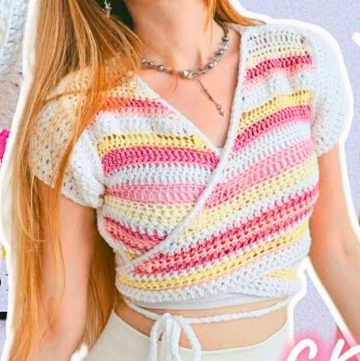
Bring youthful charm and timeless coziness into a single project with this crochet striped sweater design. Vibrant hues and delicate textures combine to create a piece that’s as fun to make as it is to wear! If you're crafting for a toddler or an adult, this design offers the perfect opportunity to transform yarn into something truly personal and stylish for all ages.

Crochet Striped Sweater Pattern
This crochet sweater stands out for its thoughtful construction, including adaptable measurements across sizes, a touch of elegance in the neckline ribbing, and a playful mix of bold stripes. It provides a blend of warmth and creativity, allowing you to experiment with colors to match any mood or season. The result? A cozy, yet chic garment you'll be proud to showcase or gift.
Credit LaDenser Crochets
Materials & Tools Needed
- Yarn: Medium weight milk cotton yarn (used colors: maroon and light peach/nude).
- Crochet hook: 3.5mm hook.
- Stitch markers (optional).
- Darning needle for joining and weaving in ends.
- Scissors for cutting yarn.
- Measuring tape for exact sizing.
Measurements Needed:
- Back of the neck length.
- Yoke length from shoulders.
- Chest measurement from one corner to the other.
- Body length (full length of the sweater).
- Sleeve length (measured from underarm to wrist).
For reference:
- Child (ages 3-4):
- Back of the neck: 5 inches
- Yoke length: 6 inches
- Chest: 22 inches
- Body length: 16 inches (subtract 2 inches for the bottom ribbing).
- Sleeve length: 13 inches (subtract 2 inches for cuff ribbing).
Pattern Abbreviations and Terminology
- ch: Chain
- HDC: Half Double Crochet
- sc: Single Crochet
- sl st: Slip Stitch
- st(s): Stitch(es)
- YO: Yarn Over
Terminology follows US crochet standards.

Step-by-Step Breakdown
Part 1: Yoke
This sweater uses a rectangular yoke worked as rows with chain increases at the corners.
1. Calculate Starter Chains for Yoke:
Use a swatch and the formula from the tutorial to determine the stitch count for your size. Here's an example for 3-4 years:
- Back of the neck: 20 stitches.
- Sides: 15 stitches each.
- Wider front: 20 stitches.
- Add 4 corner stitches.
Total starter stitches: 74 chains.

2. Foundation Chain:
- Use maroon yarn to chain 74 stitches for size 3-4 years.
- Add 1 extra chain for turning.
3. Row 1 (Foundation Row):
- Work HDC starting in the 2nd chain from the hook:
- Place 10 HDC for the back of the neck.
- At the first corner: Place 1 HDC, ch 2, and 1 HDC in the same stitch.
- 15 HDC for one side.
- At the second corner, repeat the corner stitch: 1 HDC, ch 2, 1 HDC.
- 20 HDC for the wider front.
- Repeat the corner stitch for the third and fourth corners.
- Finish with 10 HDC.
At the end of Row 1, fold to check that the corners align correctly.
4. Row 2 Onward:
- Chain 1, turn.
- Work 1 HDC into each stitch, but at each corner space work: 1 HDC, ch 2, 1 HDC to maintain the increases.
- Corner stitch counts increase by 2 HDC each row, and row ends increase by 1 HDC per side each row.
- Measure regularly to ensure you reach the yoke length.
5. Color Changes:
After completing 4 rows with maroon:
- Cut the yarn and fasten off.
- Attach light peach/nude yarn, slip stitch to join, and chain 1 to begin.
- Work 2 rows with the new color.
Alternate colors until you reach desired yoke measurements (5-6 inches for ages 3-4).
6. Chest Measurement:
Check chest width by measuring from one wide corner to another. For size 3-4 years, ensure 22 inches. Adjust rows accordingly.

Part 2: Separating Sleeves
1. Mark Sleeves:
Fold the yoke so the corners align to determine placement for sleeves.
2. Join for Sleeves:
- Work 1 HDC to the first corner.
- Skip all stitches between corners (these skipped stitches create the sleeve opening).
- Chain across to bridge the gap, then continue with 1 HDC along the body.
3. Slip Stitch Closure:
When the row is complete, slip stitch to join.
Part 3: Body (Main Sweater)
1. Continue Rows to Full Length:
- Work HDC rows alternating colors (maroon and peach).
- Reach the body length minus ribbing inches (e.g., 14 inches for size 3-4 years).
2. Bottom Ribbing:
- Switch to nude color.
- Chain 8 for ribbing.
- Work sl st into the back loops only for a total of 7 stitches.
- Continue back-loop slip stitch ribbing rows across the sweater base.
- Slip stitch to connect ribbing ends.

Part 4: Sleeves
1. Sleeve Construction:
- Attach yarn to the sleeve opening using the same process as the body.
- Work HDC rows alternating colors to desired sleeve length minus ribbing inches (e.g., 11 inches for size 3-4 years).
2. Reduce Stitches for Tapering:
Once sleeves reach half the length, begin reducing stitches:
- At row starts and ends, join 2 sts using sc2tog.
- Continue reducing rows every alternate row until reaching desired width (30 stitches for children).
3. Sleeve Ribbing:
- Chain 8 and work back-loop sl st ribbing across the sleeve cuff.
- Slip stitch to join the ribbing ends.
Part 5: Neckline
1. Raise Back Neckline:
- Work 2 rows of HDC across the back for slight elevation.
2. Single Crochet Border:
- Work 1 sc across the neckline to create a clean edge.
3. Ribbon:
- Attach nude yarn and chain 6.
- Work back-loop sl st ribbing across the neckline.

Part 6: Finishing
1. Joining and Weaving Ends:
- Use darning needle to connect open edges at the neckline or body.
- Weave in all loose ends.
2. Check Fit:
Ensure the sweater fits comfortably with slight stretch at the neckline and ribbing.
Optional Customization
For larger or smaller sizes:
- Adjust the starter chains and stitch counts based on back-neck measurements.
- Scale yoke measurements following the tutorial method to fit the recipient.