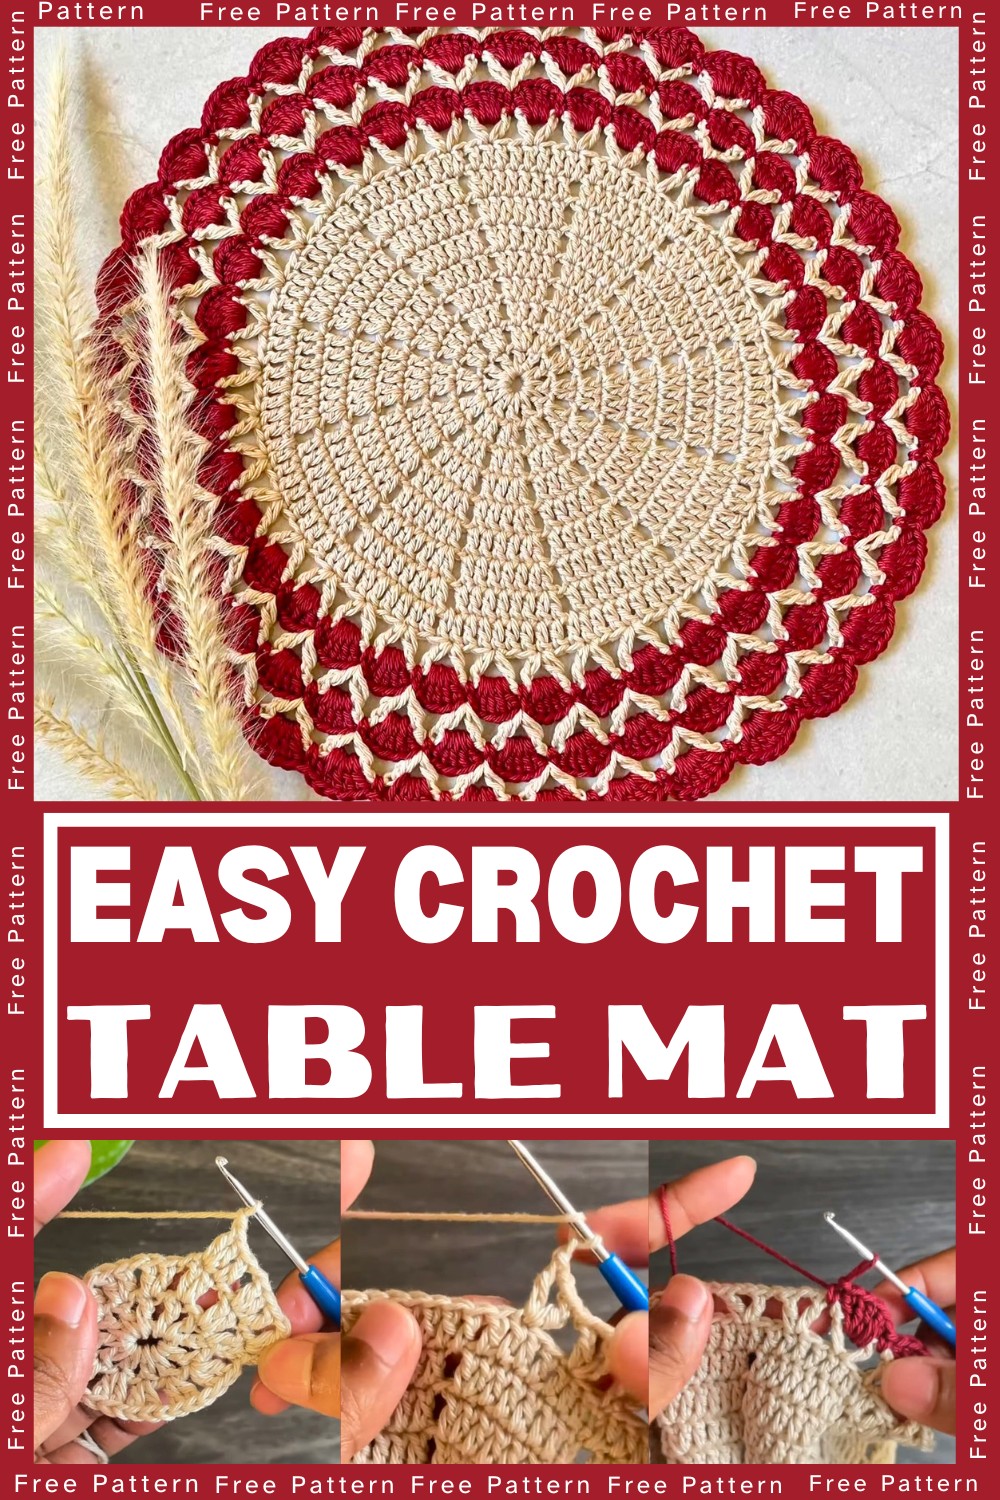
Looking to create a stunning centerpiece for your table? This crochet table mat pattern combines elegance and functionality, perfect for adding a handcrafted charm to your dining or coffee space. Whether for daily use or special occasions, this versatile design matches any decor beautifully.
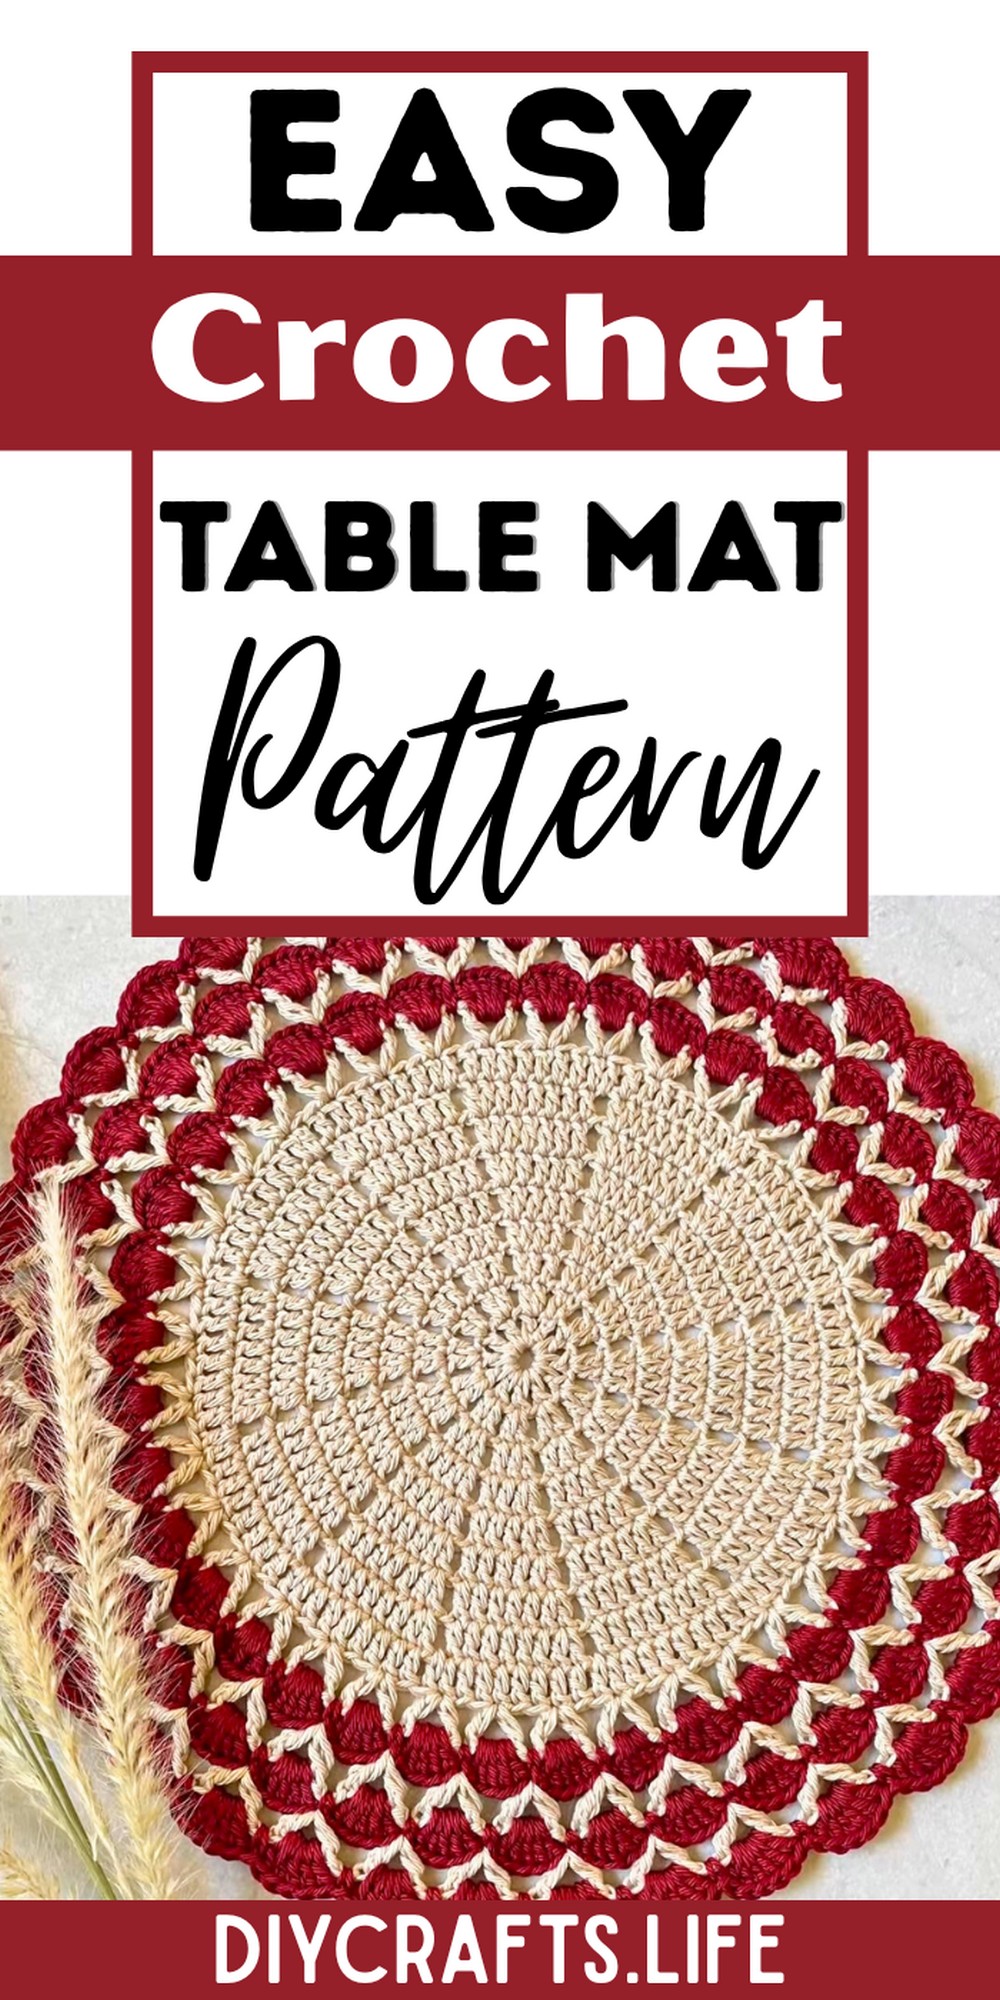
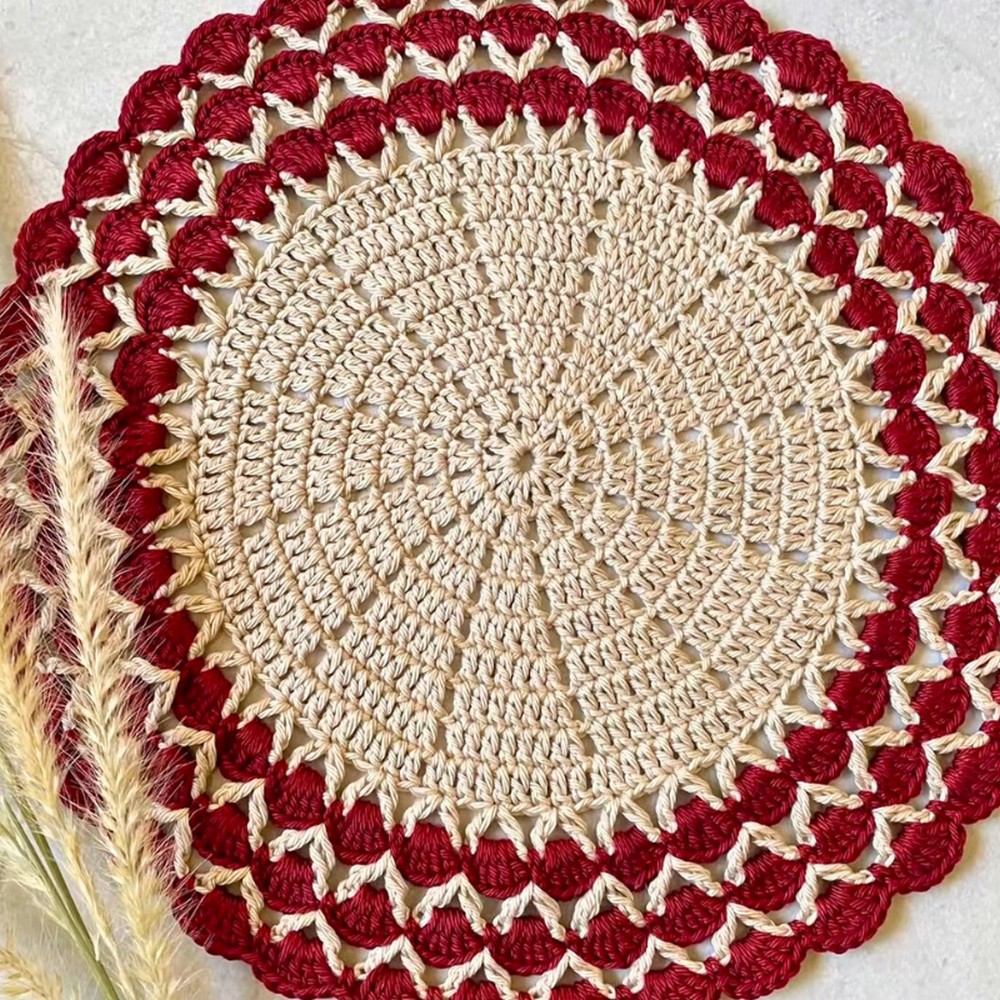
This crochet table mat is durable, eye-catching, and practical. Its intricate pattern makes it a decorative focal point while being sturdy enough for daily use. Perfect as a placemat or centerpiece, it protects surfaces and adds timeless charm to your home ensemble.
Crochet Table Mat Pattern
Crafting this table mat is fun and accessible for all skill levels. Working with cotton yarn and a versatile pattern allows you to customize colors and sizes. With repeatable rows and creative freedom, this project is both rewarding and a way to explore your artistic potential.
Materials and Preparation:
To create this beautiful crochet table mat, you’ll need the following materials:
- Yarn: 100% cotton yarn (Nature Cotton Yarn is used in the tutorial)
- Colors: Beige and Dark Red
- Hook Size: 2.5 mm crochet hook
- Additional Tools: Scissors, tapestry needle (for weaving ends)
- Yarn Weight: Medium or DK weight yarn
Optional: Gauge swatch is not necessary for this project, but it's a good habit if you’d like to check your tension.
Abbreviations and Notes:
Before starting the pattern, familiarize yourself with these abbreviations:
- CH: Chain
- DC: Double Crochet
- SC: Single Crochet
- SL ST: Slip Stitch
- SP: Space
Important Notes:
- This pattern grows with each row, so pay close attention to increases.
- Each row increases by an extra DC in every set, making the mat expand evenly.
- Color changes for alternating rows add texture and detail.
- Keep a loose tension to avoid puckering or distortion.
Gauge, Approximate Size, and Pattern Notes:
Gauge: Not critical for this project but follow tutorial tension for best results.
Finished Dimensions: Approximately 11 inches in diameter after completing all rows.
Pattern Notes:
- This mat uses "V-stitch" and "fan stitch" techniques for decorative effect.
- Each row builds from the foundation chain outwards in a circular format.
Step-by-Step Pattern:
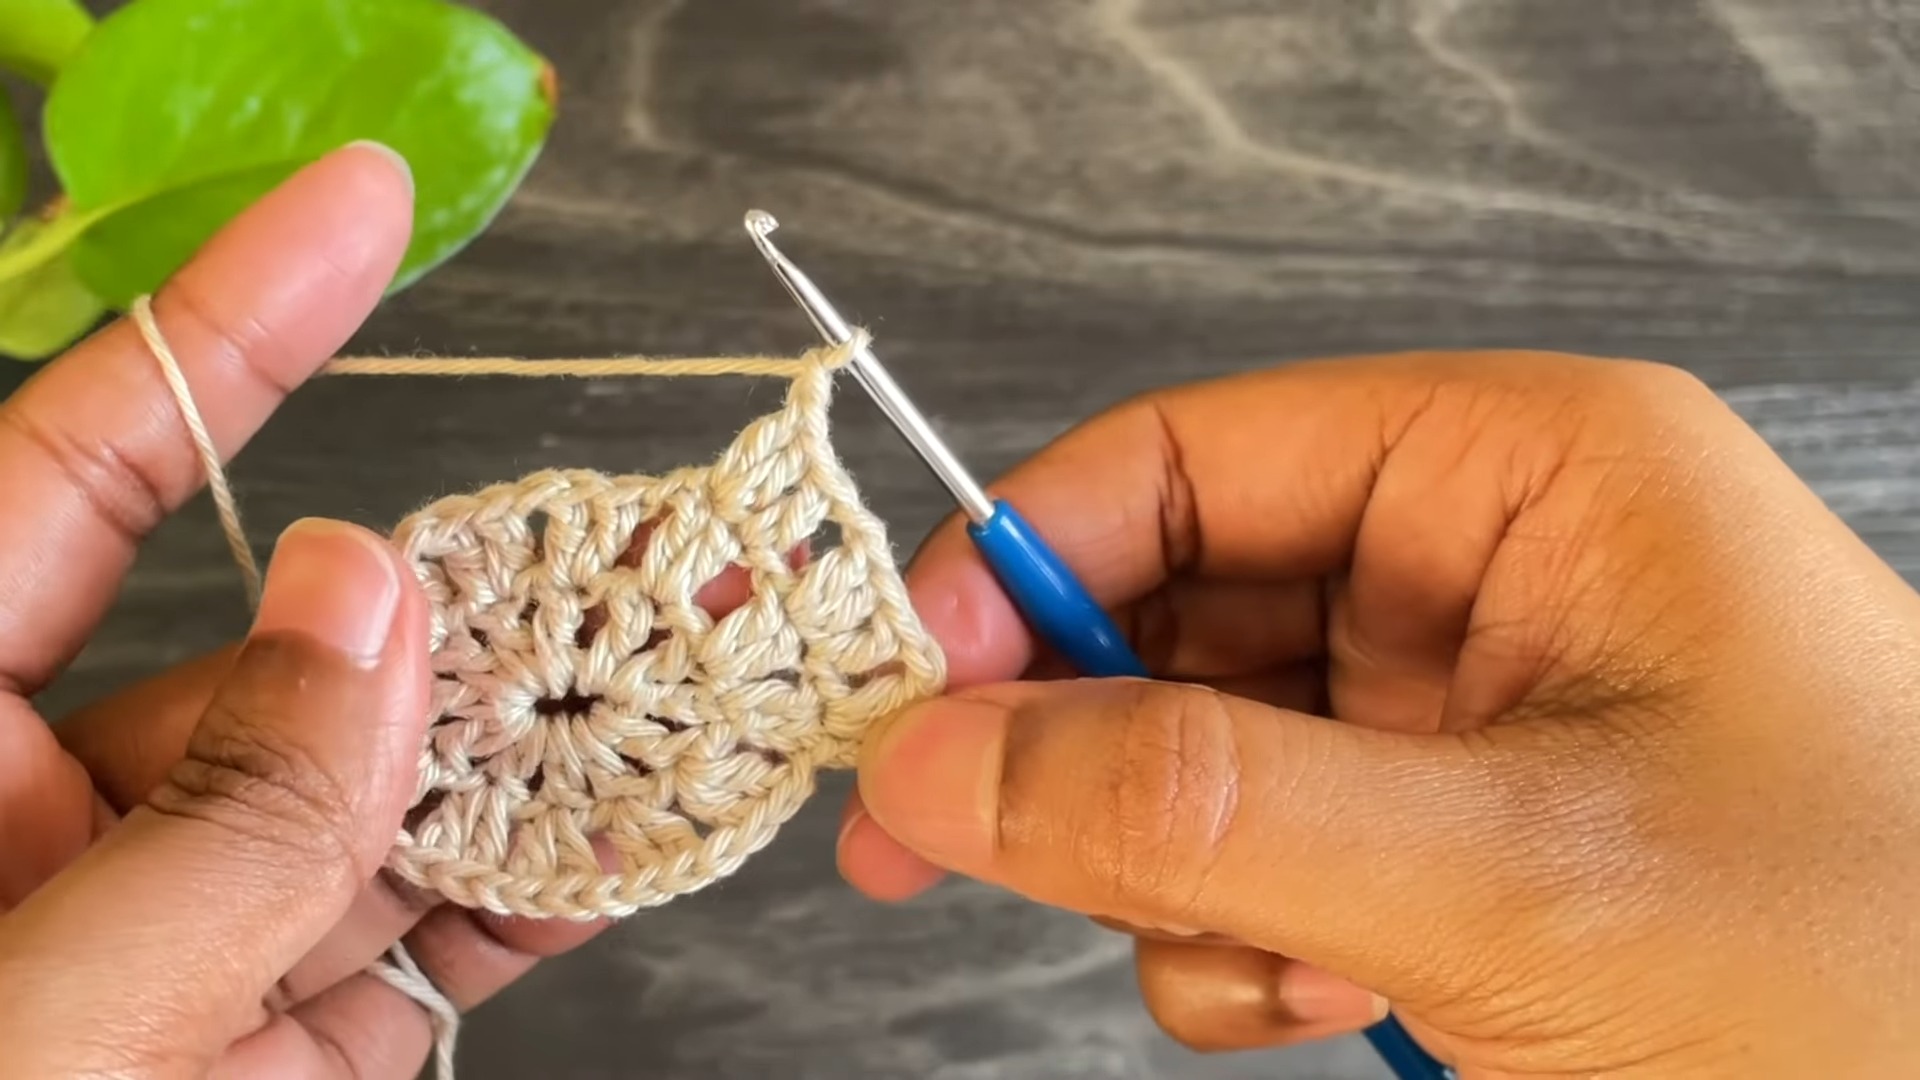
Foundation Base (Row 1):
- Using beige yarn, begin with a slip knot.
- Work 7 CH.
- Join the last chain to the first using a SL ST to form a ring.
- CH 4 (counts as first DC and CH-1 SP), then create a DC in the ring.
- CH 1, then work another DC into the ring. Repeat until the ring has 12 DC (including the CH-4).
- Close the round with a SL ST into the third chain to complete the row.
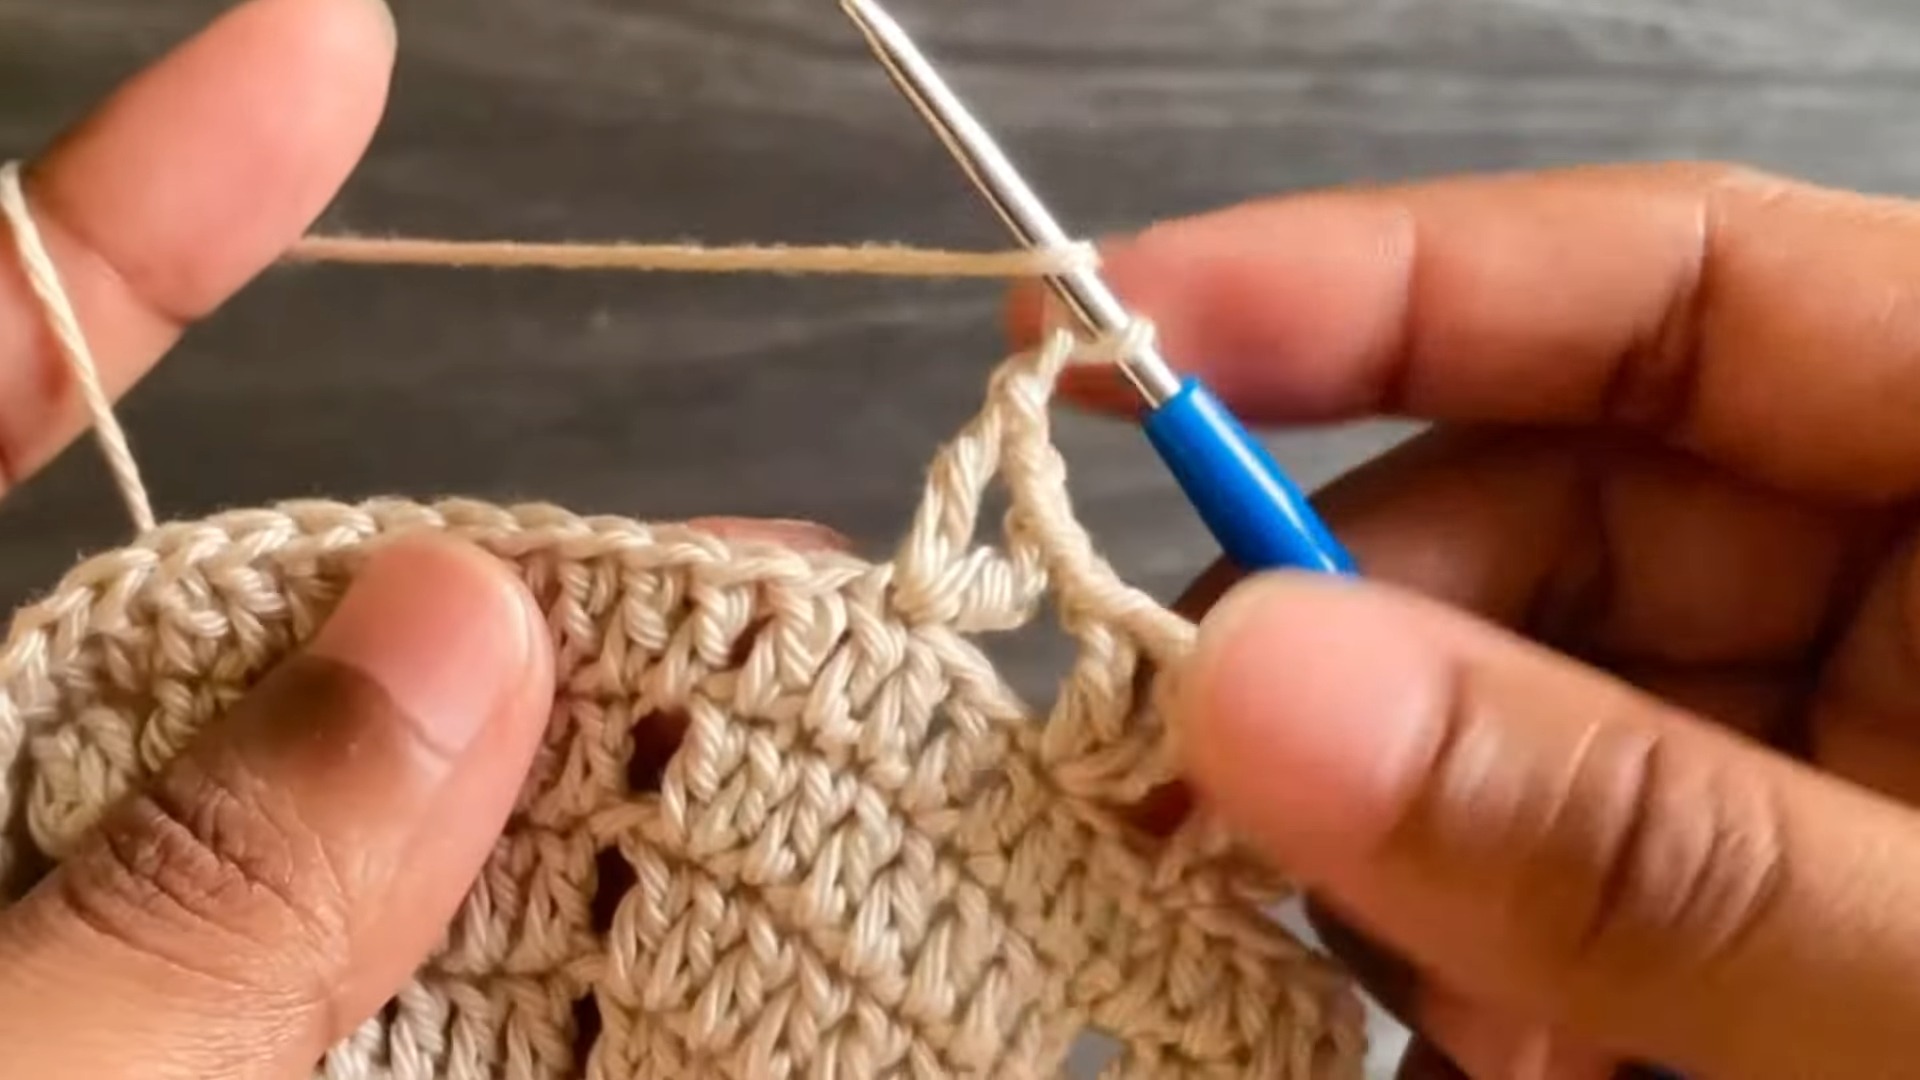
Row 2:
- CH 2 (counts as the first DC).
- In the same space, work another DC to start the increase.
- CH 1, then work 2 DC into the next DC top (skip the chain spaces from the previous row).
- Repeat the pattern—CH 1, 2 DC into each DC top—until the end.
- Complete the row with SL ST into the second chain.
Row 3:
- CH 2, work 1 DC into the next DC top.
- Work 2 DC into the following DC top (increase).
- Repeat this pattern:
- CH 1
- Work single DCs, followed by 2 DC increases in the last DC of each cluster.
- Continue around, increasing in every cluster's last DC.
- Close with SL ST into the second chain.
Row 4:
- CH 2, work 1 DC in the next DC top.
- Work 1 DC in the following DC top, then increase with 2 DC in the next DC.
- Repeat the pattern:
- CH 1,
- 2 individual DCs, followed by an increase (2 DC in the same stitch).
- Finish the row and join with SL ST.
Continue Rows 5-8:
- Follow the same formula. Each row increases by one additional DC per cluster.
- For Row 5: Work clusters of 5 DCs with increases.
- For Row 6: Work clusters of 6 DCs with increases, and so forth.
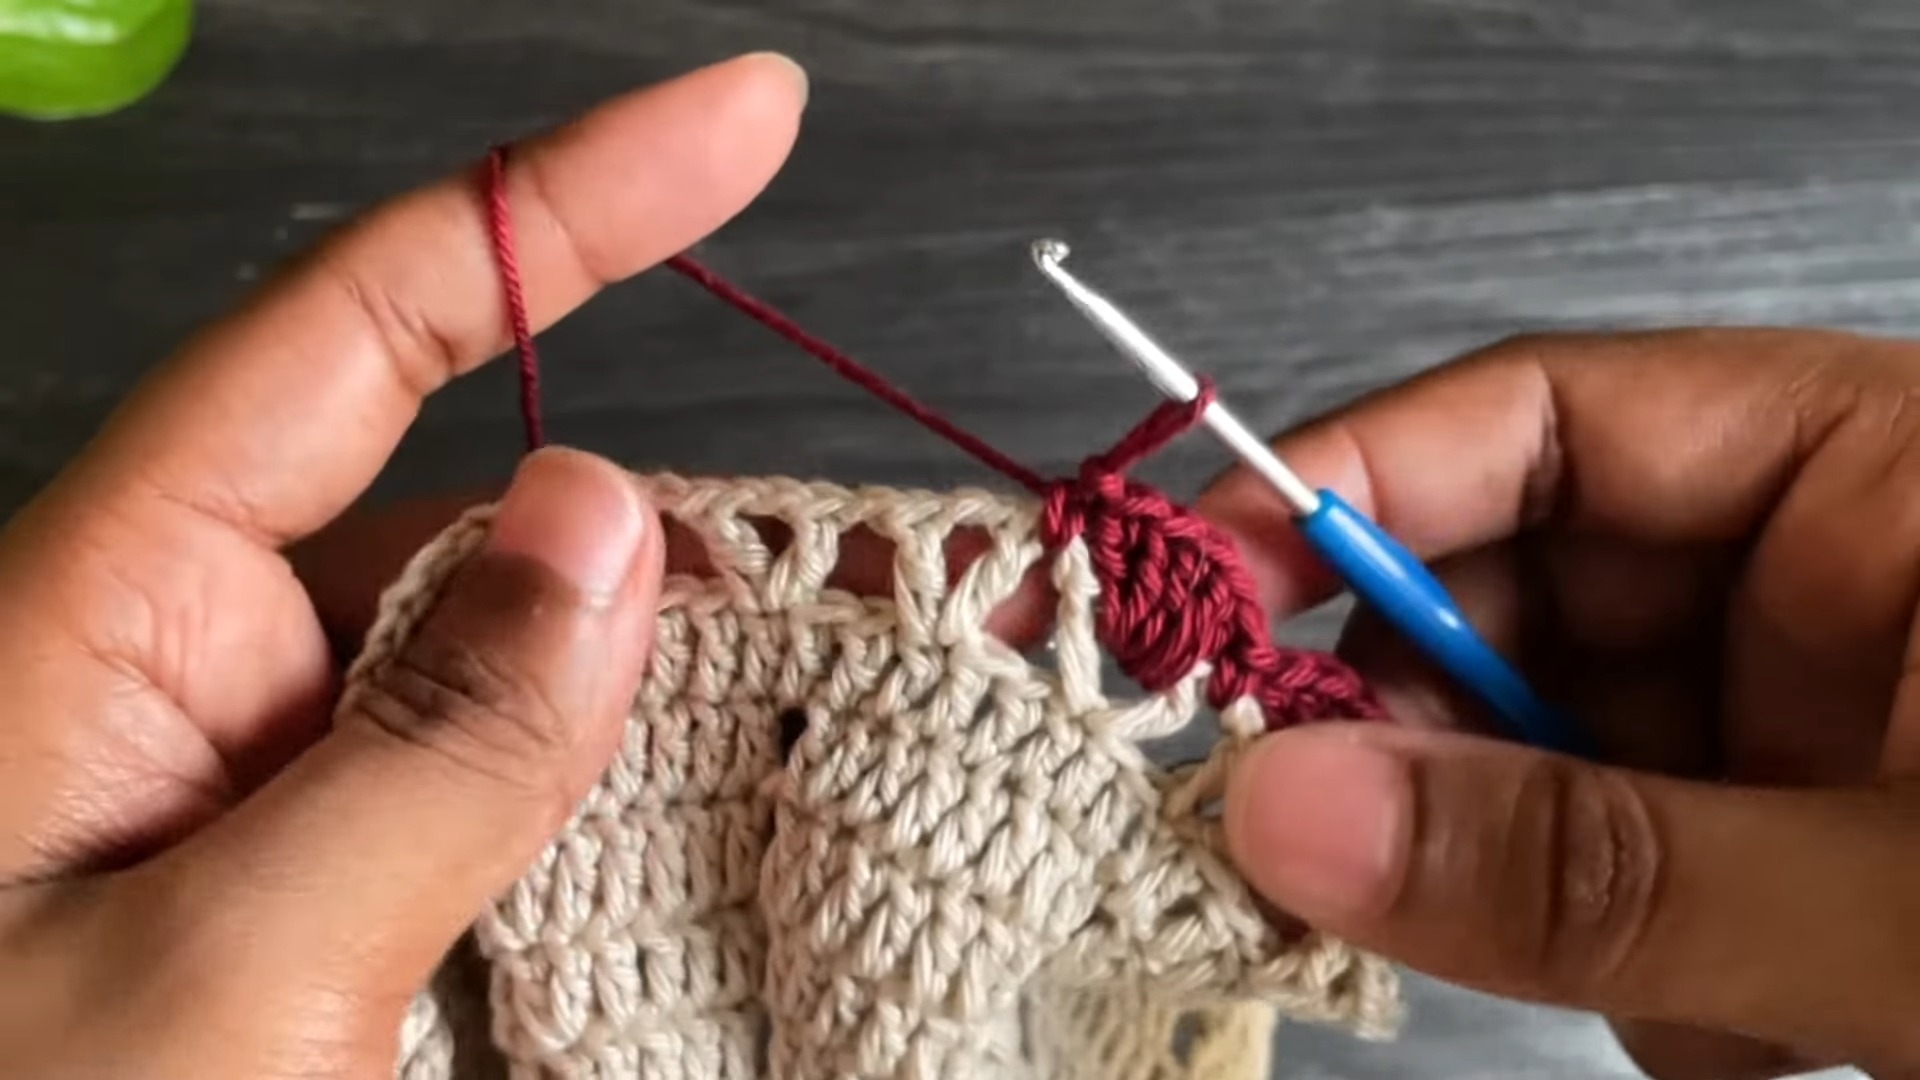
Creating the Decorative V-Stitches (Row 9):
- Switch to Dark Red yarn with a slip knot.
- Join the yarn to the top of any V-stitch with a SL ST.
- CH 3 (counts as first DC), then work 4 DC into the same space (total 5 DC).
- SC into the next chain-1 space.
- Repeat across:
- Work 5 DCs into each V-stitch
- Work SC into each chain-1 space between clusters.
- Finish the row and join with SL ST.
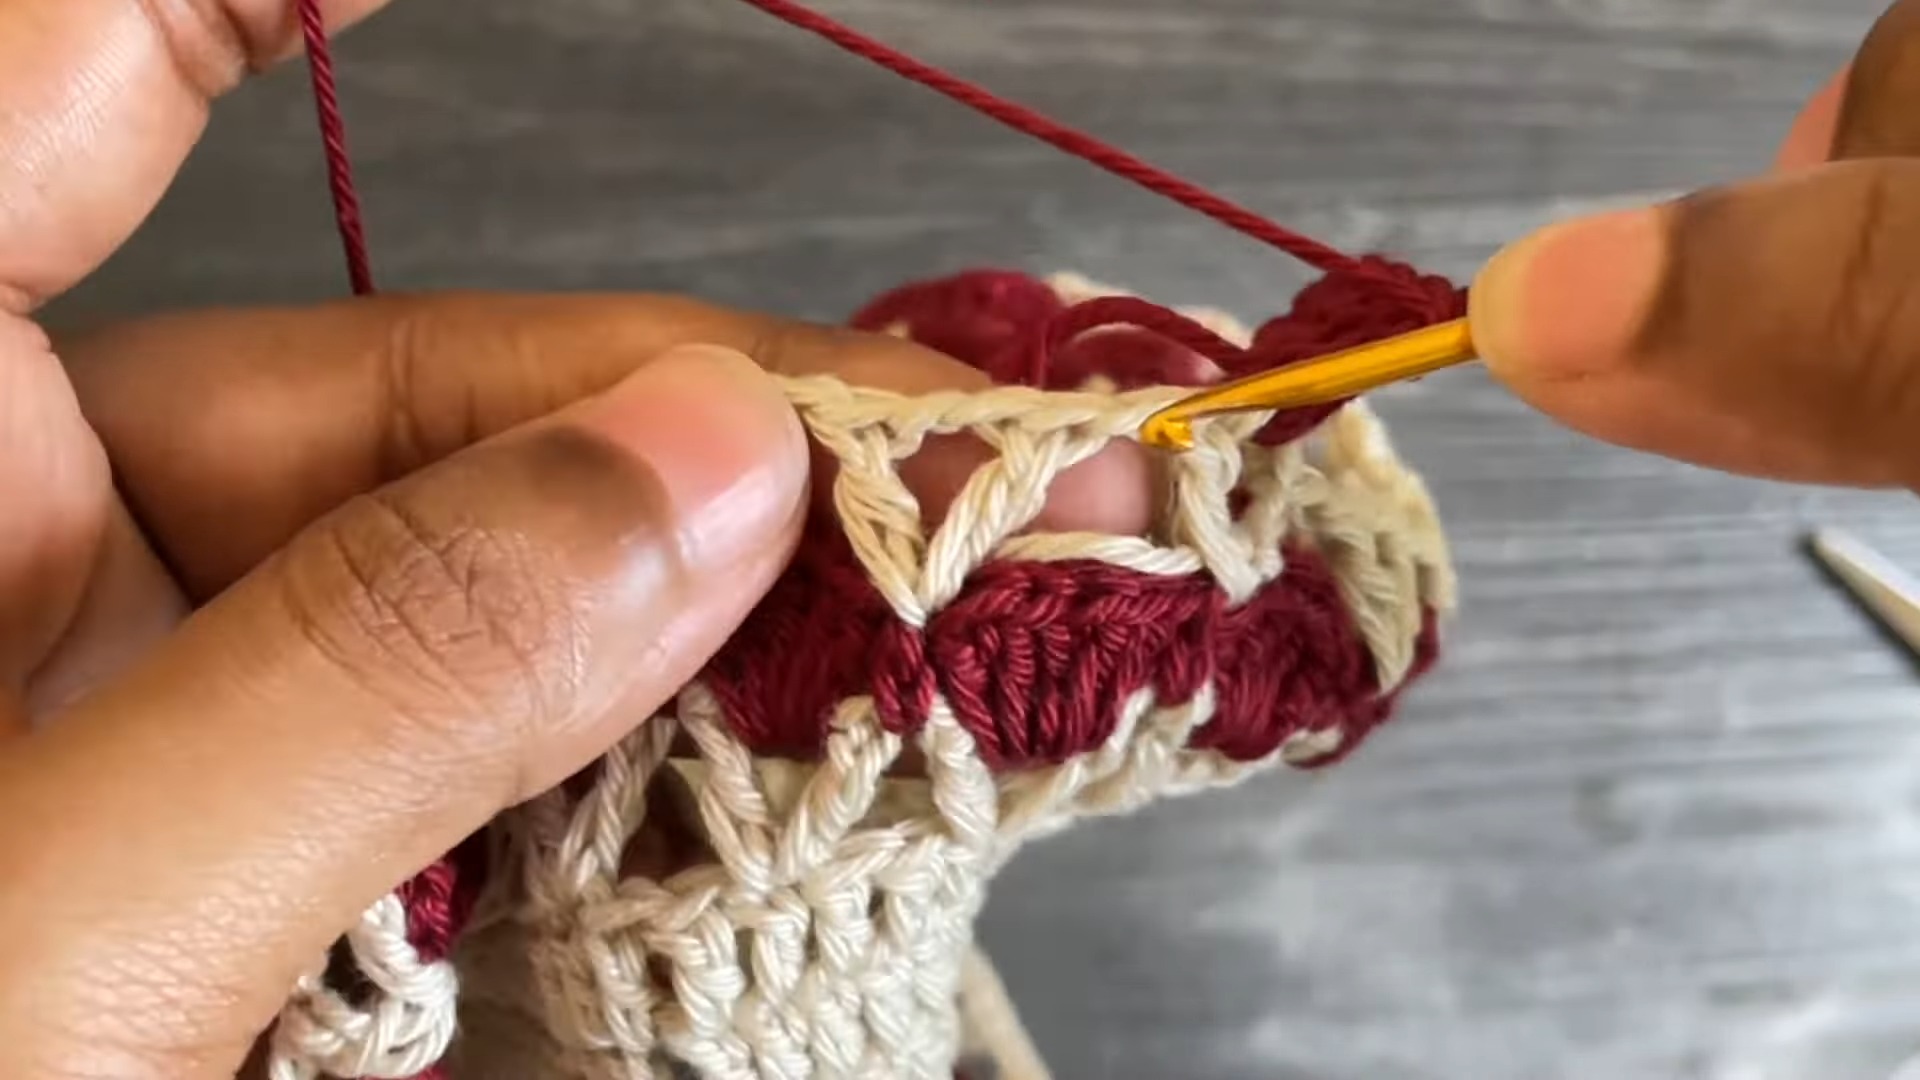
Second V-Stitch Row (Row 10):
- Switch back to beige yarn with a slip knot.
- Attach yarn in SC space from the previous row.
- CH 5, work a DC into the same space (forms a V-stitch).
- CH 1, skip to the next SC and work more V-stitches (DC, CH 2, DC) in each SC space.
- Finish the row and join with SL ST.
Repeat Fan Rows (Row 11+):
- Use Dark Red yarn.
- Work fan stitches (5 DC in each V-stitch space) across the row.
- Alternate yarn for subsequent rows (beige for next V-stitch row, red for next fan row).
Final Touches:
- Complete with 2 more rows of alternating V-stitch and fan stitches to extend.
- Fasten off and weave in all loose ends with a tapestry needle.
- Block gently if needed to achieve the desired dimensions.
Pattern Question
Q: Can I use a different yarn for this pattern?
A: Yes, you can experiment with other yarns; however, cotton yarn works best for durability and structure. Adjust your crochet hook size accordingly to match the yarn weight for consistent results.
Conclusion
This crochet table mat is a joy to create, offering elegance, practicality, and customization options for crafters of all levels. It’s a perfect way to elevate your home decor while enjoying the satisfaction of crafting something beautiful and functional.


