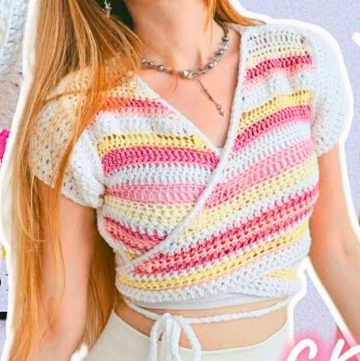
This crochet top is a lovely and wearable creation, perfect for those who adore handmade clothing. Its simple design gets a stylish upgrade with delicate embroidery, adding an elegant touch to your wardrobe. Whether for casual outings or dressing up, this top combines comfort and beauty in a heartfelt way.

Making this crochet top is surprisingly straightforward, focusing on combining soft yarn work with colorful embroidery. The embroidery adds a pop of charm, letting you personalize it with your favorite colors and patterns. It’s not just a top, it’s a unique piece that you can wear proudly or gift someone special.
Credit WONDER NETTING
Materials & Tools Needed:
- Yarn: Approximately 1.5 skeins of yarn (milk cotton or acrylic recommended). You’ll also need yarn for embroidery (red and green for cherries; adjust colors for other designs).
- Hook: 5 mm crochet hook (smaller hook recommended for edging).
- Tools:
- Yarn needle
- Scissors
- Stitch markers (optional)
Pattern Abbreviations & Terminology:
- ch = chain
- sl st = slip stitch
- sc = single crochet
- dc = double crochet
- st = stitch
- loop = refers to the front/back loop of the stitch
- tog = together (used for decreases)

Step-by-Step Crochet Instructions:
This pattern is divided into sections to match the tutorial: the bottom section, upper body shaping, straps, embroidery, and edging.
1. Bottom Section
This forms the ribbed section around the waist.
- Foundation chain:
- Chain 18 air loops (or adjust for desired height of the ribbed bottom).
- Ensure your chain measures around 13 cm long for a similar look.
- Row 1:
- Starting in the 2nd loop from the hook, make sl st across the chain (total: 17 sl st).
- Tip: Hold the yarn loosely so stitches don’t shrink.
- Row 2 (and subsequent rows):
- Chain 1, turn your work.
- Work sl st into the back loop only across the row.
- Repeat Step 3 until the piece fits snugly around your chest (with slight stretch). For reference: work rows until the piece measures 51 cm in length.
- Join ends:
- Fold the ribbed section in half, aligning the first and last rows.
- Use sl st through the back loops only of both edges to join and close the bottom band.
- Turn the work right side out.
2. Upper Body
The body section adds width to the top.
- Foundation single crochet round:
- Chain 1 to secure.
- Work sc into the space between rows of slip stitches (bar between rows). Alternate between ridge spaces and bars for even spacing.
- Place a stitch marker in the first sc to keep track of the rounds.
- Subsequent rounds:
- At the end of each round, join with a sl st, chain 1, and turn work.
- Continue working sc evenly around for 7 rows (or adjust width as desired).
- Shape Neckline:
- Count and mark the center of the top. Cut the yarn and pull the loop through.
- Work the left and right sections separately using sc rows, turning after each row (do not join rounds).
- Left Side:
- Attach yarn at the marker and work across one side following the same single crochet pattern for 4 rows (or adjust based on neckline depth).
- Right Side:
- Work on the second side, mirroring the steps for the left section.

3. Straps
Straps are worked as straight rows after shaping the neckline.
- Decrease Rows: Start shaping straps:
- Begin with a decrease: Insert hook into the first st, yarn over, pull through. Insert hook into next st; yarn over and pull through. Finish the decrease by pulling through all 3 loops on the hook.
- Continue with sc until 2 st remain, and decrease at the end of the row.
- Repeat decrease rows at the beginning and end of every row until strap width measures 6 cm (should be around 7 stitches wide).
- Straight Strap Rows:
- Once strap width is achieved, work sc rows without decreases for 39 rows (or adjust based on desired strap length).
- Attach Second Strap:
- Repeat the same steps for the second strap on the opposite side, starting at the marked stitch.

4. Embroidery
Use red yarn for cherries and green yarn for leaves. Adjust colors for other designs (bow, heart, lemon).
- Using a yarn needle, thread red yarn and create small crosses to form cherries.
- Insert the needle diagonally to make each berry symmetrical and miniature.
- Space cherries evenly.
- For leaves:
- Thread green yarn through the top of each berry, making a small stitch.
- Shape each leaf relative to the berries’ placement.
- Secure ends on the wrong side:
- Tie knots and weave in loose ends. Trim excess yarn.
5. Edging
Work the edging around the neckline, armholes, and bottom.
- Edging Pattern:
- Attach yarn to the edge using a sl st.
- In each stitch or row edge, work: sc, dc, sc into the same space.
- Repeat this pattern along the entire edge, adjusting to lie flat as you go.
- Bottom Edging:
- Work only into the open bars (spaces between slip stitch rows) using the same sc, dc, sc pattern.
- Finishing:
- Join the edging round with a sl st, chain 1, and fasten off.
- Weave in all remaining loose ends.

Finishing Touches
Ensure all embroidery and edges are secure. If you’re adding embroidery to another item or making color-coordinated edging (e.g., yellow for lemons, pink for bows), follow similar steps.