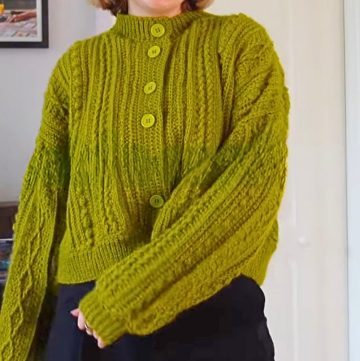
A crochet granny square cardigan is a stunning and practical wearable item that offers comfort and style. Made from individual colorful squares stitched together, this cardigan is a perfect blend of creativity and coziness. You can wear it as a light layer during cooler seasons, making it both functional and fashionable. It’s like wrapping yourself in your favorite blanket, but even better because you can take it anywhere!

Creating this cardigan is fun and satisfying. It starts with crocheting simple granny squares, which are then joined together to form the body of the cardigan and the sleeves. The process allows you to play with colors and patterns, making each piece unique to you. Finally, ribbed edges are added for a clean and snug finish. Whether you're a beginner or an expert, assembling these squares into a wearable keeps getting more exciting as you see your cardigan take shape.
Credit LaDenser Crochets
Materials & Tools Needed
- Yarn: Medium-weight yarn in at least two colors (e.g., black, gray, or your choice of colors).
- Rough yardage: Black (main color) ~1,000 yards; Gray (accent color) ~650 yards.
- Hook Size: 4mm (adjust size if needed to achieve consistent gauge).
- Tapestry Needle: For sewing and weaving in ends.
- Scissors
- Stitch markers (optional, for marking corners or specific stitches).
Finished Size
Cardigan Measurements
- Length: Approximately 23–25 inches (adjustable by adding or removing squares/rectangles).
- Width: Fits a standard medium size (adjust by altering the number of squares/rectangles used).
- Sleeves: ~18 inches in length (adjustable).
Customization Ideas
- Add or reduce the number of squares/rectangles for a longer or shorter cardigan.
- Use multiple colors for a patchwork effect.
- Extend the ribbing at the bottom or around the cardigan opening for a more prominent border.
Pattern Abbreviations & Terminology
(Note: US Terminology is used.)
- ch: Chain
- sl st: Slip Stitch
- sc: Single Crochet
- dc: Double Crochet
- YO: Yarn Over
- sp: Space

Step-by-Step Crochet Instructions
Granny Square Pattern
- Round 1 (Magic Circle):
- Create a magic ring.
- Chain 2 (does not count as a stitch).
- Work 12 dc into the magic ring.
- Pull the tail to tighten the ring and close the circle.
- Join with a sl st to the first dc (not the chain).
- [12 dc in total]
- Round 2:
- Chain 3 (counts as the first dc in this round).
- Make another dc into the same stitch as the ch-3.
- Chain 1.
- Skip the next stitch, and place 2 dc in the next stitch.
- Repeat (ch 1, skip 1 stitch, 2 dc in the next stitch) around.
- After finishing, slip stitch to join to the top of the ch-3.
- Fasten off the yarn.
- [12 clusters of 2 dc separated by ch-1 spaces]
- Round 3 (Start with new color):
- Attach the yarn to any ch-1 space with a slip stitch.
- Chain 3 (counts as the first dc).
- In the same space: Work (3 dc, ch 2, 3 dc) to form the first corner.
- Chain 1, then in the next ch-1 space: Work 3 dc.
- Continue around the circle, forming 4 corners with (3 dc, ch 2, 3 dc) and working 3 dc in the non-corner spaces.
- Join with a slip stitch at the top of the ch-3.
- [Forms a square with 4 corners and 3 clusters between each corner.]
- Round 4 (Grow the square):
- Slip stitch over to the nearest ch-2 corner space.
- Chain 3 (counts as the first dc).
- Into the corner space: Work (3 dc, ch 2, 3 dc).
- For the side spaces, simply work 3 dc in each ch-1 space.
- Repeat this process for all corners and side spaces.
- At the end of the round, slip stitch into the ch-3 to join.
- Fasten off and weave in ends.

Rectangles
Rectangles follow a similar pattern to the granny square but are only extended on two sides to maintain the rectangle shape.
- Base Rounds:
- Use the exact instructions for Rounds 1 and 2 of the granny square.
- Work only 8 dc (
Round 1) and adjust for proportion in each subsequent round.
Assembly of Cardigan
- Create Individual Components:
- Create 70 squares and 12 rectangles.
- Block the pieces if needed to ensure clean shape and size.
- Layout:
- Arrange 6 squares vertically for the length of one panel (front or back).
- Add 6 rectangles along one side for the sleeve length.
- Join 12 squares side by side for the extended panel (12 squares = 6 back + 6 front).
- Joining Method:
- Use a darning needle or slip stitching technique with a hook.
- Align the pieces and join them square-by-square or rectangle-by-rectangle using a whip stitch or sl st in the corner spaces and along the edges.
Sleeves
- Use 3 squares joined into a round for the basic sleeve.
- Join additional squares/rectangles as needed, repeating the "join-as-you-go" method around the armhole opening.

Ribbing
- Bottom Edge Ribbing:
- Attach the yarn along the bottom edge.
- Work 1 row of dc across.
- Work 4 rows of alternating front post dc (fpdc) and back post dc (bpdc) for a ribbed texture.
- Front Border:
- Attach yarn along the opening edge of the cardigan.
- Work 4 rows of fpdc/bpdc to match the bottom ribbing style.
- Optional Sleeve Ribbing:
- Repeat the ribbing process around each sleeve opening if a fitted cuff is desired.
Color Changing Tips
- Always change colors at the start of a new round/row for a seamless transition.
- Secure and weave in the ends as you go to reduce final finishing time.

Finishing Touches
- Joining Two Halves:
- After completing one side (front and back with sleeve), mirror the process for the other half of the cardigan.
- Join both halves in the center back using slip stitching or a whip stitch.
- Weaving in Ends:
- Use a smaller darning needle to weave in all loose ends securely.
- Block the Cardigan:
- For a polished and professional finish, block the cardigan to ensure the squares align and lay flat.