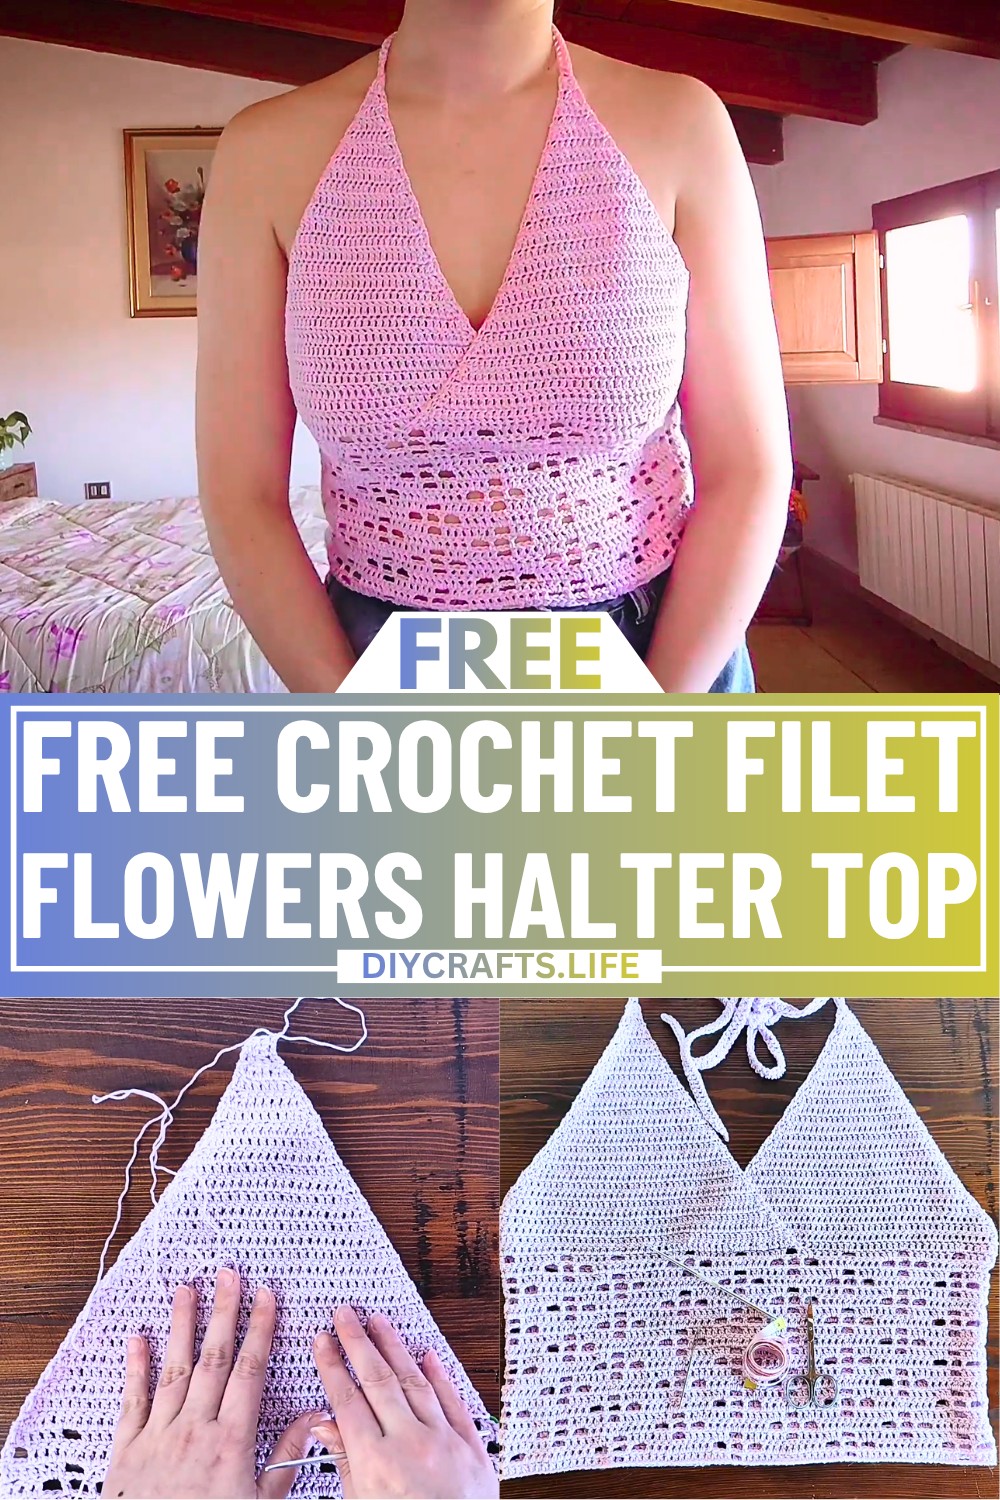
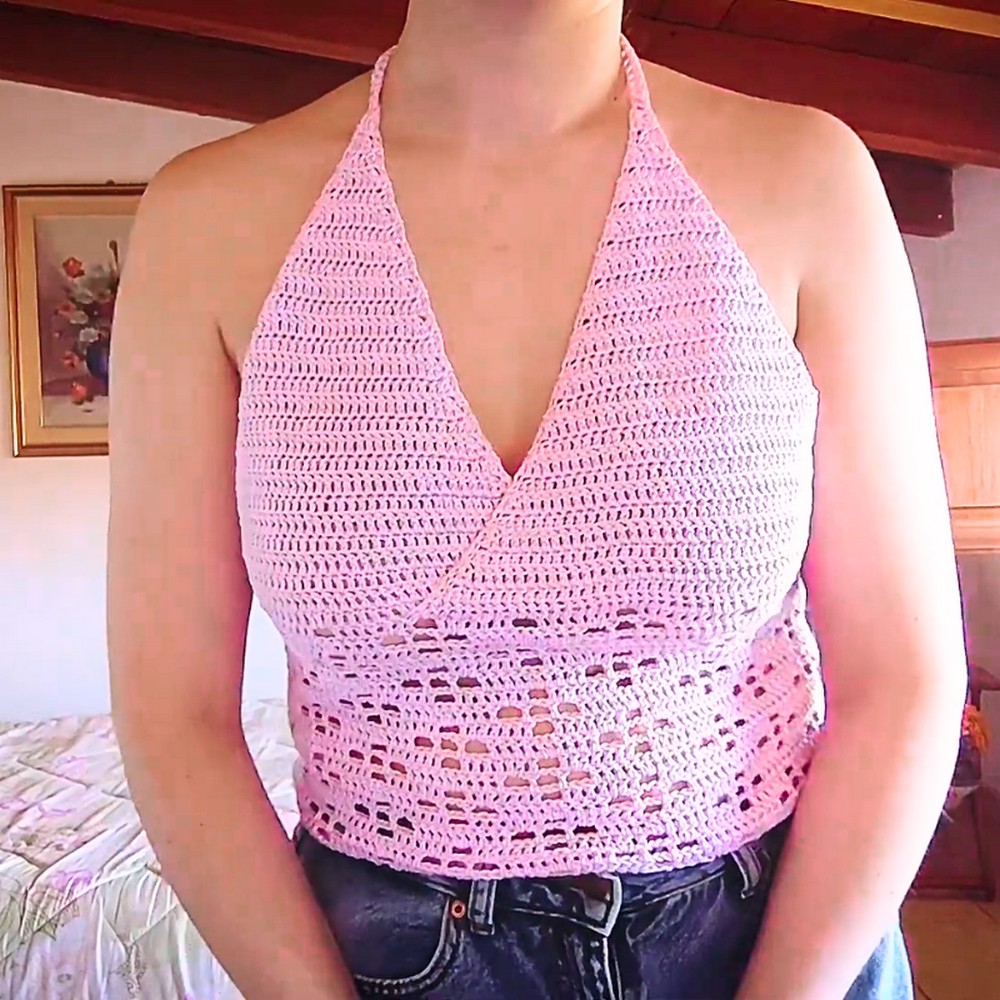
The Crochet Filet Flowers Halter Top is a lightweight, stylish garment that’s perfect for warm days or special occasions. Its intricate floral filet pattern adds a unique touch, making it both elegant and playful. Designed with comfort in mind, this halter top is tied around the neck with straps, giving it an adjustable fit. Whether worn casually at the beach or paired with a skirt for a chic look, this halter top is a beautiful blend of creativity and practicality.
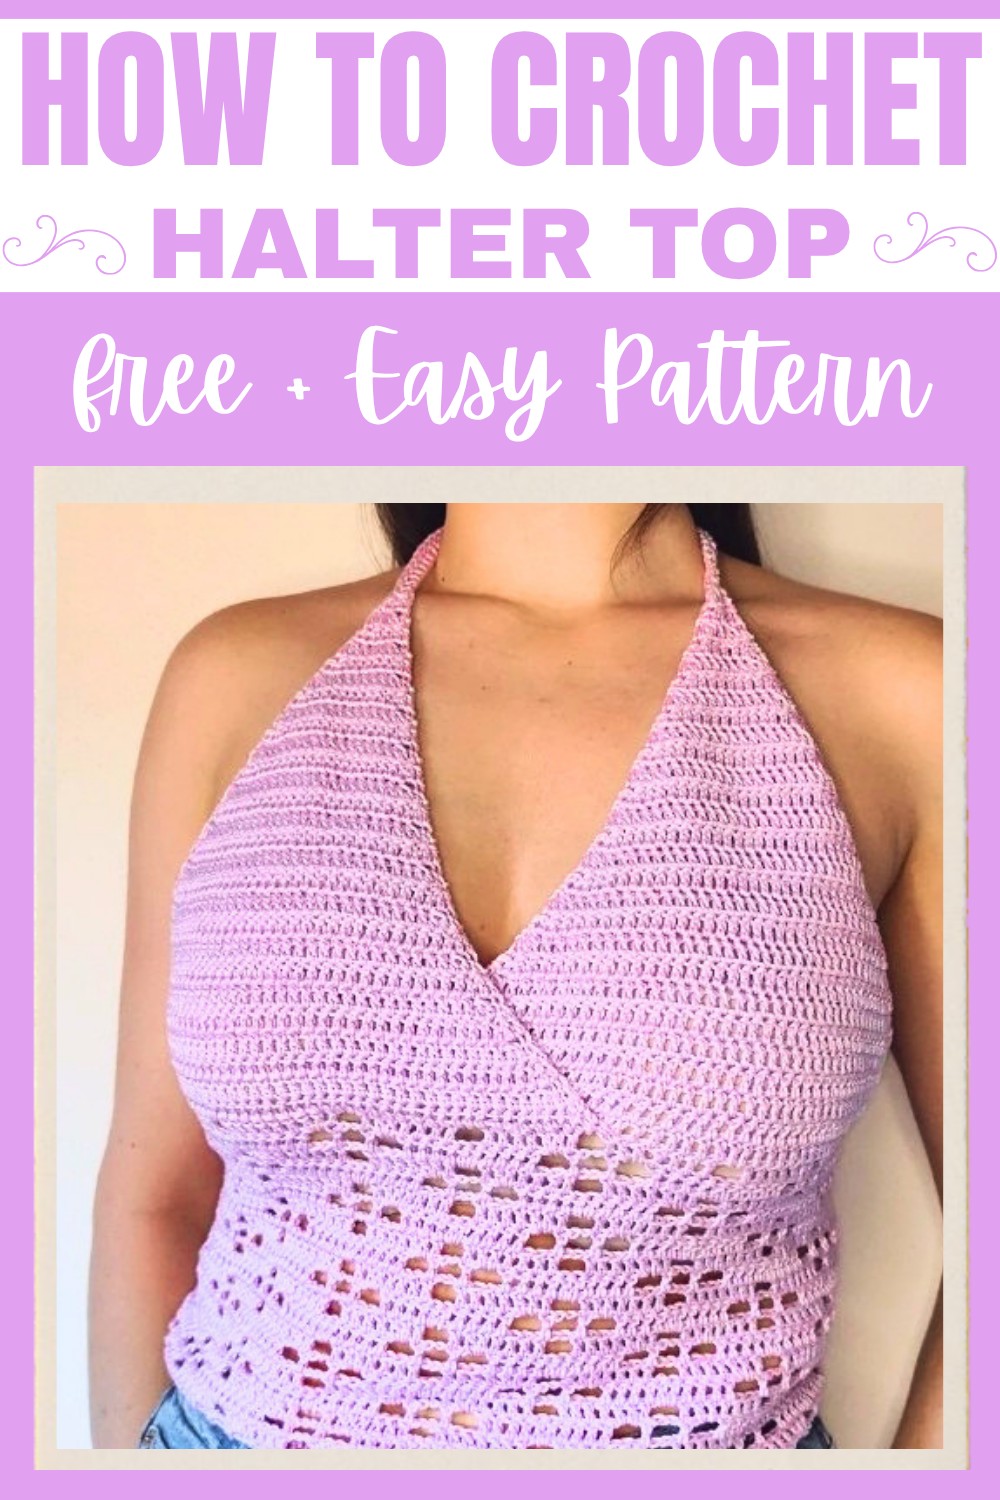
This halter top is pieced together with a front and back panel joined neatly at the sides, assuring a sleek design that suits different body shapes. The highlight of this top pattern lies in its filet floral design, which features small decorative spaces that create the charming flower shape. Though the crafting involves double crochet stitches and smart shaping for the upper part, you don’t need to memorize every detail right away—just enjoy building it step by step. The final touch is adding sturdy neck straps that ensure both beauty and function.
Credit Veroknitcrochet
Materials & Tools Needed
- Yarn: Fine weight 100% cotton yarn (50g/125m per ball). You will need approximately 150g (3 balls for a medium size).
- Hook: 3mm Crochet Hook
- Other Tools:
- Measuring tape
- Scissors
- Tapestry needle
- Stitch markers (at least 2)
Finished Size & Customization Ideas
- The described pattern is for a Size Medium with approximately:
- Front (underbust width): 40 cm (adjust this based on your underbust measurement).
- Height (waist to underbust): 20 cm (customizable).
- To adjust the sizing, ensure your starting chain is in multiples of 18 (e.g., 4×18, 5×18). This will change the width.
- The back panel is made slightly smaller than the front to ensure a snug fit in this halter design.
- You can also add bra cups to the triangles or an elastic band to the back for a more secure fit as suggested in the tutorial.
Pattern Abbreviations & Terminology
- Ch: Chain
- Dc: Double Crochet
- Sc: Single Crochet
- Sl st: Slip Stitch
- Sp: Space
- St(s): Stitch(es)
- Stk sc (Stacked Single Crochet): An alternative to starting a row with a chain-3. See instructions under Row 2 for how to make it.
- Dc2tog: Double Crochet 2 Together (decrease)
Step-by-Step Crochet Instructions
1. FRONT PANEL
Step 1: Start with the foundation chain
- Make a slip knot.
- Chain a multiple of 18. For a size medium, chain 90 ch (5 x 18), which equals approximately 40 cm.
- Adjust the number of chains according to half your underbust measurement.
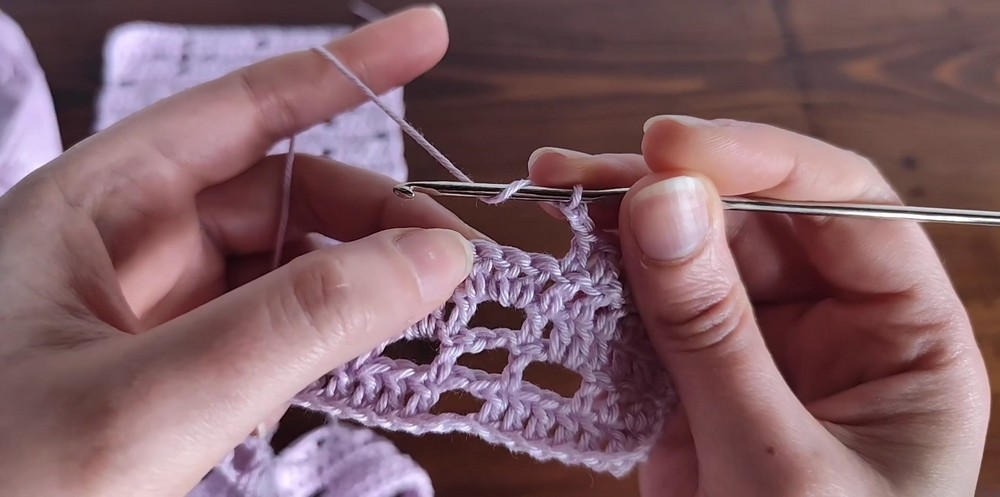
Step 2: Filet Pattern - Rows 1–5
Row 1:
- Skip 3 chains from the hook, make 1 Dc in the 4th chain (the skipped chains count as 1 Dc).
- Make 1 Dc in each of the next 5 chains (total: 7 Dc including the one at the beginning).
- Chain 2, skip 2 chains, then begin the repeat:
- Make 16 Dc (1 in each chain).
- Chain 2, skip 2 chs.
- Repeat this pattern (16 Dc, chain 2, skip 2 ch) until you have 7 chains left.
- Make 1 Dc in each of the last 7 chains.
- Turn your work.
Row 2:
- Create a stacked single crochet (stk sc) as follows (alternative to chain 3):
- Insert your hook into the first stitch.
- Yarn over, pull up a loop, yarn over, and pull through 2 loops.
- Insert your hook into the vertical bar of the single crochet, yarn over, pull up a loop, yarn over, and pull through 2 loops.
- This counts as your first "double crochet."
- Make 1 Dc in the next 3 stitches.
- Chain 2, skip 2 stitches, make 1 Dc in the next stitch.
- Repeat the pattern:
- Chain 2, skip 2 stitches, make 10 Dc.
- Continue this sequence (Chains and clusters of Dc) until 4 stitches remain.
- Dc in each of the remaining 4 stitches.
Rows 3–5:
- Continue in the filet pattern. Detailed instructions for each row are as follows:
- Row 3: Extend the 16 Dc groups further, with chain 2 between sections.
- Row 4: Transition to areas of decreases and clusters of 10 Dc as per the tutorial.
- Row 5: Follow the diminishing spaces to form the lattice-like structure.
Step 3: Repeating Pattern
- Repeat Rows 2–5 until the fabric measures from waist to underbust (approximately 20 cm for medium size).
- Customize the length as needed.
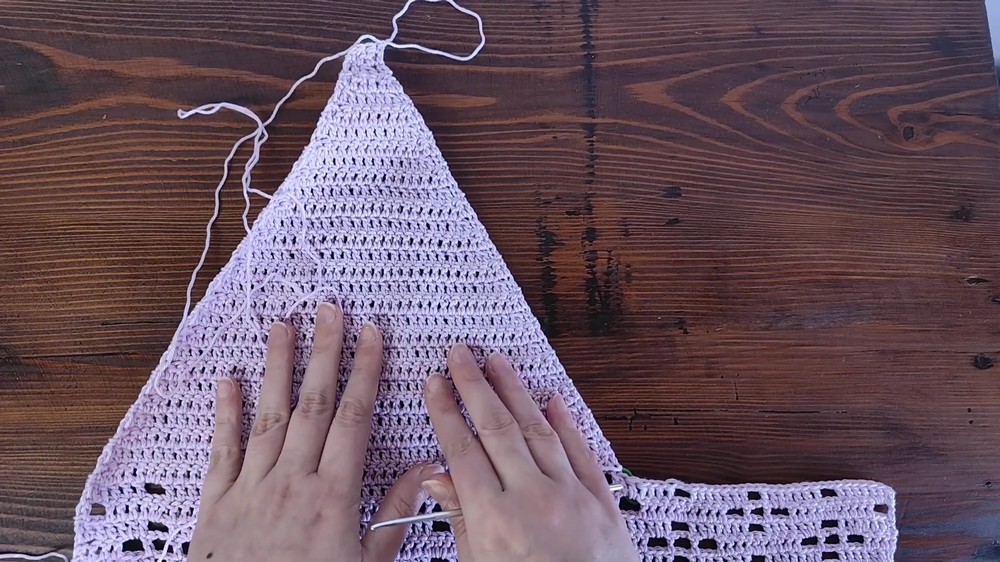
2. TRIANGLES (Upper Front)
The upper portion is made of two overlapping triangles.
Step 1: Positioning for Triangles
- Find the center of the panel. Use stitch markers to divide into two overlapping triangle bases.
Step 2: First Triangle
- Attach your yarn at the base corner.
- Start with a Stk sc (or chain 3), then Dc2tog into the second and third stitches (beginning decrease).
- Work regular Dc across until 2 sts remain before the stitch marker.
- Make a Dc2tog (back loop only).
- Turn your work and continue decreasing on each side to form the triangle's point.
Step 3: Second Triangle
- Attach yarn on the opposite side, working similarly to the first triangle.
- Ensure this triangle overlaps slightly behind the first.
3. BACK PANEL
- Chain 4 x 18 = 72 chains (or adjust based on sizing; this panel is slightly smaller for stretch).
- Follow the same filet floral pattern rows (rows 2-5) as in the front panel.
- Continue until the height matches the front panel’s lower rectangle before the triangles.
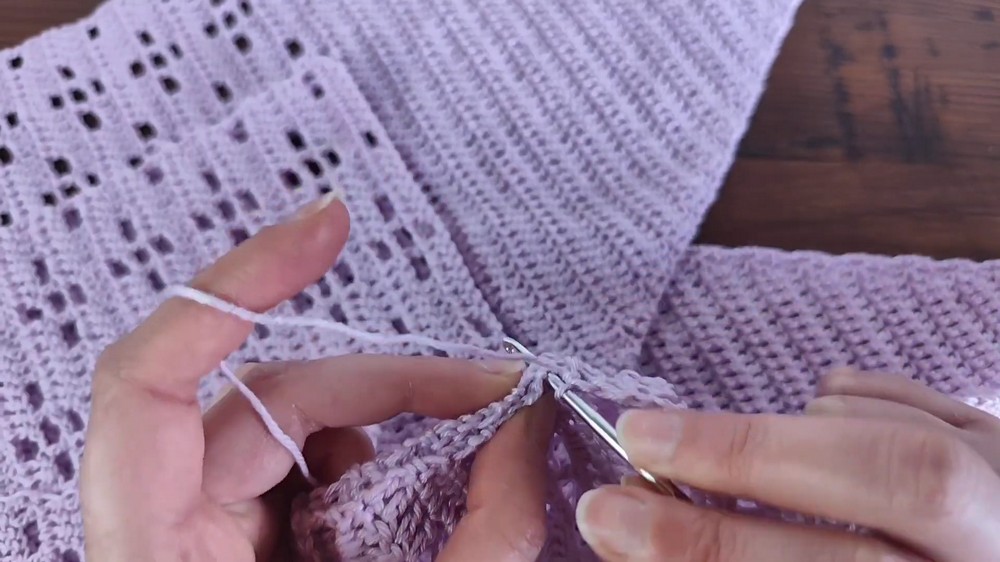
4. SEAMING THE FRONT AND BACK
- Place the front and back panels together with right sides facing each other.
- Use single crochet (Sc) to seam the sides together.
- Fasten off and weave in any loose ends.
5. STRAPS
- Attach yarn at the top corner of a triangle.
- Chain the desired strap length.
- Skip the first chain from the hook and work back:
- Sl st in the first chain, Sc in the next two chains, Hdc in the next, and Dc in the remaining chains.
- Join the strap to the top corner stitch of the triangle using Dc. Fasten off.
- Repeat for the second strap.
6. WEAVING IN ENDS
- Use a tapestry needle to weave in all the loose ends for a clean finish.
Finishing Touches
- Optional:
- Sew in bra cups inside the front triangles for more coverage.
- Add elastic to the back panel for a snug fit.