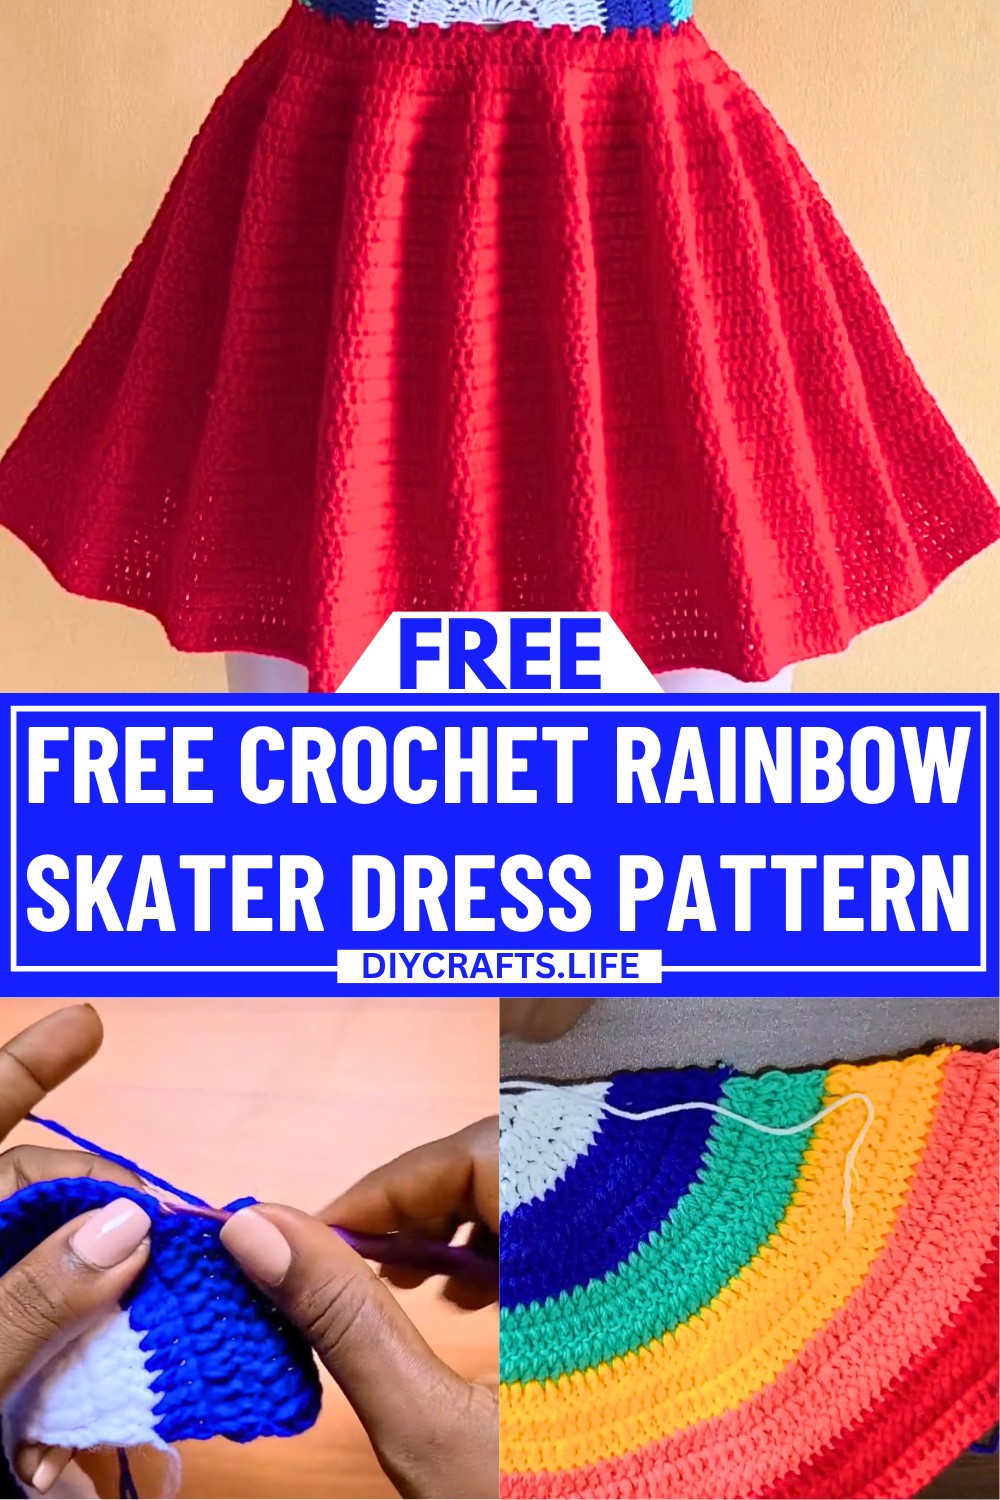
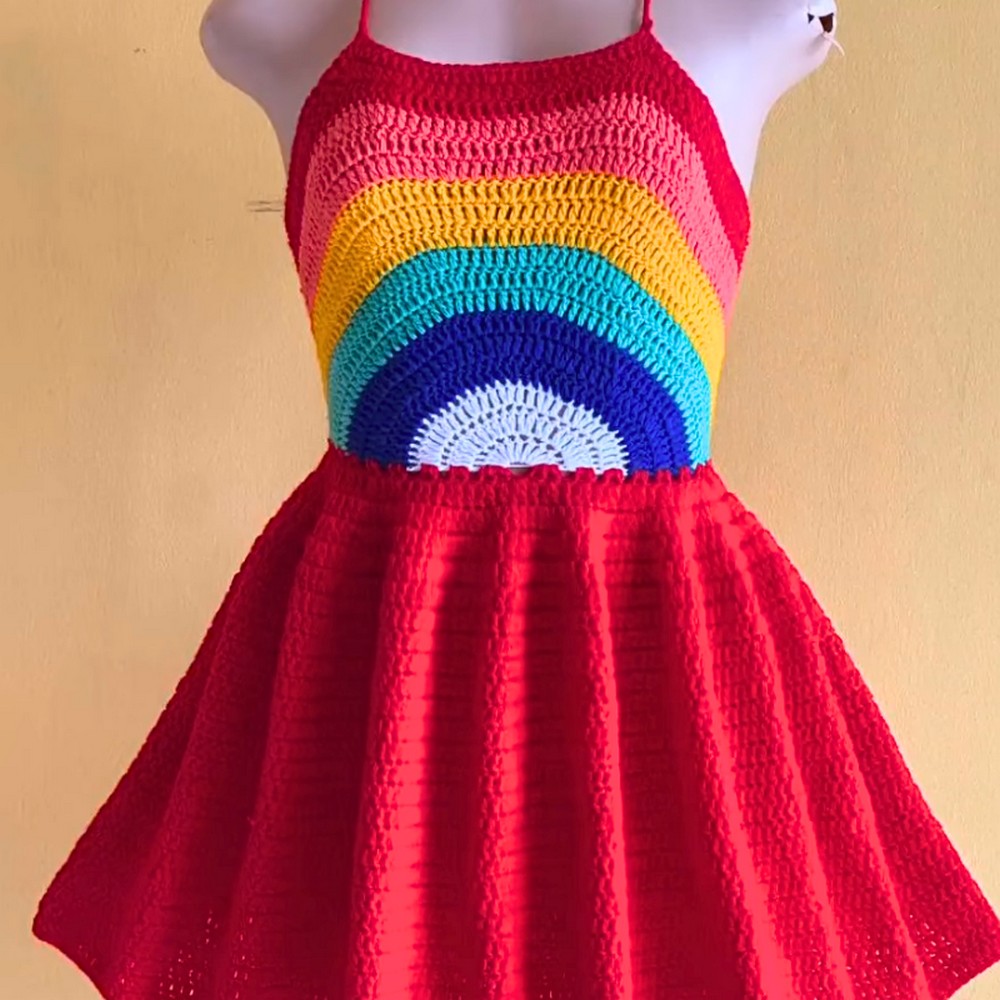
This crochet rainbow skater dress is a fun and colorful clothing piece designed to brighten any day. With its vibrant rainbow shades and flowing skater shape, it’s both stylish and cheerful, perfect for kids, teens, and adults alike. This dress is wearable art, making it ideal for parties, festivals, or just a joyful addition to your wardrobe.
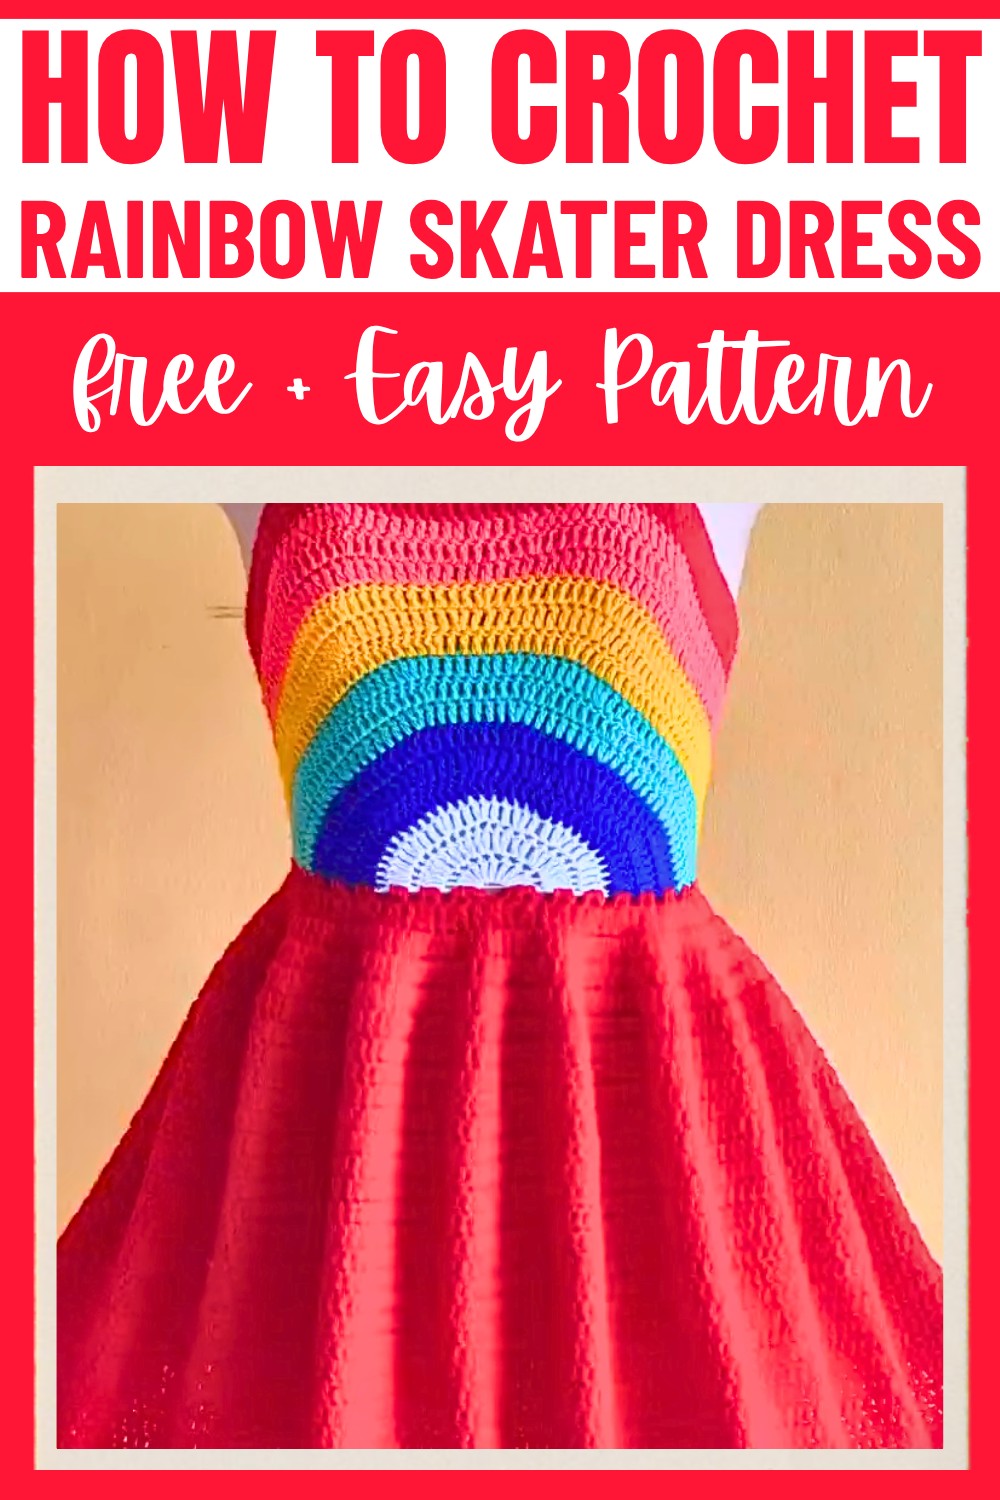
Creating this dress is easier than it seems. It’s worked up using simple crochet techniques in alternating color bands to give it that seamless rainbow look. The pattern showcases its practical versatility – wear it on its own or pair it with other pieces for layered style. It’s a beautiful blend of comfort and creativity that anyone can enjoy wearing.
Credit Shyler crochets
Materials & Tools Needed
- Robin light weight fingering yarn 100% acrylic (double strand) : approximately 2500 yards
- Substitute yarn : dk weight size 3 (single strand) : approximately 1300 yards
- 3mm hook for the rainbow design and a 4mm hook for the ruffle
- Measuring tape
- Darning needle
- Scissors
Finished Size & Customization Ideas
- Default Size: The provided measurements and instructions are for a small size (waist circumference ~25 inches).
- To Customize:
- Bigger Sizes: Continue with the increase pattern for the bodice and skirt until the base of the bodice matches your waist circumference or desired size.
- Length Customization: Add more rows for the bodice, lengthen the skirt by working more ruffled rounds.
Tip: The top should measure approximately 3 inches less than your waist circumference for a snug fit.
Pattern Abbreviations & Terminology
- ch: Chain
- st: Stitch
- sl st: Slip Stitch
- sc: Single Crochet
- dc: Double Crochet
- inc: Increase (2 dc in the same st)
- RS: Right Side
- WS: Wrong Side
This pattern uses US crochet terminology.
Step-by-Step Detailed Instructions
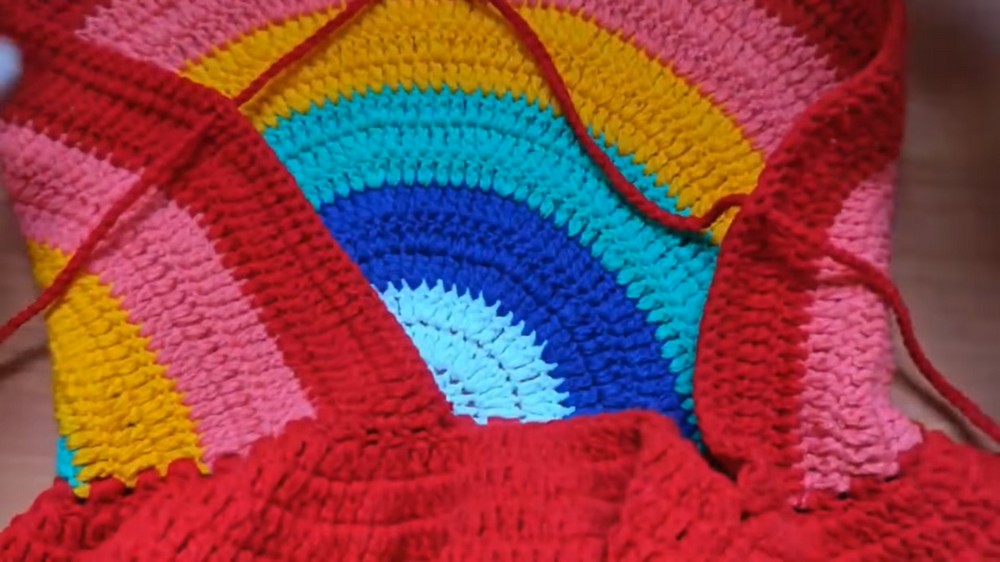
Bodice Section
The bodice forms the fitted upper portion of the dress.
Round 1 (White):
- Create a magic ring.
- Insert your 3 mm hook into the ring, pull through, and secure with a chain 1 to close the ring. (This does not count as a stitch).
- Ch 3 (counts as first dc), then work 11 dc into the magic ring.
- Tighten the ring by pulling the tail. You should have 12 dc in total (including the ch 3).
- Sl st into the top of the beginning ch 3 to join.
Round 2:
- Ch 3 (counts as first dc), turn your work.
- Work 1 dc into the same st as the ch 3.
- Place 2 dc into each st around.
- Sl st into the top of the ch 3 to join. You should have 24 dc in this round.
Round 3:
- Ch 3, turn your work, and 1 dc into the same st.
- Place 1 dc into each of the next 2 sts, then inc into the next st (2 dc in one st).
- Repeat this pattern (1 dc in next 2 sts, inc) around.
- Sl st into the top of the ch 3. You should have 32 dc.
From this point on:
- Repeat the increase logic, adding more stitches between increases (e.g., Round 4: 1 dc in next 3 sts, inc; Round 5: 1 dc in next 4 sts, inc, etc.).
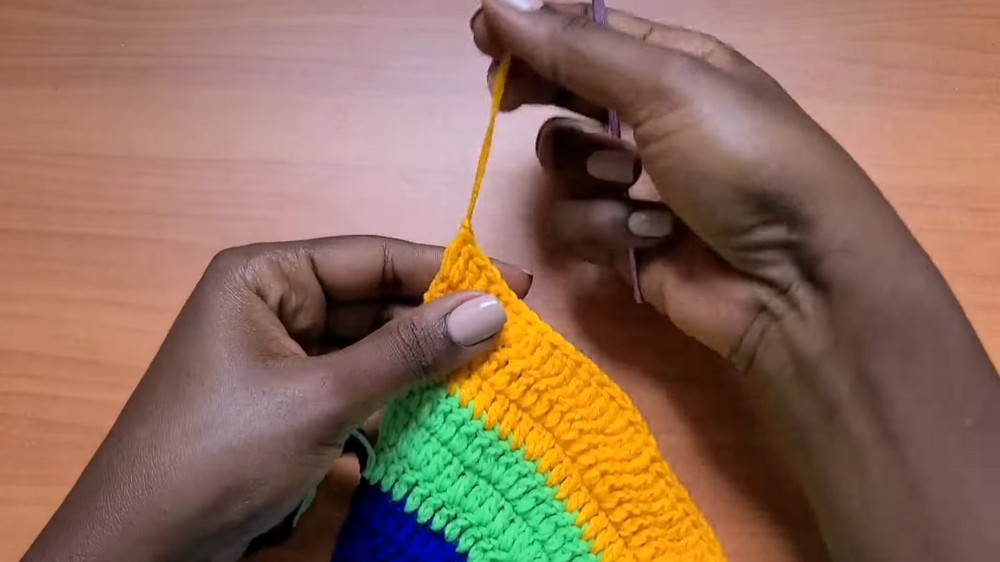
- Switch Colors: Change yarn every 3 rounds to create rainbow stripes using the slip knot method to attach the new color. Cut off the previous color yarn and weave in the loose ends as you work.
Tip: Continue until the bodice base measures approximately 3 inches less than your waist circumference.
Skirt Ruffle Section
Once the bodice is complete, the skirt is worked in rounds with more increases to create the skater-style ruffles.
- Create a Chain for the Waist Adjustment:
- Attach yarn at one side of the bodice and create a chain that matches the difference between the bodice base and your waist circumference.
- E.g., If your bodice is 22 inches and your waist is 26 inches, chain enough to measure 4 inches. Sl st the chain to the opposite side of the bodice to form a full loop.
- Ruffled Skirt Rounds (Begin Increases):
- Round 1:
- Attach red yarn and ch 3.
- Work 1 dc in the next st, 2 dc in the next st (alternate between 1 dc and 2 dc around).
- Sl st to the ch 3 to join.
- Round 2:
- Ch 3, work 1 dc in each of the next 2 sts, inc in the next st.
- Repeat (1 dc, 1 dc, 2 dc) around.
- Round 3:
- Ch 3 and repeat with 3 sts between increases (1 dc in next 3 sts, 2 dc in next st).
- Round 1:
Continue this incremental increase (adding one extra dc between increases each round) until you have 5 rounds of ruffles or desired width for the skirt ruffle.
- Plain Skirt Rounds (Stop Increases):
- After the ruffles, proceed with plain 1 dc in each st around for the rest of the skirt.
- Work for as many rounds as needed to create the desired dress length (e.g., 15 inches for a mini-dress).
Finishing
- Edging: To finish the skirt, work 2 dc in each row along the base to create a neat edge.
- Straps:
- Fold the bodice in half and mark the center point. From the center, count 12 sts to each side and attach matching yarn for a strap on both sides.
- Work a chain of 200 ch for each strap.
- Attach straps as shown and weave through the back to adjust the fit.
- Loose Ends: Weave in all remaining tails with the darning needle.
- Block: Lightly block the dress for improved shaping.