Transform leftover yarn into a delightful handmade creation—a charming crochet fish! In just 20 minutes, you’ll craft an adorable little companion that’s perfect for adding a playful touch to your accessories or even as a fun toy for your pet. With minimal materials and basic crochet skills, this project brings life to your unused yarn, sparking joy through artistic expression.

Crochet a Cute Fish
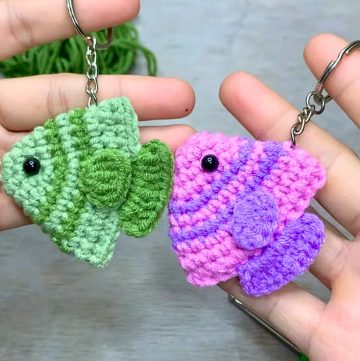
This crochet pattern stands out with its clever use of colors to imitate scales and its intricate yet straightforward design. The fish measures about 10–11 cm, making it ideal as a keychain or pocket-sized decorative piece. Personalize it with a ringing element inside or choose vibrant hues for its scales to truly make it your own. Whether you’re a beginner or a seasoned crafter, this project combines creativity with practicality, offering endless possibilities for customization while showcasing your unique style.
Credit Olga Garkusha
Materials Needed
- Flesh-colored yarn (or any color of your choice for the body of the fish)
- Leftover yarn in various colors for the scales
- Thin black thread
- Holofiber (stuffing material)
- 2 beads (4-5 mm) for eyes
- Metal ring (if making a keychain)
- 1.75 mm crochet hook
Abbreviations:
- sc: Single crochet
- /*: Increase (2 single crochets in the same stitch)
- /*: Decrease (crochet two stitches together)
- air loop: Chain stitch

Crochet Instructions:
Fish Body:
- Row 1: Start with 6 single crochets (sc) in a magic ring.
- Row 2: (1 sc, /*) repeat 3 times (9 stitches total).
- Row 3: (2 sc, /*) repeat 3 times (12 stitches total).
- Row 4: (5 sc, /*) repeat 2 times (14 stitches total).
- Row 5: (6 sc, /*) repeat 2 times (16 stitches total).
- Row 6: (7 sc, /*) repeat 2 times (18 stitches total).
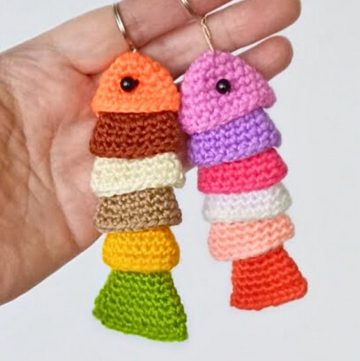
- Change thread to start crocheting the colorful scales.
- Rows 7-13: Alternate between different colors, crocheting 2 rows in each color (18 stitches per row).
- Row 14: (7 sc, /) repeat 2 times (16 stitches total).*
- Row 15: Work 16 single crochet (16 stitches total).
- Row 16: (6 sc, /) repeat 2 times (14 stitches total).*
- Row 17: Work 14 single crochet (14 stitches total).
- Row 18: (5 sc, /) repeat 2 times (12 stitches total).*
- Row 19: Work 12 single crochet (12 stitches total).
- Row 20: (1 sc, /*) repeat 3 times (9 stitches total).
- Row 21: Work 9 single crochet (9 stitches total).
- Row 22: (2 sc, /*) repeat 3 times (12 stitches total).
- Row 23: (3 sc, /*) repeat 3 times (15 stitches total).

Align the Fish:
To align the fish properly:
- Identify where the color transition is.
- Crochet additional shift loops (single crochet) to make the fish symmetrical and reach the middle.
- In the example, 3 single crochet stitches were used, but this can vary depending on your crochet.
Closing the Fish:
- Create 1 air loop. Fold the fish in half and crochet 7 single crochets (sc) through both sides of the fish to join them together.
- Stuff the fish using holofiber before completely closing it.

Fin:
- Move back 1 row from the head.
- Crochet as follows:
- Chain 3 (air loops),
- 2 double crochets,
- 2 half double crochets,
- 2 single crochets.
- Move back 1 row from the scales to begin placement of the fin. Secure it.

Eyes:
- Sew on the two beads (4-5 mm each) to form the eyes.
- For extra security, sew the thread through each bead again to tighten into place.
Recommendation for Keychain or Pet Toy:
- If using as a keychain, sew a metal ring to the back of the fish.
- If using as a toy for pets, consider inserting a small rattle or "something ringing" inside the stuffing.

Final Notes:
- The finished fish should measure around 10-11 cm.
- For best results, ensure even tension while crocheting and pay attention to color changes for neat scales.
If you have specific questions about any step, feel free to ask! Happy crocheting! 😊