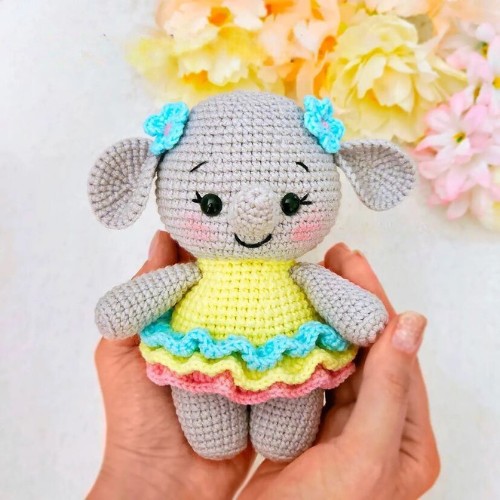
This charming crochet elephant amigurumi, adorned with a vibrant dress and floral accents, is a delightful addition to any collection. Handcrafted with care, it offers a unique blend of visual charm and tactile pleasure. Perfect as a thoughtful gift, a decorative piece, or a beloved playmate for children, this amigurumi brings joy and a touch of whimsy wherever it goes. It's soft grey texture and friendly appearance make it an instant favorite for all ages.
Materials:
- Yarn (grey and pink) Of your Choice
- Crochet hook
- Tapestry needle
- Fiberfill stuffing
- Safety eyes
Step-by-Step Crochet Elephant Pattern
Arms:
Crochet with the grey yarn. Stuff only ⅔ of the arm.
- 1. 8 sc into a magic ring (8)
- 2. 8 inc (16)
- 3. Back loops only: 16 sc
- 4-5. 16 sc (2 rounds)
- 6. (6 sc, dec)*2 (14)
- 7-9. 14 sc (3 rounds)
- 10. (5 sc, dec)*2 (12)
- 11-13. 12 sc (3 rounds)
- 14. (4 sc, dec)*2 (10)
- 15-16. 10 sc (2 rounds)
Fasten off and cut the yarn, leaving a tail for sewing. Sew the arms to the body between rounds 16-17.
Legs:
Crochet with the grey yarn. Stuff as you go.
- 1. 7 sc into a magic ring (7)
- 2. 7 inc (14)
- 3. (sc, inc)*7 (21)
- 4. Back loops only: 21 sc
- 5-10. 21 sc (6 rounds)
For the left leg: Fasten off and cut the yarn.
For the right leg: Don't cut the yarn, we will continue with the body:
Body:
Continue crocheting with the grey yarn.
1. Crochet 6 sc more on the right leg, join the left leg and crochet 21 sc on it. Crochet 21 sc on the right leg and put the marker here (42)
2. inc, 18 sc, 4 inc, 18 sc, inc (48)
3-5. 48 sc (3 rounds)
Change the yarn to a yellow colour.
6. Back loops only: 48 sc
7. Back loops only: 48 sc
8. Back loops only: 48 sc
9. 48 sc
10. (6 sc, dec)*6 (42)
11-12. 42 sc (2 rounds)
13. (5 sc, dec)*6 (36)
14-15. 36 sc (2 rounds)
16. (4 sc, dec)*6 (30)
17. 30 sc
18. (3 sc, dec)*6 (24)
Stuff the body firmly, especially in the neck. Cut the yellow yarn, we will continue with the head, but first we need to finish the dress:
Dress:
Crochet with the body turned upside down:
Attach the pink yarn in the front loops of round 6.
- ch 2, (2 dc in one st)*48, sl st (96)
- 2. 96 sc
Make a sl st, fasten off and hide the yarn.
Now attach the yellow yarn in the front loops of round 7.
- ch 2, (2 dc in one st)*48, sl st (96)
- 96 sc
Make a sl st, fasten off and hide the yarn.
Now attach the blue yarn in the front loops of round 8.
- ch 2, (2 dc in one st)*48, sl st (96)
- 96 sc
Make a sl st, fasten off and hide the yarn.
Head:
Continue crocheting from the body. Change the yarn to grey color. Stuff as you go.
- 1. (sc, inc)*12 (36)
- 2. (2 sc, inc)*12 (48)
- 3. (7 sc, inc)*6 (54)
- 4. 4 sc, inc, (8 sc, inc)*5, 4 sc (60)
- 5-12. 60 sc (8 rounds)
- 13. 4 sc, dec, (8 sc, dec)*5, 4 sc (54)
- 14. 54 sc
- 15. (7 sc, dec)*6 (48)
- 16. 48 sc
Insert the safety eyes between rounds 8-9 with 9 sc between them. There must be 7 sc visible.
- 17. 3 sc, dec, (6 sc, dec)*5, 3 sc (42)
- 18. 42 sc
- 19. (5 sc, dec)*6 (36)
- 20. 2 sc, dec, (4 sc, dec)*5, 2 sc (30)
- 21. (3 sc, dec)*6 (24)
- 22. (sc, dec)*8 (16)
- 23. 8 dec (8)
- Make sure that the head is stuffed firmly. Close the opening and hide the yarn inside.
- Using a black thread embroider the eyebrows in round 12. Embroider the mouth in round 5.
- Color the cheeks with a pink blush.
Ears:
Crochet with the grey yarn.
- 1. 6 sc into a magic ring (6)
- 2. 6 inc (12)
- 3. (sc, inc)*6 (18)
- 4. sc, inc, (2 sc, inc)*5, sc (24)
- 5. (3 sc, inc)*6 (30)
- 6. 30 sc
- Fold the ear in half and crochet 2 sc through both sides.
- Fasten off and cut the yarn, leaving a tail for sewing.
- Sew the ears to the sides of the head in round 15.
Trunk:
Crochet with the grey yarn. Stuff a little.
- 1. 8 sc into a magic ring (8)
- 2. 8 sc
- 3. (3 sc, inc)*2 (10)
- 4-5. 10 sc (2 rounds)
- 6. (4 sc, inc)*2 (12)
- 7-9. 12 sc (3 rounds)
Make a sl st, fasten off and cut the yarn, leaving a tail for sewing. Sew the trunk to the head in rounds 7-8. Bend it upwards.
Flowers:
Start crocheting with the pink yarn.
- 1. 5 sc into a magic ring Change the yarn to blue colour.
- 2. (ch 2, 2 dc, ch 2, sl st)*5
Fasten off and cut the yarn, leaving a tail for sewing. Sew the flowers near the ears.
Designer: Marizzatoys On Instagram