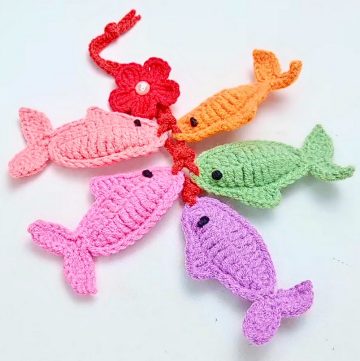
Create your own charming ray fish keychain with this delightful crochet pattern that brings a playful touch to your accessories. Perfect for adding a splash of personality to your keys or bags, this design blends simplicity with a whimsical twist, making it a fun project for anyone who loves crochet.

Crochet Ray Fish Keychain Design
This crochet ray fish design features intricate details like curved fins and a textured body, crafted using 4-ply cotton yarn and a 2.5mm hook. The layered approach and symmetrical shape give it a realistic yet artistic appeal. With its clever use of front loop-only stitches and a carefully crafted tail, this keychain is both eye-catching and easy to personalize. Choose bold or soft colors to match your style, making it a unique addition to your handmade collection.
Credit Ada's Handmade
Step-by-Step Crochet Pattern:
Materials:
- 2.5mm crochet hook
- 4-ply cotton yarn (white and blue as specified)

Instructions:
Base Pattern - Round 1 to Round 5:
- Round 1 (R1):
- Create a magic loop.
- Crochet 8 single crochet (SC) into the magic loop.
- Pull yarn to tighten the loop.
- Slip stitch (SL ST) into the first stitch.
- Chain (CH) 1.
- Round 2 (R2):
- Work 1 increase (INC) in each stitch around (INC x 8 = 16 SC).
(An "INC" means 2 single crochets in the same stitch.) - Slip stitch into the first stitch, then chain 1.
- Work 1 increase (INC) in each stitch around (INC x 8 = 16 SC).
- Round 3 (R3):
- Alternate 1 single crochet (SC) and 1 increase (INC) around the round
(SC, INC) x 8 = 24 SC. - Slip stitch into the first stitch, then chain 1.
- Alternate 1 single crochet (SC) and 1 increase (INC) around the round
- Round 4 (R4):
- Alternate 3 single crochet (SC) and 1 increase (INC) around the round
(3 SC, INC) x 6 = 30 SC. - Slip stitch into the first stitch, then chain 1.
- Alternate 3 single crochet (SC) and 1 increase (INC) around the round
- Round 5 (R5):
- Alternate 9 single crochet (SC) and 1 increase (INC) around the round
(9 SC, INC) x 3 = 33 SC. - Slip stitch into the first stitch.
- Alternate 9 single crochet (SC) and 1 increase (INC) around the round

Shaping the Design - Round 6:
- Round 6 uses front loop only for the stitches.
- Begin:
- Crochet 2 double crochet (DC) in the next stitch.
- Crochet 1 treble crochet (TC) in the next stitch.
- Crochet 1 double crochet (DC) in the next stitch, followed by a slip stitch in the same stitch.
- Crochet 1 single crochet (SC) in the next 2 stitches.
- Continue:
- Crochet 2 half-double crochet (HDC) in the next stitch.
- Crochet 2 double crochet (DC) in the next stitch.
- Crochet 1 treble crochet (TC) in the same stitch.
- Crochet 1 treble crochet (TC) in the next stitch.
- Crochet 1 double treble crochet (DTC) in the same stitch.
- Crochet 2 double treble crochet (DTC) in the next stitch.
- Midpoint:
- Crochet 1 double treble crochet (DTC) in the next 2 stitches.
- Crochet 2 double crochet (DC) in the next stitch.
- Crochet 1 half double crochet (HDC) in the next stitch.
- Reverse Order for Other Half:
Reverse the stitches to create symmetry:- Start with: HDC, DC, DTC, DTC × 2, TC, DC × 2, etc.
(Work backward from the midpoint to re-create the first half.)
- Start with: HDC, DC, DTC, DTC × 2, TC, DC × 2, etc.

Finishing Details:
- Chain 10.
- Slip stitch into the next stitch.
- Work 4 slip stitches and 5 single crochet (SC).
- Slip stitch to close the round, chain 1, and cut the yarn.
Blue Yarn Section:
The same steps for the white yarn design apply here but with blue yarn. At the end:
- Chain 10.
- Work 4 single crochet (SC) and 5 half-double crochet (HDC).
- Slip stitch to finish, chain 1, and leave a long tail for sewing.

Final Assembly:
Use the long tails to sew the blue and white crocheted pieces according to the design in the YouTube video.