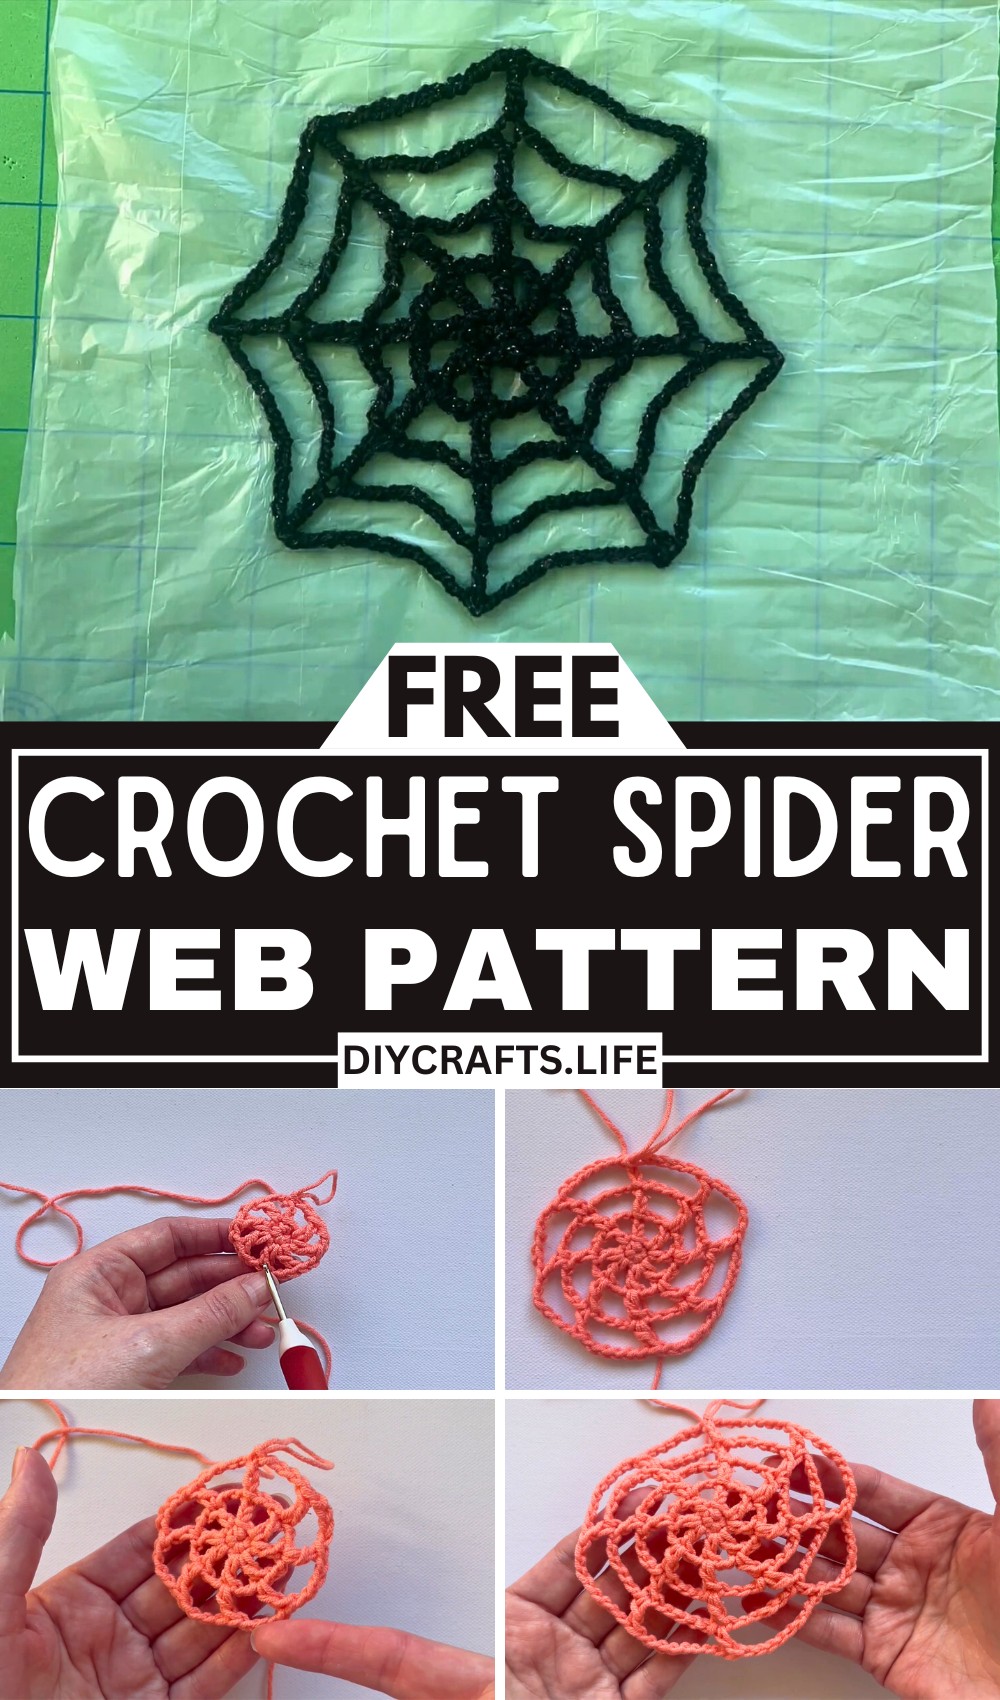
Create a stunning crochet spider web that combines style, creativity, and functionality. Perfect as a decorative piece for Halloween or year-round for a spooky twist, this project is easily customizable in size and color while showcasing delicate and intricate craftsmanship.
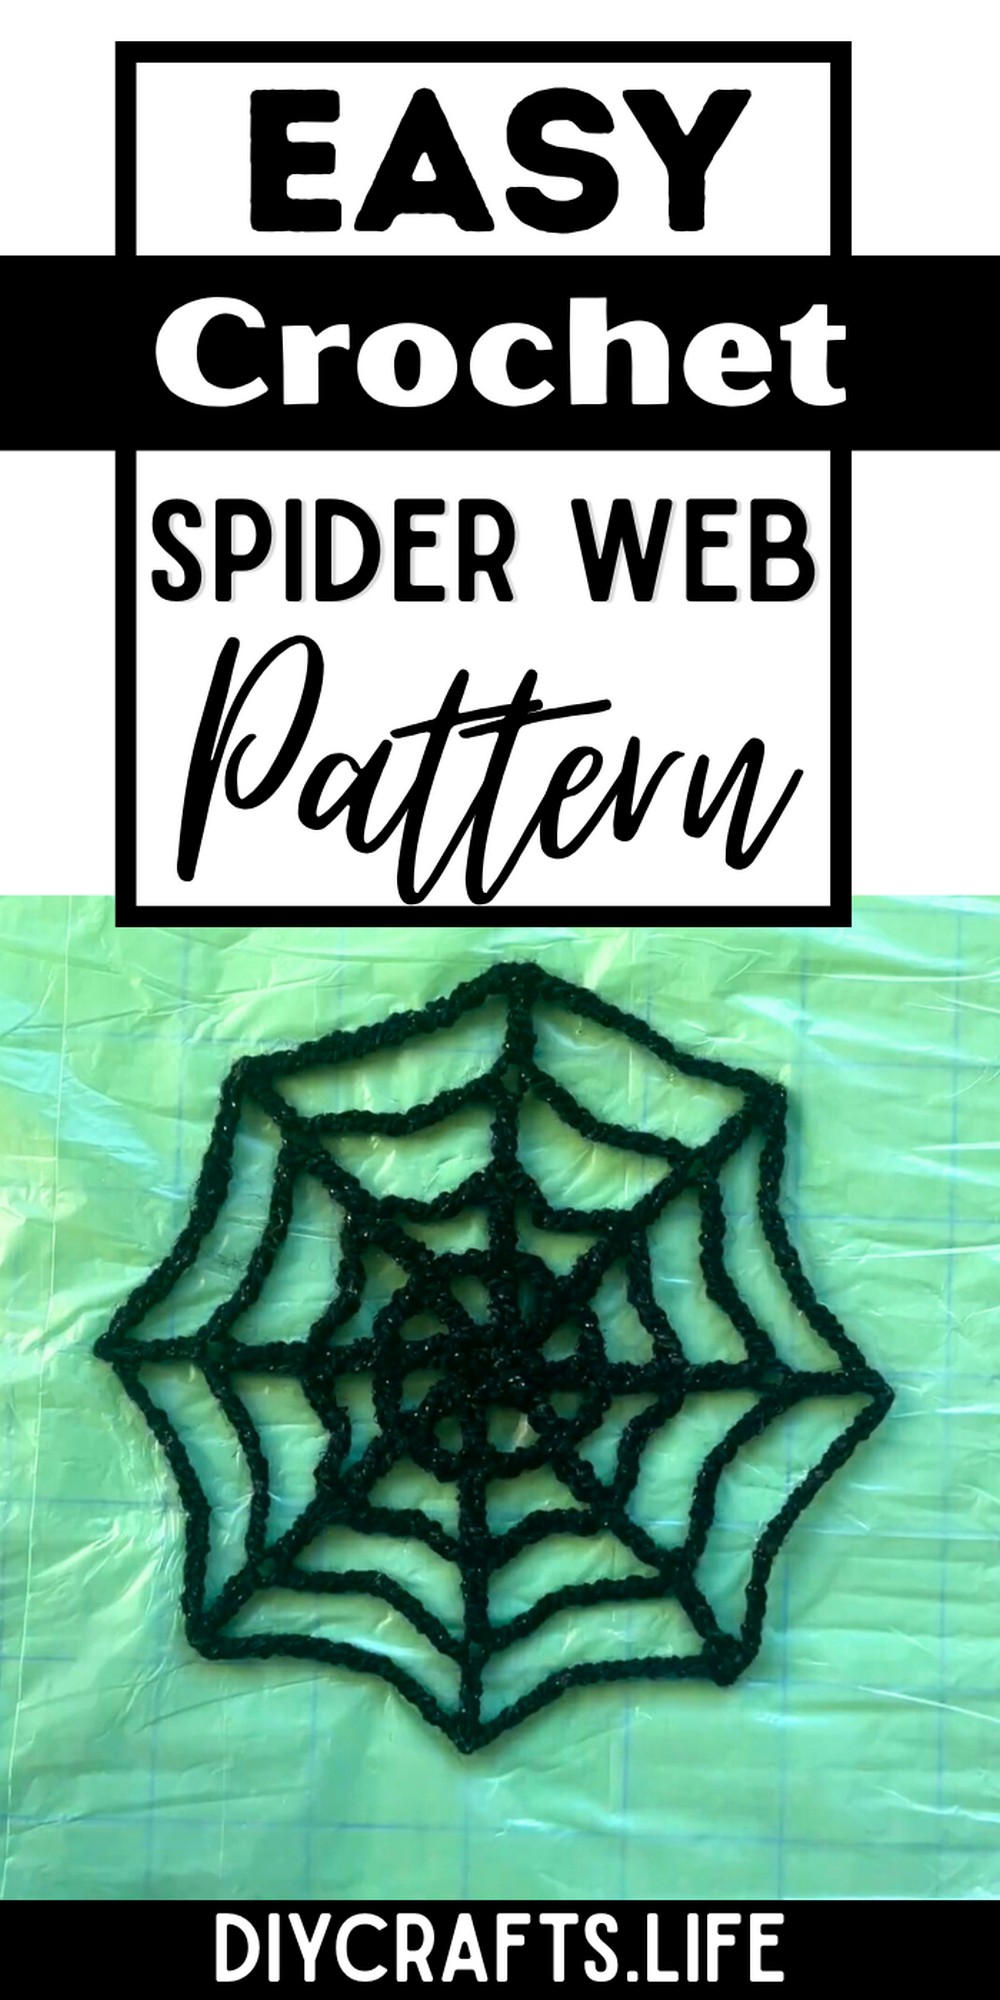
This crochet spider web is both captivating and versatile. Use it as Halloween décor, wall art, or as a table centerpiece. Its standout features include adjustable size, intricate detailing, and durability when stiffened, ensuring it becomes a long-lasting addition to your holiday decorations.
Crochet Spider Web Pattern
Crafting this crochet spider web is straightforward and enjoyable for all skill levels. Beginners can appreciate its simplicity, while seasoned crafters can customize its size and details for added creativity. With minimal materials, this project unleashes your artistic potential in no time.
Materials and Preparation
To create a crochet spider web, you’ll need the following:
- Yarn: Fine sport weight yarn or double-knit yarn (use a bright color for better visibility if learning, though black is recommended for a spooky effect).
- Hook: 3.5 mm crochet hook or the size recommended on your yarn’s ball band.
- Blocking Supplies:
- Foam blocking mat or a surface where you can pin the web.
- Plenty of pins.
- Fabric stiffener or starch for shaping.
- Plastic covering (to protect your blocking mat and prevent sticking).
- Scissors: For cutting the yarn.
- Tapestry Needle: To weave in ends.
Abbreviations and Notes
Here are the crochet abbreviations used and key details about the pattern:
Abbreviations (US Terms):
- CH: Chain stitch
- SC: Single crochet
- DC: Double crochet
- SL ST: Slip stitch
- MR: Magic ring or magic circle

Notes:
- Stitches are written using US crochet terms (with UK equivalents noted in brackets).
- Use a bright-colored yarn for practicing as black yarn can make stitches harder to see.
- Each round of the web expands by adding 2 more chains to the gaps between DC stitches, allowing you to customize the size of your web.
- After crocheting, the web is stiffened and shaped using fabric stiffener, blocking mats, and pins.
Gauge, Approximate Size, and Pattern Notes
- Gauge: A gauge swatch is not essential.
- Finished Size: Pattern creates approximately a 5-inch spider web with 5 rounds. You can extend the web for larger sizes by following the established pattern.
- Special Techniques:
- Magic Ring: This technique is used to start the project. A short demo is linked in the original video.
- Blocking: Shaping the web after crocheting is key to achieving a realistic spider web look.
- The size of your spider web can be adjusted simply by adding additional rounds, with each new round following the formula of adding 2 extra chains.
Step-by-Step Pattern
Foundation: Round 1
- Start with a magic ring (MR). (If you’re unfamiliar with the magic ring, refer to the video tutorial.)
- Make 4 SC into the ring. [UK: 4 DC]
- Pull the ring tightly closed and secure with a SL ST into the first SC to form a small circle.
- You should now have a circle with 4 SC stitches.
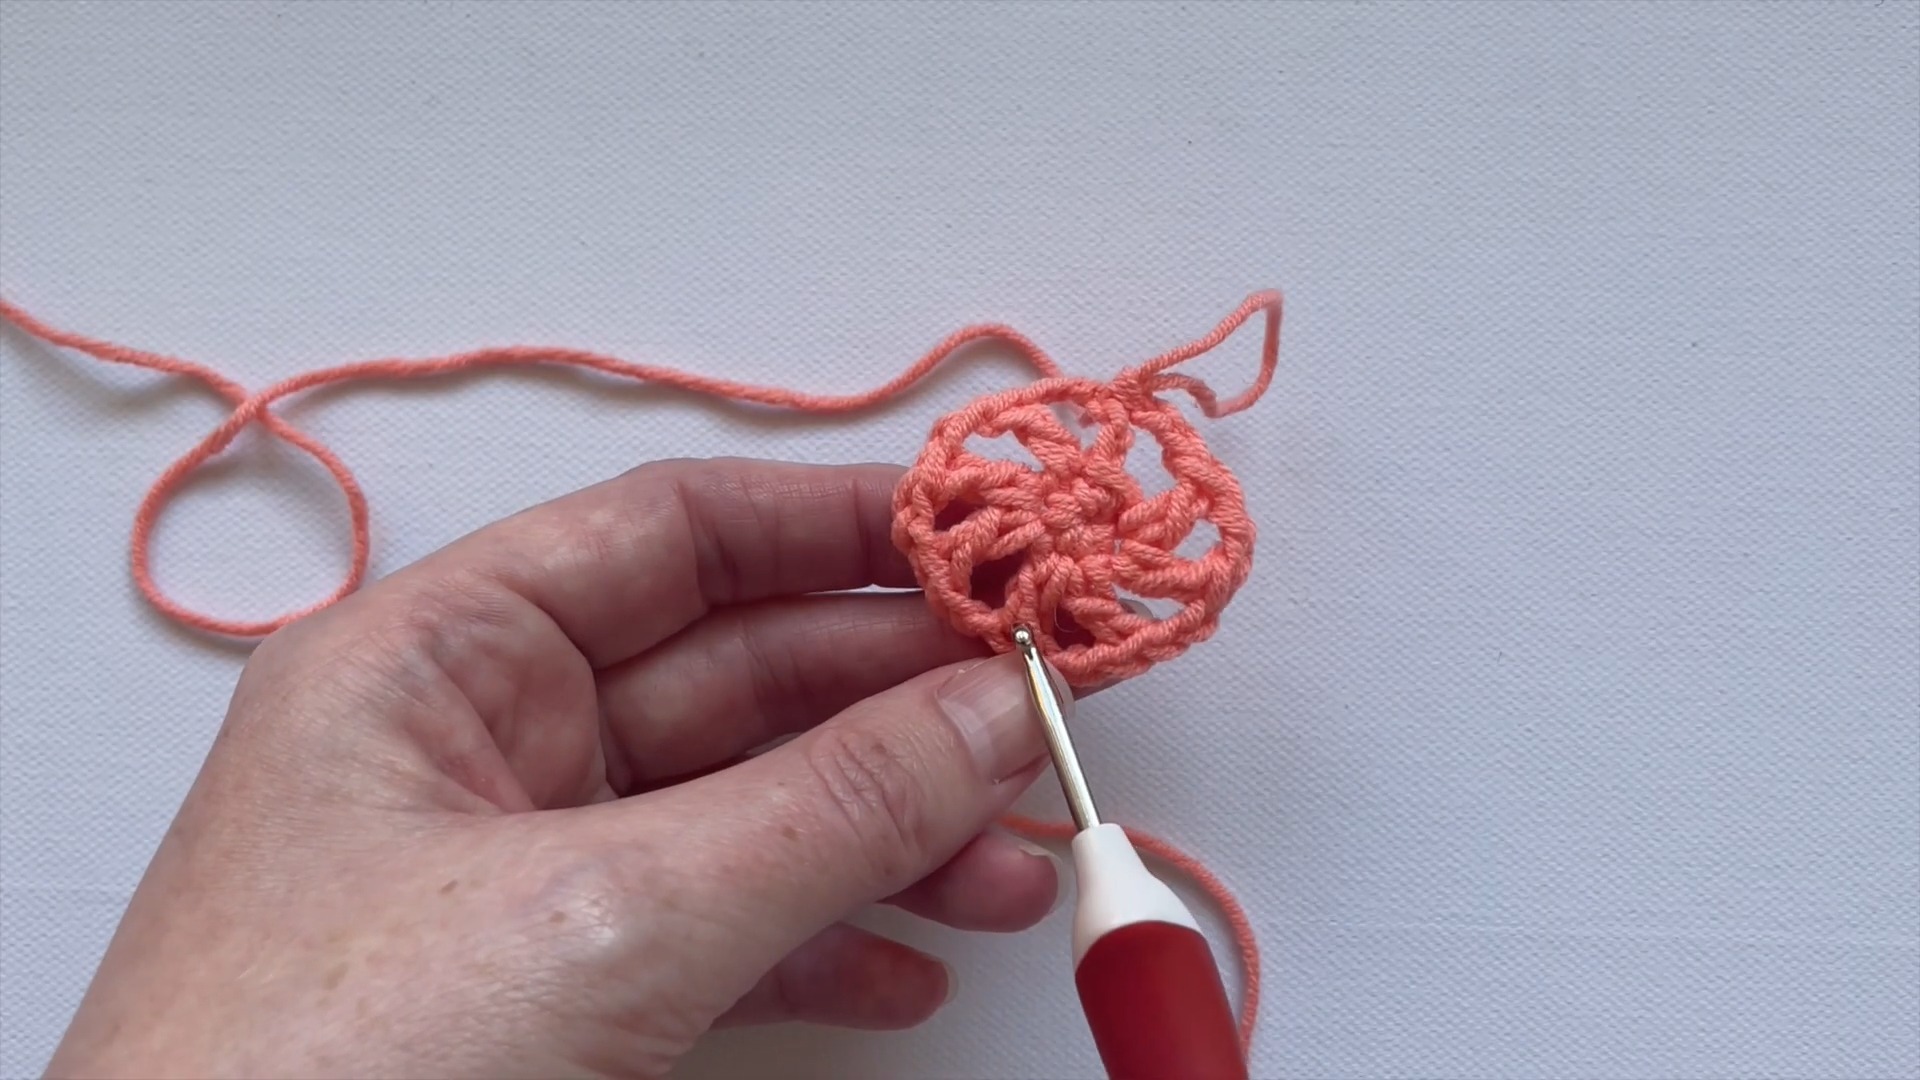
Round 2
- CH 5 (counts as 1 DC + 2 CH). [UK: CH 3 treble + 2 CH]
- Make 1 DC in the same SC beneath the SL ST. [UK: 1 treble]
- CH 2, and make another DC in the next SC stitch. Repeat for all SC stitches around.
- At the end of the round, you should have 8 DC spokes, with each separated by 2 CH.
- Join with a SL ST in the 3rd chain of the starting CH 5.
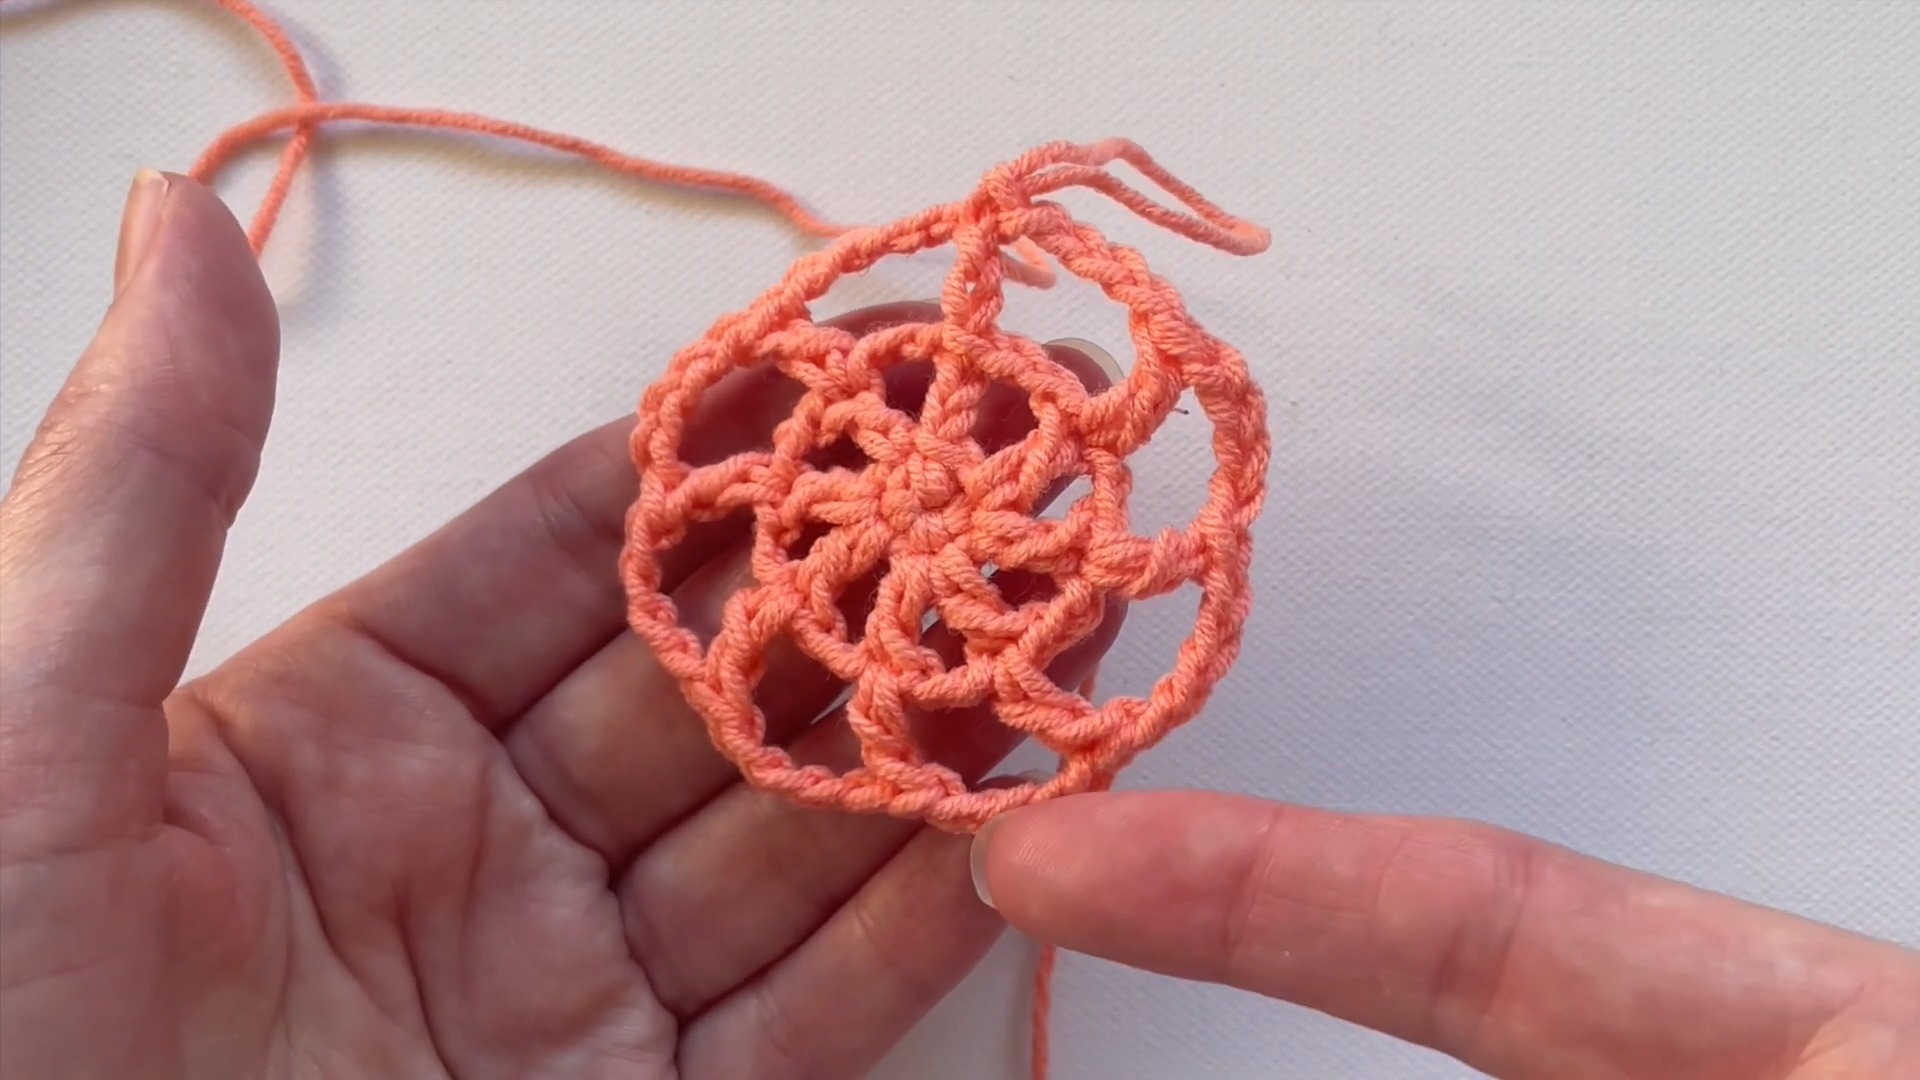
Round 3
- CH 7 (counts as 1 DC + 4 CH). [UK: treble + 4 CH]
- DC into the 1st DC stitch of the previous round.
- CH 4, then repeat: Make 1 DC into each DC of the previous round, followed by CH 4.
- You should now have 8 DC spokes, each separated by 4 CH spaces.
- Join with a SL ST into the 3rd chain of the initial chain (CH 7).
Round 4
- CH 9 (counts as 1 DC + 6 CH). [UK: treble + 6 CH]
- DC into the 1st DC stitch from the previous round.
- CH 6, then repeat: Make 1 DC into each DC stitch of the previous round, followed by CH 6.
- You should now have 8 DC spokes, each separated by 6 CH spaces.
- Finish the round by joining with a SL ST into the 3rd chain of the starting CH 9.
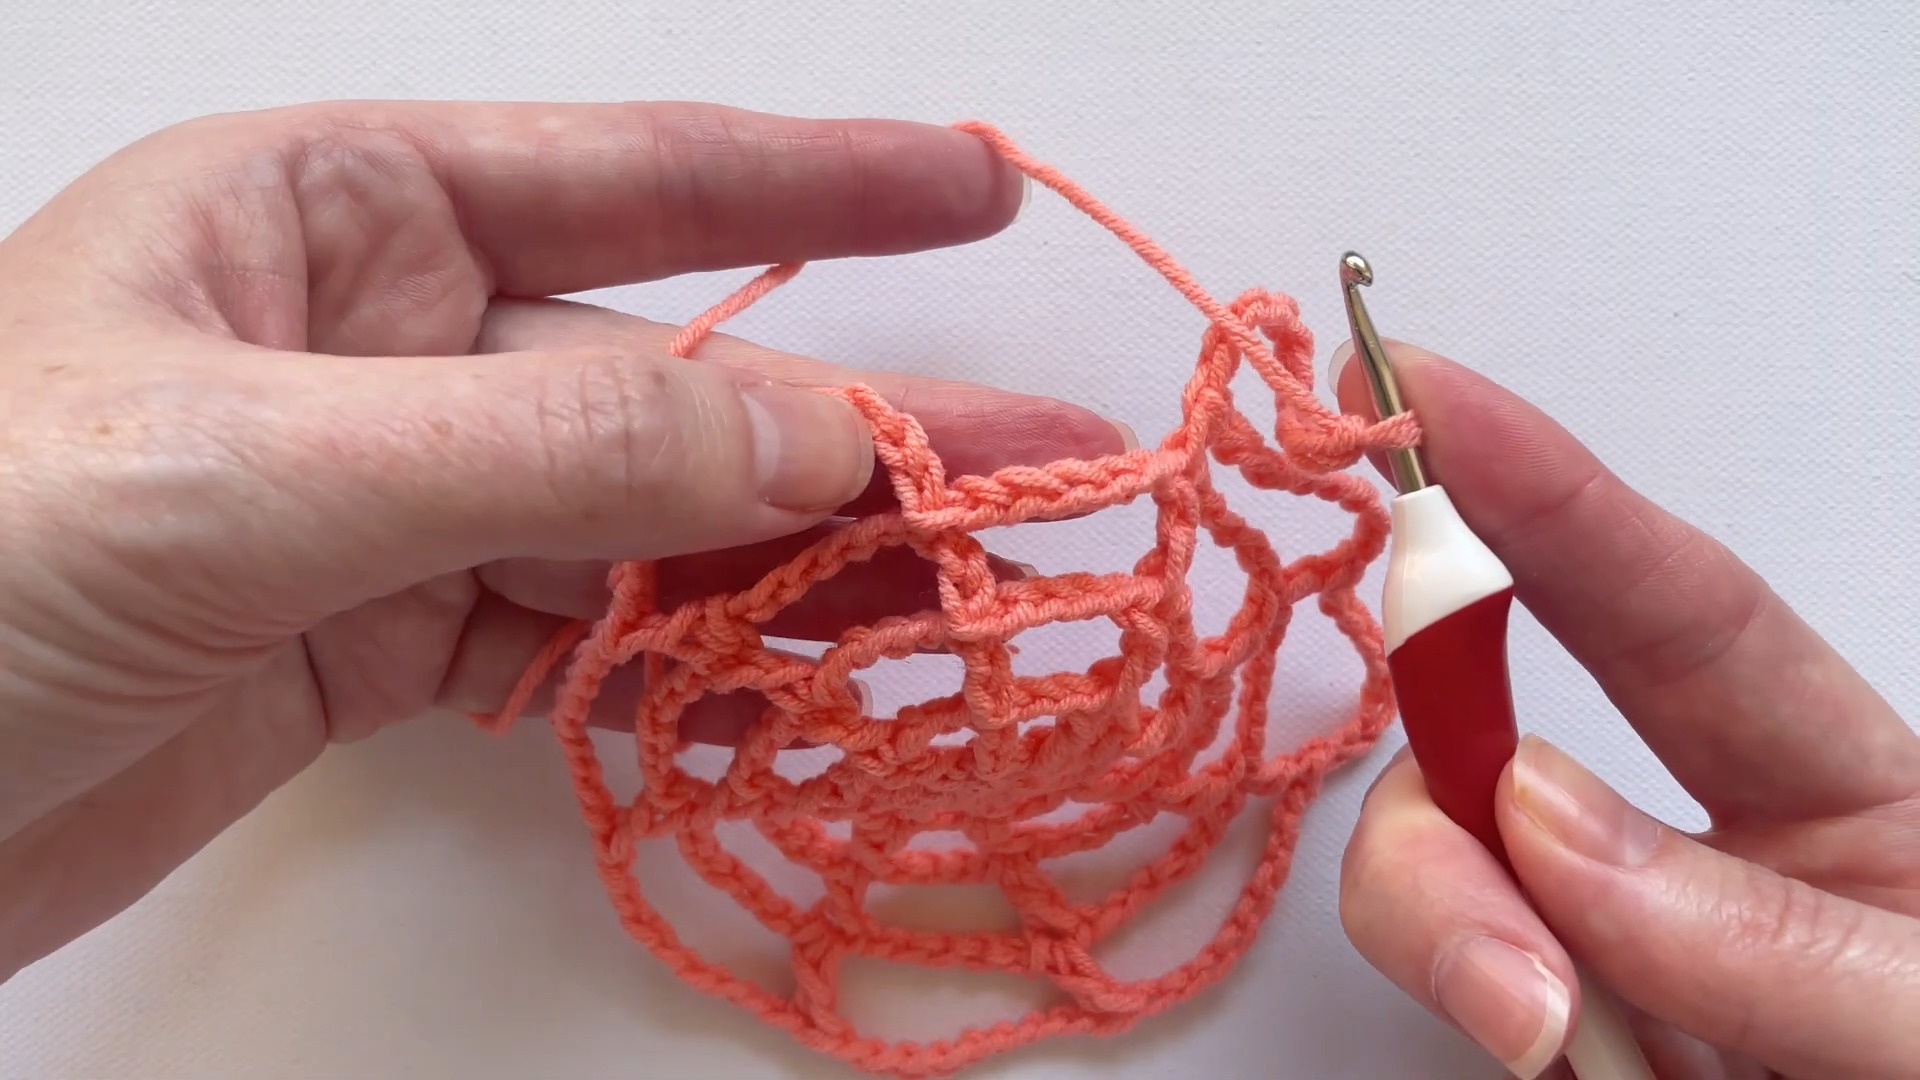
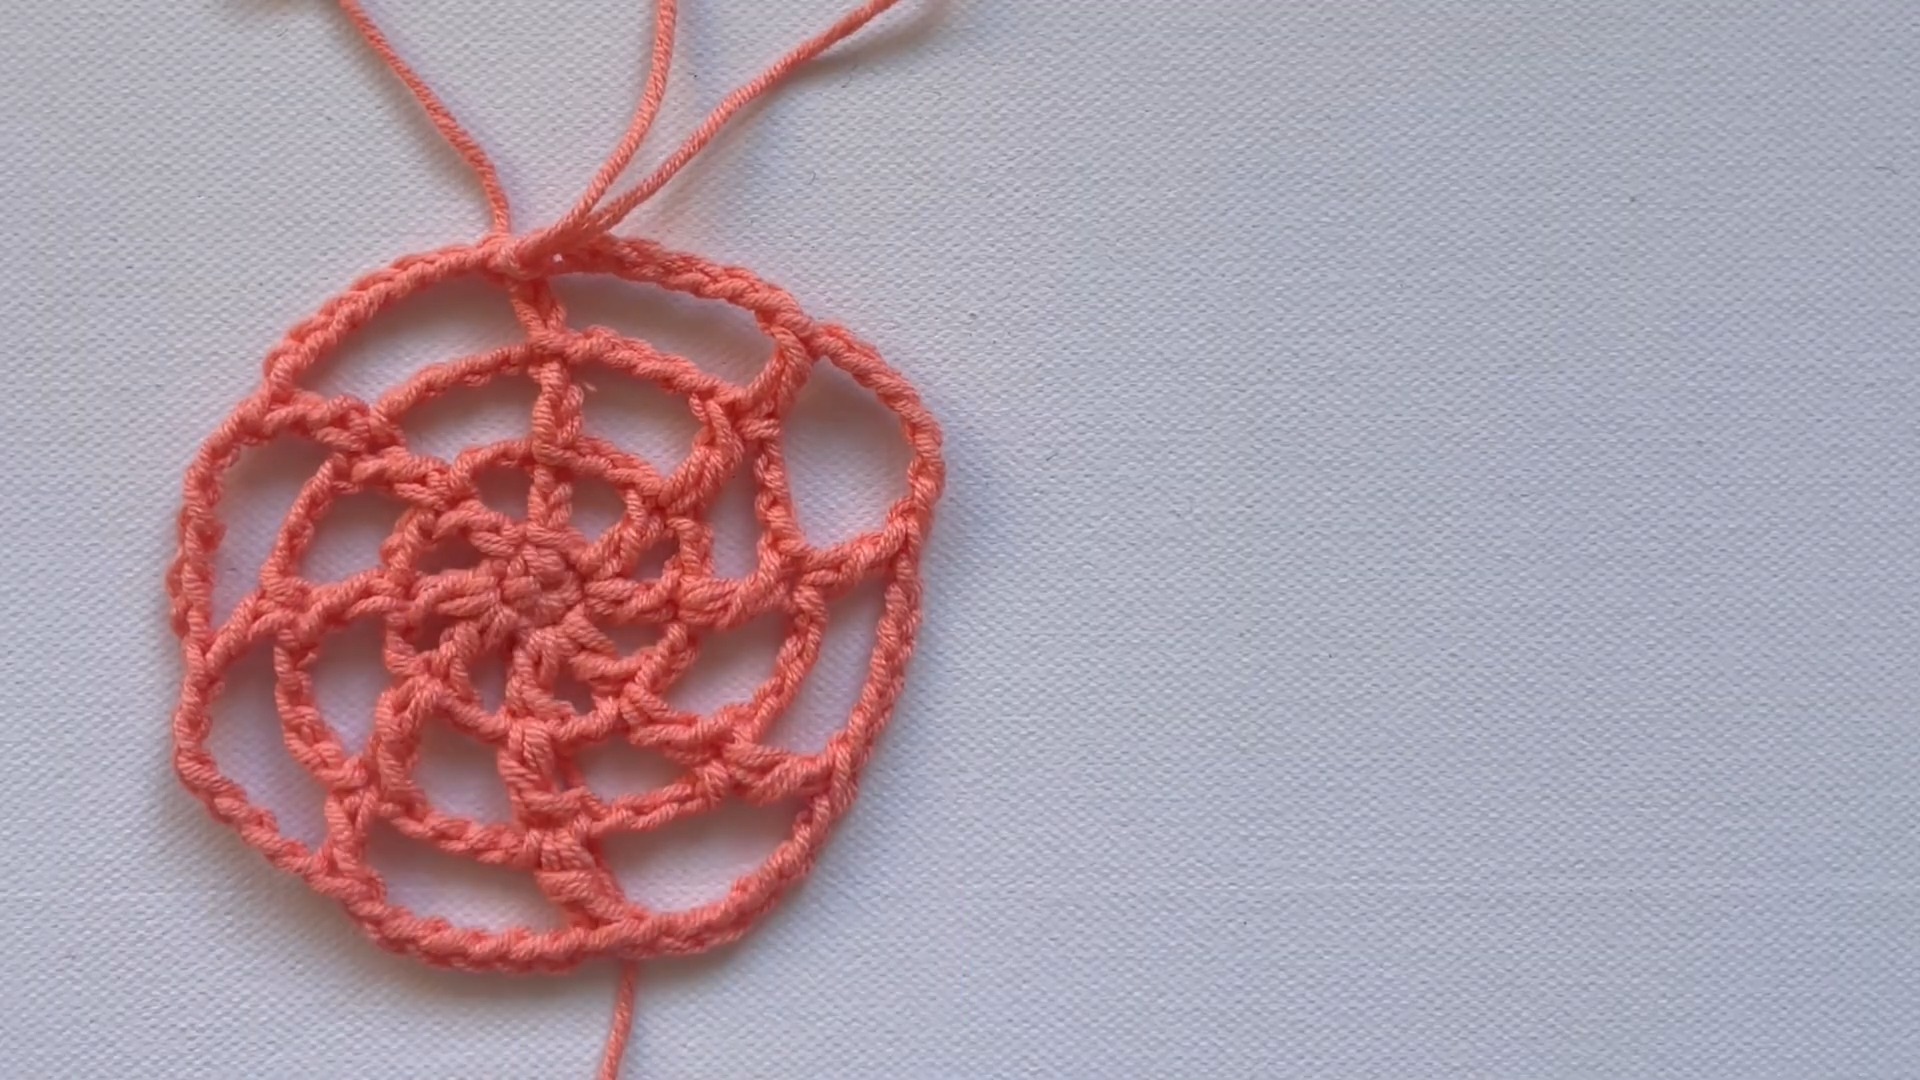
Round 5 (Final Round for 5-Inch Web)
- CH 11 (counts as 1 DC + 8 CH). [UK: treble + 8 CH]
- DC into the 1st DC stitch of the previous round.
- CH 8, then repeat: Make 1 DC in each DC around, each followed by CH 8.
- At the end of this round, you should have 8 DC spokes, each separated by 8 CH spaces.
- Join the round with a SL ST into the 3rd chain of the initial chain (CH 11).
- Bind off and weave in the ends.
To Create a Larger Web: Add more rounds following the same progression (increase chain spaces between DC stitches by 2 for each new round).

Finishing Touches: Blocking the Web
- Soak the Web: Submerge the finished web in fabric stiffener or starch. Ensure it is fully saturated before gently squeezing out the excess.
- Prepare the Blocking Surface:
- Cover your foam blocking mat with plastic to protect it.
- Lay the web flat, aligning vertical and horizontal lines.
- Pinning:
- Start by pinning the center of the web.
- Stretch and pin the top, bottom, left, and right points to form a diamond shape.
- Stretch and pin the diagonal points next to finalize the shape.
- For a curved spider web look, use additional pins to curve the strands between each spoke.
- Drying:
- Let the web dry completely. This can take several hours or overnight. A hairdryer can speed up the process.
- Once dry, remove the pins, and your spooky spider web is ready to use!
Pattern Question:
Q: How can I make the crochet spider web larger?
A: To make the web larger, simply add rounds by increasing the starting chains by 2 and the chain gaps between double crochets by 2 for each new round.
Conclusion:
This crochet spider web is an engaging, creative project that’s perfect for anyone. Its timeless appeal, adaptability, and ease of crafting make it a must-try for both beginners and experienced crocheters. Give your decorations a spooky yet sophisticated look!