Add a touch of charm and functionality to your everyday essentials with the Crochet Heart Granny Square Pouch! This delightful design combines the timeless beauty of crochet granny squares with the sweetness of heart motifs, creating a handcrafted accessory that’s as practical as it is beautiful. Perfect for storing small keepsakes or accessories, this pouch brings playful elegance to your collection.
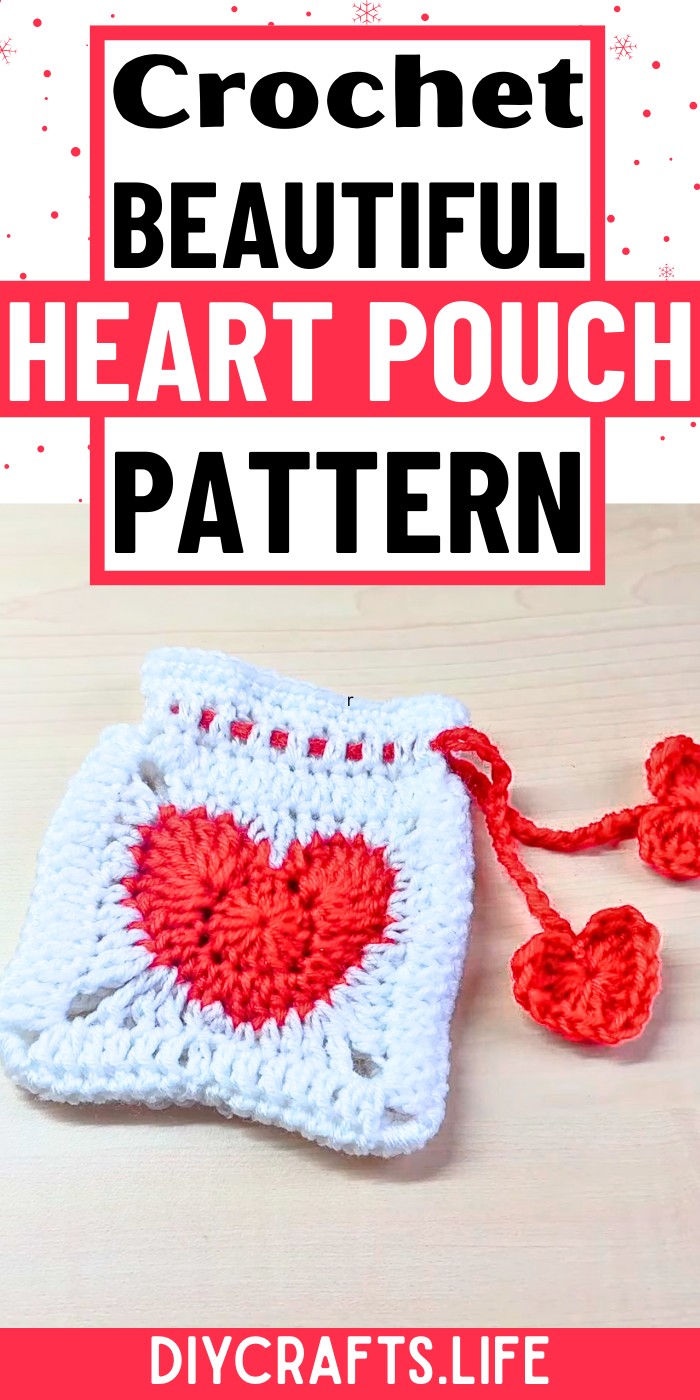
Crochet Heart Granny Square Pouch
The design features intricate granny squares adorned with bold crochet heart details, joined seamlessly to form a mini pouch with a drawstring closure. The hearts and squares are balanced with textured edges and a versatile shape that blends artistry with utility. Personalize it with your favorite color combinations, making it uniquely yours. Small enough to carry, yet spacious enough to keep your essentials, this pouch is a creative expression of style and crafting passion.
Credit Handmade by Appy
Required Materials
- Acrylic yarn (red and white) – specifically from Mr. DIY (or any other acrylic yarn, depending on availability)
- 5 mm crochet hook
- Stitch markers (optional, for easier reference points)
- Scissors
- Yarn/darning needle
- Fiber fill (optional, if you want to add dimension to tiny hearts used for embellishment)
Important Notes
- Magic Circle Basics: Both the heart shapes and small hearts are started with a magic circle.
- Slip Stitch Technique: Used frequently to complete rounds and join edges, especially for neat closures.
- Stitch Recognition: Mark key stitches, particularly where the heart decoration is aligned, to ensure even results.
- Edge Alignment: When joining granny squares, ensure both edges are properly aligned before crocheting together.
- Custom Lengths: You can adjust the pouch length and drawstring size to suit your preferences.
- Right Side Awareness: Keep track of the “right side” for both granny squares. The right side includes raised bumps from the heart pattern.

Step-by-Step Instructions
Making the Heart for the Granny Square
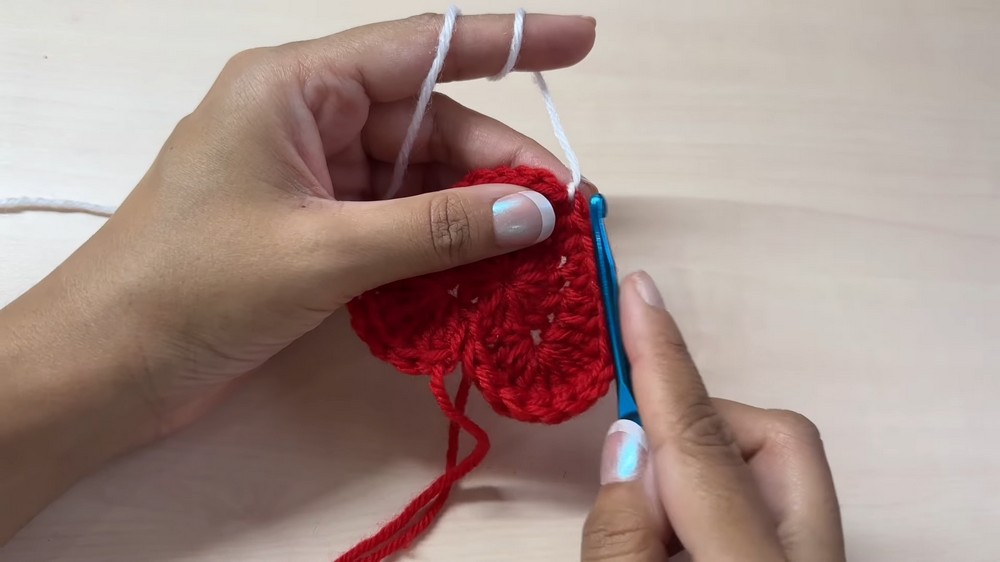
- Step 1:
- Start with red yarn and make a magic circle.
- Chain 3, which counts as your first double crochet (DC).
- Work 12 double crochets into the magic circle.
- Pull the loop to close the circle and slip stitch into the top of the initial chain 3.
- Step 2:
- Skip the first two stitches after the slip stitch.
- Into the third stitch, work 8 triple crochets (TC).
- Into the next stitch, make 1 double crochet (DC).
- In the next stitch, work 1 double crochet (DC) and 1 half double crochet (HDC).
- The following stitch will have 2 half double crochets, and the next stitch will have 1 half double crochet (HDC) and 1 double crochet (DC).
- Mark this double crochet with a stitch marker (it is the longest part of the heart).
- Step 3:
- Continue making symmetrical stitches on the opposite side of the heart:
- 2 half double crochets, followed by 1 double crochet and 8 triple crochets.
- Skip the final stitch and slip stitch into the initial slip stitch to complete the heart.
- Fasten off and cut the yarn.
- Continue making symmetrical stitches on the opposite side of the heart:
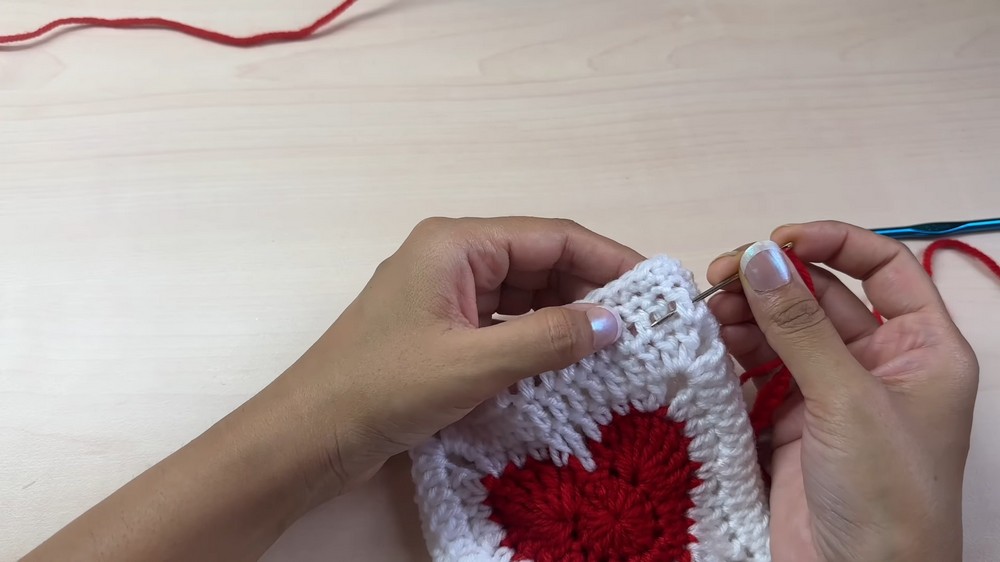
Adding the Border with White Yarn
- Attach white yarn to the stitch marked with the stitch marker (or the first double crochet at the longest part of the heart).
- Start with a chain 1 and make a single crochet (SC) in the same stitch.
- Follow the symmetrical border instructions:
- Work single crochets (SC), half double crochets (HDC), double crochets (DC), and triple crochets (TC) in specific stitches to define the granny square edge.
- For specific corners, create chain 3 spaces.
- Slip stitch at the end of the row to finish the border for the heart granny square.
Completing the Granny Square
- Begin the next round with chain 3. This acts as your first double crochet.
- Work double crochets in every stitch until reaching a chain 3 corner space.
- At corners (chain 3 space), crochet:
- 2 double crochets, chain 3, and 2 double crochets.
- Continue crocheting along edges until the entire square is completed.
- End the round with a slip stitch and fasten off. Weave in ends.

Joining the Granny Squares
- Create two identical granny squares following the steps above.
- Place the granny squares right sides facing each other (raised heart sides on the inside).
- Align edges and begin joining with single crochets using white yarn.
- At corners, make 3 single crochets into the chain spaces to ensure neat corners.
- Continue until three edges are joined. Leave the top edge open for the pouch opening.
Adding Length to the Pouch
- Turn the pouch inside out (right sides facing outward).
- Continue crocheting along the top edge to add height to the pouch:
- Start with a chain 3, then make double crochets into each stitch around.
- Join with a slip stitch at the end of the round.
- Add single crochets (SC) for finishing rounds.
- Fasten off and weave in all ends.
Creating the Drawstring
- Use red yarn and make a long chain (approximately 56 chains, or adjust to your desired pouch opening).
- Leave a long tail at both ends of the chain for sewing later.
- Using a yarn needle, weave the drawstring through the top edge of the pouch.
- Go in and out around stitches where the pouch rim meets the granny square.
Adding Mini Hearts to the Drawstring
- For each heart:
- Create a magic circle using red yarn.
- Chain 3, then work 3 triple crochets (TC).
- Add 3 double crochets (DC), chain 1, and make 1 triple crochet (TC) into the magic circle.
- Continue with:
- 3 double crochets (DC) and 3 triple crochets (TC).
- End with a chain 3 and slip stitch into the magic circle.
- Close the circle and weave in ends.
- Attach mini hearts to both ends of the drawstring using the extra long tails.
Final Touches
- Tie knots or bows in the drawstring ends near the mini hearts for decoration.
- Your crochet heart granny square pouch is now complete!