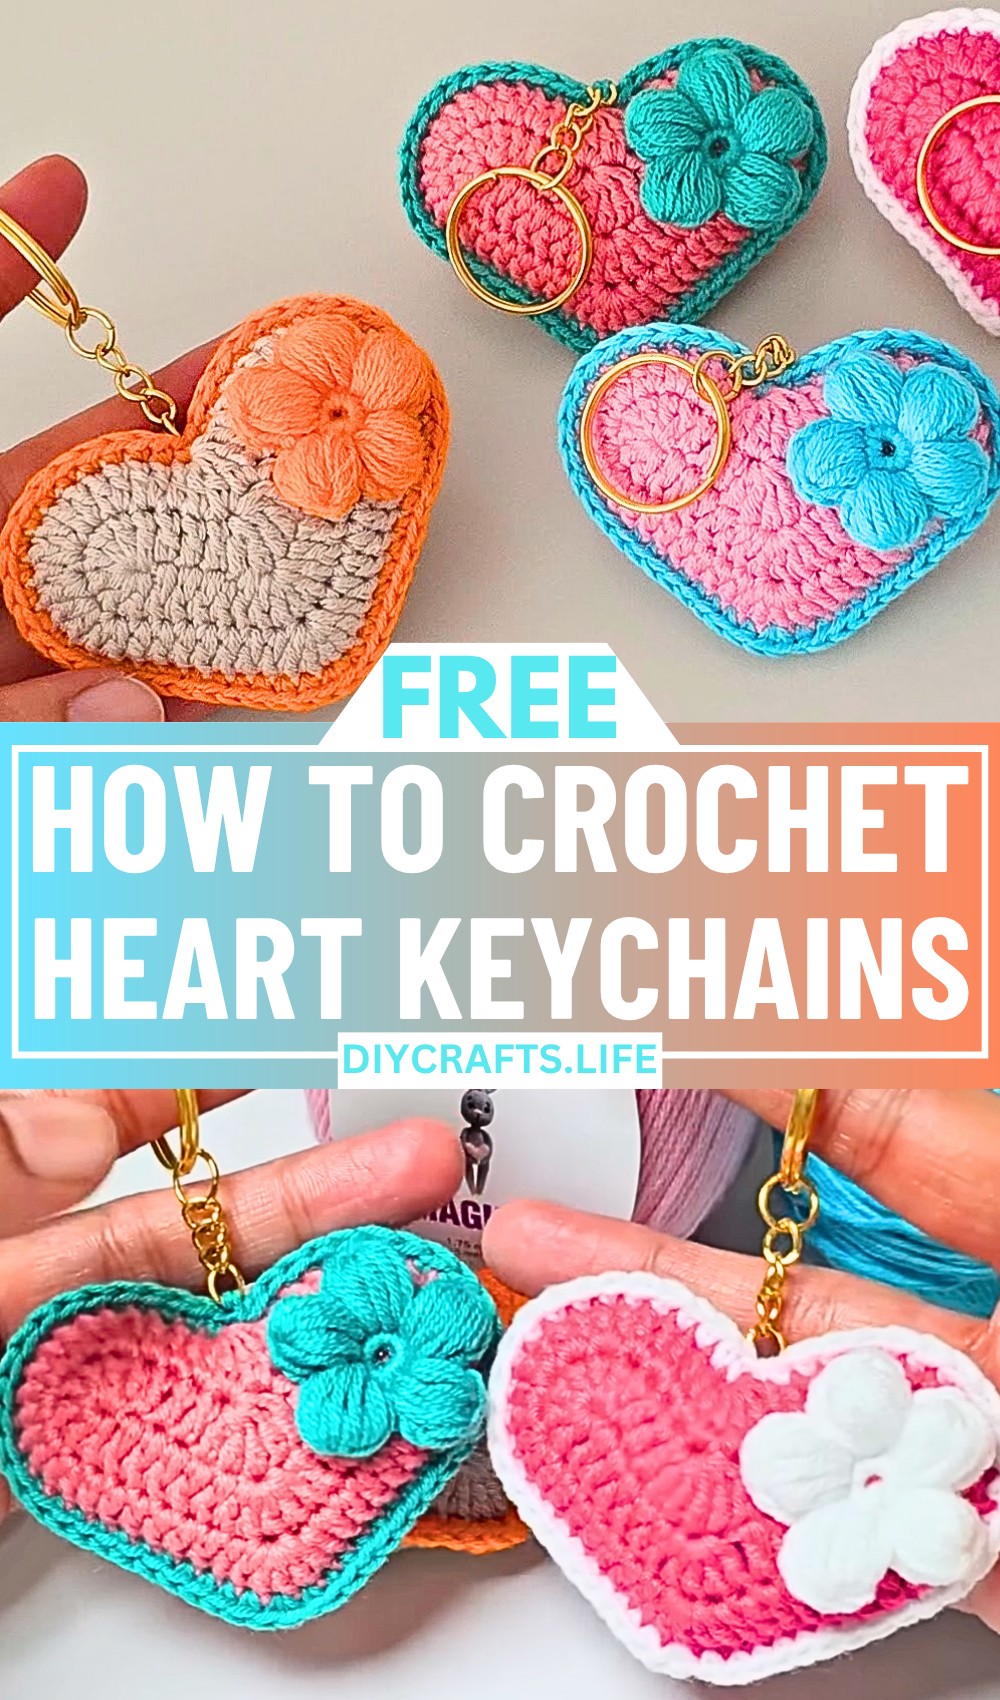
Create vibrant crochet heart keychains that are both stylish and functional! This quick and easy project showcases a lovely amigurumi design. Whether as gifts or charming accessories, their handmade touch, customizable colors, and adaptable sizes make them perfect for any occasion.

These heart-shaped keychains are durable, lightweight, and uniquely appealing. Made with soft Himalaya Himagurumi Cotton yarn and stuffed with fiberfill, they're plump yet sturdy. Attach them to keys, backpacks, or purses to reflect a touch of handmade love in your everyday items.
Crochet Heart Keychains
From crafting 3D heart shapes to joining pieces and adding puff flowers, this tutorial breaks every step down. Beginners can confidently master stitches like double crochet and single crochet, creating sturdy yet adorable designs for these lovely accessories.
Credit Crochet Craftsman
Materials and Preparation
For this project, you'll need the following materials:
- Yarn: Himalaya Himagurumi Cotton yarn (soft and durable, comes in vibrant colors).
- Crochet Hook: 2.50-millimeter hook for good stitch definition.
- Fiberfill: For stuffing the heart.
- Keychain clip: To turn your project into a functional keychain.
- Yarn needle: To weave in ends and attach the keychain clip.
- Scissors: For cutting yarn.
Yarn Weight Requirements: Use lightweight cotton yarn for best results.

Abbreviations and Notes
Here are the crochet abbreviations used in this project:
- CH: Chain
- SC: Single Crochet
- DC: Double Crochet
- HDC: Half Double Crochet
- Slip Stitch: Insert the hook, yarn over, and pull through both loops on the hook.
Important Notes & Tips:
- You can personalize the heart keychain with your favorite color combos or adjust its size based on your needs.
- Heart keychains look best in vibrant colors or contrasting shades for added charm.
- Keep stitches even and tension consistent to avoid irregular shapes.
Gauge, Approximate Size, and Pattern Notes
Gauge: This project is forgiving in terms of gauge, but maintaining even tension is essential. No swatch is required.
Finished Size: Approximately 3 inches wide, perfect for a keychain, though you can adjust with thicker yarn or a larger hook.
Special Techniques:
- Magic Ring: Used to create the puff flower embellishment.
- Decreases at specific points create the curves of the heart shape.
- Invisible join adds a professional touch to the project’s finish.
Step-by-Step Pattern
Step 1: Row 1 – Creating the Heart Base
- Start with a slip knot and chain 16 stitches (CH 16).
- Skip the first 3 chains, and into the 4th chain, make 6 double crochet stitches (DC). Including the initial chains, this gives 7 DC in the first space.
- Work 1 DC into each of the next 3 chains.
- In the next chain space:
- Start with 1 half double crochet (HDC).
- Perform a decrease by pulling through all 6 loops on the hook.
- Work 1 DC into the next 3 chains.
- In the last chain space, make 7 DC stitches.

Step 2: Row 2 – Shaping the Heart
- Turn your work. Work 1 DC in each of the first 5 stitches.
- Locate the 3rd stitch from the decrease in Row 1, and make 5 DC in that stitch to form the bottom point of the heart.
- Continue with 1 DC into each stitch across.
- At the end of the row, join with a Slip Stitch into the top of the first chain.
Step 3: Row 3 – Adding Definition
- Chain 3 (CH 3) – this counts as the first DC.
- In the same stitch, make another DC (increase).
- Work 2 DC in each of the next 6 stitches, forming the first curve.
- Make a decrease similar to Row 1, pulling through 6 loops for a smooth curve.
- Work 2 DC in the next 7 stitches for the second curve.
- Finish with 5 DC in the 3rd stitch from the decrease to enhance the heart shape.
- Slip stitch to join to the first stitch. Fasten off and leave a long tail.

Step 4: Make a Second Heart Piece
Repeat Steps 1 to 3 to create an identical second heart piece.
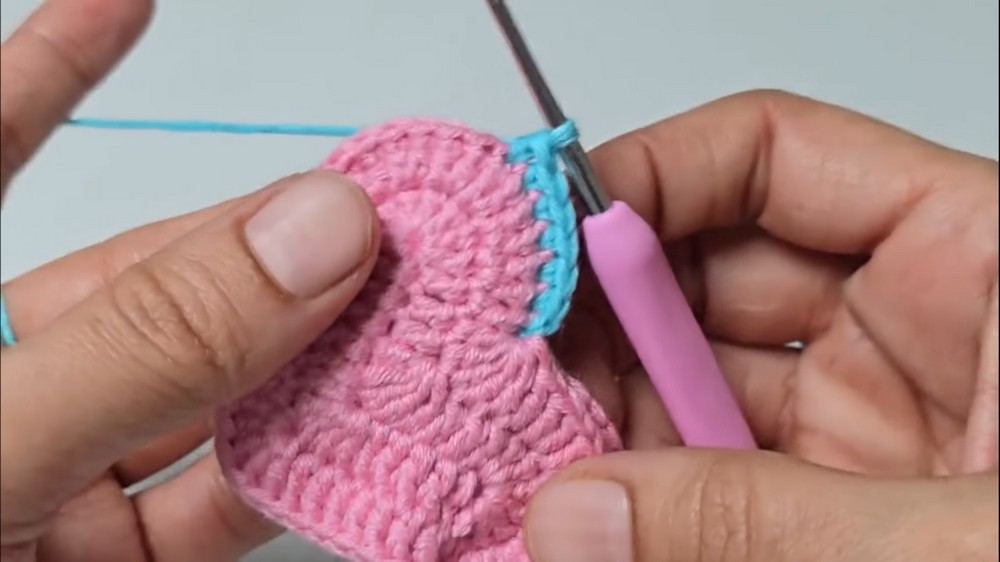
Step 5: Joining the Hearts and Stuffing
- Place the two heart pieces together with the wrong sides facing.
- Using contrasting yarn, start joining by single crocheting (SC) around the edge.
- Leave a small gap at the top for stuffing.
- Stuff with fiberfill, gently shaping as you go.
- Close the gap with SC and fasten off with a long tail. Use an invisible join for a clean finish.
Step 6: Adding the Keychain Clip
- Thread the long tail through the loop of the keychain clip.
- Secure the clip by sewing or weaving the yarn through the heart.
- Tie a knot for extra security and trim excess yarn.
Step 7: Adding the Puff Flower Embellishment
- Create a Magic Ring and chain 1.
- Into the ring, make 10 SC stitches and join with a slip stitch.
- Chain 2, then pull up 3 loops in the same stitch.
- Move to the next stitch, pull up 3 more loops, yarn over, and pull through all loops for the puff stitch.
- Repeat this process for a total of 5 puff flowers.
- Fasten off the yarn and tighten the ring. Secure the flower to the heart using yarn or fabric glue.
You're Done!
Congratulations! You've completed your adorable Crochet Heart Keychain. These keychains make perfect gifts or whimsical accessories. Personalize with colors and embellishments for added flair.
Pattern Question
Question: How do I ensure my edges align when joining the heart pieces?
Answer: Match the top stitches of both heart pieces and check alignment as you single crochet around. Use a stitch marker to avoid gaps or misalignment during the joining process.
Conclusion
Crafting these crochet heart keychains brings joy and creativity to your routine. Personalize colors, sizes, and embellishments to make unique gifts or accessories. Share your creations, and let this project inspire your crochet journey further!