This crochet angel ornament brings elegance and charm to any setting. With its intricate design, it’s perfect for festive decor, gift-giving, or personal keepsakes. The lightweight ornament combines beauty with versatility, making it an ideal addition to holiday celebrations or everyday decor.

Angel ornaments are ideal for Christmas trees, mantels, or thoughtful handmade gifts. They are durable yet delicate in appearance, showcasing timeless appeal. Their small size and intricate design ensure usability for decor and personal touches that captivate admirers.
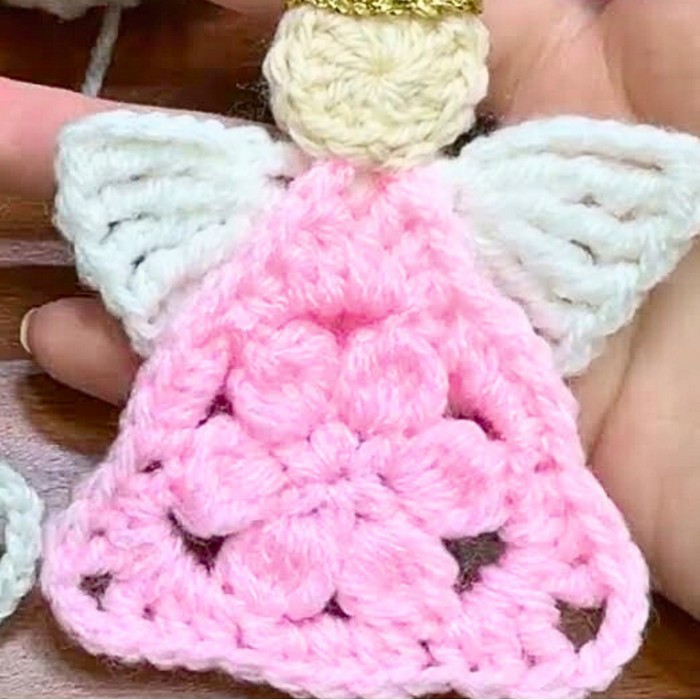
Crochet Angel Ornament
No matter your skill level, you can bring creative flair to this angel ornament. The pattern offers simple steps and opportunities for customization, from color choices to embellishments. Beginners and seasoned crocheters alike will enjoy this fun, rewarding process.
Credit Butterfly Craft
Materials and Preparation
Here’s everything you’ll need to crochet this angel ornament:
- Yarn: Light or sport-weight yarn (100g ~ 260m). Choose a soft or metallic yarn for a festive look.
- Crochet Hook: 3.0 mm / Size D crochet hook.
- Additional Tools: Scissors, yarn needle (for weaving in ends and sewing pieces together).
- Optional: Craft glue for attaching pieces (if not sewing).
Abbreviations and Notes
Below are the common crochet abbreviations used in this tutorial:
- CH: Chain
- SC: Single Crochet
- DC: Double Crochet
- TR: Treble Crochet
- DTR: Double Treble Crochet
- HDC: Half Double Crochet
- SL ST: Slip Stitch
- ST: Stitch
- Magic Circle: A looped foundation technique, also known as a "magic ring."
Important Notes:
- This pattern is divided into three main parts: the angel head, body, and wings, followed by a halo for decoration.
- Tip: Be sure to keep your stitches tight when making the pieces so the ornament holds its shape.
- Marking the beginning of your rounds can be helpful, especially for new crocheters.
Gauge, Approximate Size, and Pattern Notes
- Gauge: Gauge is not absolutely crucial for this pattern since it is a decorative item. Use the recommended hook and yarn, and ensure your tension is consistent.
- Finished Dimensions: Approx. 9 cm (3.5 inches) in height.
- Special Techniques: Magic Circle technique - If you’re new to this technique, consider practicing before starting.
- Gauge Swatch: Not required for this pattern.
Step-by-Step Pattern
We’ll create the angel in three main sections: Head, Wings, and Body. Then, we’ll assemble them and finish with a halo.
Part 1: Angel Head
- Create the Head Base:
- Make a Magic Circle. Chain 3.
- Work 13 DC into the circle. (14 stitches total, including the initial CH-3).
- Pull the circle tight and fasten off.
- Repeat:
- Work a second identical piece (as above) for the other side of the head.
Part 2: Angel Wings
- Begin the Wings:
- Join yarn into a DC stitch of the angel head. CH 4.
- Work 1 DC into the same stitch.
- Repeat 4 times: CH 1, then work 1 DC into the same stitch. (5 spaces created).
- Shape the Wings:
- Turn your work and CH 6.
- In the first space, crochet 4 DTR stitches.
- In the next space, work 3 DTR stitches, followed by 1 TR stitch in the same space.
- In the next space, work 1 DC stitch.
- In the following space, work 1 TR stitch, then 3 DTR stitches in the same space.
- In the last space, work 4 DTR stitches.
- Complete the Wings:
- CH 6 and SL ST into the same space.
- Fasten off.
Part 3: Angel Body
- Create the Body Base:
- Start with a Magic Circle. CH 1.
- Repeat 6 times: Work 1 HDC, CH 1. (6 spaces).
- Work into the spaces in the next rounds.
- Shape the Angel Body:
- SL ST into the first space, CH 3.
- In the same space, crochet 5 DC together. CH 5.
- Repeat 5 times: In the next space, work 5 DC together, CH 5.
- Pull the magic ring closed.
- Add Peaks to the Body:
- Work into the spaces once again:
- SL ST into the first space, CH 2.
- In the same space, work 3 HDC.
- In the next space, crochet: 1 HDC, 1 DC, 1 TR, CH 3, 1 TR, 1 DC, 1 HDC.
- Repeat this pattern two more times.
- Work into the spaces once again:
- Complete the Body:
- For the remaining spaces, crochet 4 HDC.
- In the next space, repeat the peak sequence: 1 HDC, 1 DC, 1 TR, CH 3, 1 TR, 1 DC, 1 HDC.
- Fasten off and weave in your ends.

Assembly
- Sew or Glue the Pieces Together:
- Position the angel body below the head. Attach them with a yarn needle (or glue if preferred).
- Attach the wings to the back of the head and body.
- Shape the ornament to ensure it sits evenly.
Part 4: Crochet Halo
- Make the Halo:
- Start with a slip knot. CH 16.
- SL ST into the first CH to create a loop.
- Fasten off and weave in the ends.
- Attach the Halo:
- Sew or glue the halo to the back of the angel’s head.
Finishing Touches
- Shape the angel gently and block it if needed for a polished appearance.
- Optional: Add a loop at the top of the head if you wish to hang it on your tree.
Pattern Question
Question: Can I adjust the size of the angel ornament?
Answer: Yes, you can alter the size by choosing a different yarn weight and hook size. Thicker yarn and a larger hook will make the ornament bigger, while finer yarn and a smaller hook will create a more delicate piece.
Conclusion
Whether for festive decor, meaningful gifts, or personal enjoyment, this crochet angel ornament provides exceptional versatility and charm. The easy-to-follow instructions and creative potential make this a worthwhile pattern for every crocheter.


