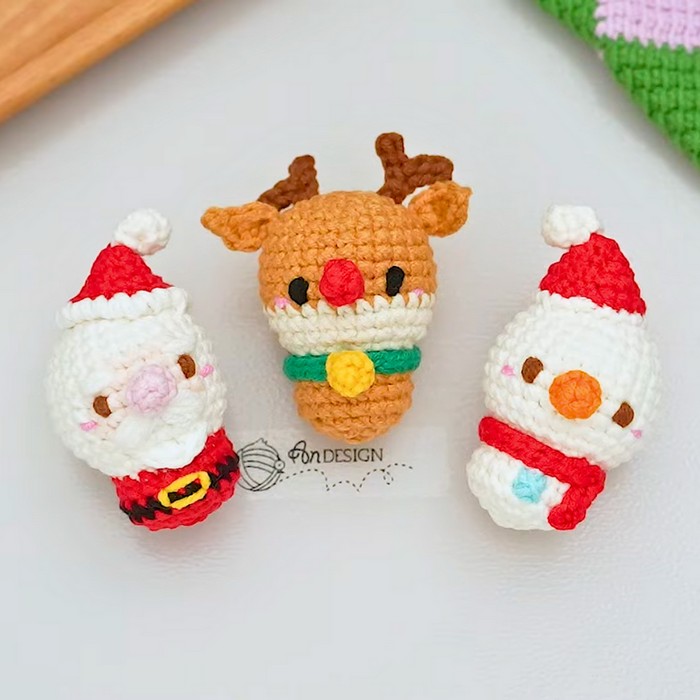
Bring holiday cheer to life with these crochet Christmas ornaments! Featuring a reindeer, Santa, and snowman made from one simple pattern, these handmade designs are ideal for tree décor or thoughtful gifting. Add a cozy, creative touch to your celebrations with this fun and versatile project.
These crochet ornaments combine functionality with festive appeal! Designed to be durable, they are ideal for decorating your Christmas tree or gifting. Each piece is customizable and compact, making them great for showcasing your creativity while enhancing your holiday decorations.
Crochet 3-in-1 ornaments
Perfect for all skill levels, this crochet project encourages creativity and personalization! Follow easy steps to craft these adorable ornaments, adapting colors and details to suit your style. Whether you're new to crochet or experienced, it's a joyful project with endless possibilities.
Credit AnDesign_Craft
Materials and Preparation
Required Materials:
- Yarn:
- 4-ply cotton yarn in multiple colors:
- Brown: for reindeer head/body
- Beige: for reindeer face
- Green: reindeer collar
- Red: Santa’s outfit/nose, snowman accessories
- White: Santa beard, snowman body
- Black: Santa's belt
- Yellow: Reindeer bell & Santa’s buckle
- Light pink: Embroidered cheeks
- Orange: Snowman nose
- 4-ply cotton yarn in multiple colors:
- Hook size: 3mm
- Stuffing tool: To shape the dolls properly using polyester fiber stuffing.
- Yarn needle: For sewing parts together and embroidering facial features.
- Scissors: For cutting yarn cleanly.
Yarn weight recommendations:
4-ply cotton yarn works best for these ornaments. It's sturdy, has a good stitch definition, and can hold the shape of the tiny parts well. Adjust hook size accordingly for different yarn weights.
Abbreviations and Notes
Crochet Abbreviations:
- MR: Magic Ring
- SC: Single Crochet
- DC: Double Crochet
- HDC: Half Double Crochet
- CH: Chain
- SS: Slip Stitch
- INC: Increase (Work two SC stitches in the same stitch)
- DEC: Decrease (Invisible decrease, working into front loops only of two stitches)
Pattern Notes:
- Each ornament shares the same base pattern for the head and body, with slight variations for colors and decorative details.
- Always begin a new round with a chain-1 and end the round with a slip stitch to keep the shape neat.
- Gauge swatch is not strictly necessary since these are small ornaments, but even tension is critical for uniformity.
- Key techniques: Working in back loops for edges and invisible decreases for shaping.
Gauge, Approximate Size, and Pattern Notes
Gauge:
Gauge is not critical for this project, but working with even tension is recommended to ensure uniformity.
Approximate Size:
Each ornament measures approximately 8–10 cm tall, perfect for hanging on a Christmas tree.
Pattern Notes & Special Techniques:
- Magic Ring Tutorial: Start each head/body with a magic ring for a neat, closed center. Ensure the tail is pulled securely to tighten the ring.
- Invisible Decrease: Insert hook into the front loops of two stitches, yarn under, pull through both loops, then yarn under again and pull through the last two loops. This creates a seamless decrease for shaping.
- Color Changes: Always switch colors when indicated in the pattern by completing the last pull-through with the new yarn color for clean transitions.
Step-by-Step Pattern
Base Pattern: Reindeer Head & Body
Head:
- Round 1:
- Using brown yarn, make a MR and crochet 6 SC into the ring. Pull the tail tight to close the ring.
- SS to the first stitch. CH 1 to start the next round.
- Round 2:
- Work 2 SC into each stitch (INC) around (12 stitches total). SS to close the round.
- Round 3:
- CH 1, crochet 1 SC followed by 1 INC across (18 stitches total). SS to close.
- Round 4:
- CH 1, work 2 SC followed by 1 INC across (24 stitches total). SS to close.
- Rounds 5–8:
- Work 1 SC in each stitch, maintaining the shape (24 stitches per round). SS at the end of each round.
- Rounds 9–10:
- Begin color changes:
- Use brown, work 7 SC.
- Switch to beige, crochet 13 SC for the face.
- Switch back to brown, work the last 7 SC. SS to close.
- Begin color changes:
- Round 11:
- Begin shaping the head with invisible decreases:
- Work 7 SC in brown, then switch to beige.
- Make 1 invisible DEC, 7 SC, another DEC, follow with 2 SC.
- Switch back to brown, work 5 SC and finish with a DEC.
- Begin shaping the head with invisible decreases:
- Round 12:
- Decrease more:
- Start with an invisible DEC and SC alternations in beige.
- Switch to brown to finish shaping. You’ll have 18 final stitches.
- Decrease more:
Body:
- Round 13:
- Work brown SC in the back loops only (18 stitches). This creates an edge between the head and body.
- Rounds 14–16:
- Continue with single crochets in every stitch. Maintain even tension.
Finishing:
- Stuff the head and body with polyester fiber, shaping carefully.
- Decrease stitches gradually until the hole is closed.
- Use a yarn needle to weave in ends through front loops of the remaining stitches and pull tight.
Details for Reindeer
- Collar:
- Using green yarn, chain 20 or adjust to fit around the neck. Work slip stitches along the back bumps of the chain.
- Horns:
- Chain 4 in dark brown yarn, then work tiny slip stitches to shape branches of the horn. Repeat for a second horn.
- Ears:
- Crochet small curved ears by chaining 4 and working SC increases.
- Nose:
- Use red yarn, make a small ball with 5 SC into a MR.
- Assembly:
- Attach parts (nose, horns, ears) securely with yarn. Embroider eyes and cheeks. Sew the collar and bell.
Details for Santa Claus
Follow the base pattern but switch yarn colors as indicated:
- Head: White and skin tone.
- Body: Red for outfit; black for belt; add yellow embroidered buckle.
- Embellishments: Crochet a beard into the loops from Round 11, assemble a triangle-shaped hat in red with fluffy white trim and pom-pom.
Details for Snowman
Use all white for the head and body.
- Accessories: Add orange yarn for the nose, red scarf (24 chains then slip stitches), and small blue embroidered buttons for decoration.
Final Assembly
Once all pieces are completed:
- Assemble each ornament carefully by sewing on the parts (nose, hat, ears, embellishments).
- Embroider cute details like eyes, cheeks, and accessories for finishing touches.
Conclusion
You’ve now created three charming Christmas ornaments: a reindeer, a Santa Claus, and a snowman! These handmade decorations bring warmth to your holiday season and make wonderful gifts. Happy crocheting!
Pattern Question:
Question: How can I adjust the sizes of the ornaments?
Answer: To adjust the sizes, simply alter the thickness of your yarn or the hook size. A larger hook and thicker yarn will create bigger ornaments, while finer yarn and smaller hooks will make them smaller.
Conclusion
Crafting these Crochet Christmas Ornaments is both fun and rewarding! Their festive charm, practical use, and customizability make them a great addition to any holiday décor or a thoughtful handmade gift. Celebrate the holidays with this cozy and creative project!


