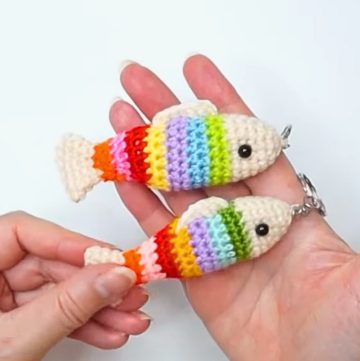
Step into the enchanting mysteries of the deep sea with this stunning crochet creation! This lantern fish isn't just a keychain—it's an artistic tribute to one of nature's most unusual and captivating creatures. With its quirky charm and unique details, this design is sure to catch anyone's eye and bring a little aquatic magic to your everyday accessories.

Crochet Deep Sea Lantern Fish Keychain
This crochet pattern brings the lantern fish to life with incredible craftsmanship and thoughtful design elements. From its detailed fins and tail to its glowing faux "lamp," every stitch has been thoughtfully crafted. The blend of textures and colors adds a vibrant pop, while its whimsical appearance makes it a conversation starter. Ideal as a gift, keychain, or decoration, this crochet creation showcases a bold personality while allowing you to express your artistic flair in a fun and approachable way.
Credit Crochet By Hui
Materials
- Yarn: Milk cotton yarn
- Hook size: 2.0 mm crochet hook
- Others: Thin wire (7 cm long), sewing needle, waste thread for marking

Step 1: Crochet the Main Body
- Round 1:
- Make a slip knot.
- Create 6 short stitches in a circular stitch to form the base.
- Round 2:
- Use the free thread for marking as you go.
- Make 6 groups: 1 short stitch + add 1 stitch.
- A total of 12 short stitches by the end of the round.
- Round 3:
- 1 short stitch, 1 stitch, and add 1 stitch. Repeat this pattern for 6 groups.
- You’ll have 18 short stitches in total.
- Round 4:
- 2 short stitches, add 1 stitch. Repeat across the round.
- Complete with 24 short stitches.
- Round 5:
- 3 short stitches, add 1 stitch. Repeat 6 times.
- End with 30 short stitches.
- Round 6:
- 4 short stitches, add 1 stitch. Repeat the pattern 6 times.
- You'll have 36 short stitches.
- Rounds 7-12:
- No increases—simply make 36 short stitches per round.
- Round 13:
- Decrease: 4 short stitches, decrease by 1 (short stitch together).
- End with 30 stitches.
- Round 14:
- Make 30 short stitches.
- Round 15:
- 9 short stitches, decrease by 1.
- Repeat for 6 sets. End with 24 stitches.
- Round 16:
- Create 24 stitches without increasing or decreasing.
- Round 17:
- 2 short stitches, decrease by 1.
- End with 18 stitches.
- Round 18:
- Simply make 18 short stitches.
- Round 19:
- 3 short stitches, decrease by 1. Repeat the sequence.
- You’ll end up with 12 stitches.
- Round 20:
- Crochet 12 stitches, then secure and close off the stitches.
- Leave enough thread for sewing.
- Stuff with filling, then sew it shut.

Step 2: Make the Side Fins and Tail
- Start the fin:
- Make 7 chain stitches with a slip knot.
- In the second-to-last stitch from the hook, insert and pick up the back loop to crochet.
- Make 6 short stitches for Row 1.
- Row 2:
- Chain one.
- Pick the inner half of the second stitch and make 5 short stitches.
- Repeat the same process for Row 3 and Row 4.
- Row 5:
- Chain 2.
- Pick the inner half of the penultimate stitch and work into it.
- Make 6 short stitches, then one more short stitch to finish the row.
- Cut the thread and leave a long end for sewing.
- Repeat these steps to create two more fins.
- You'll end up with one tail fin and two side fins.

Step 3: Crochet the “Lamp”
- Round 1:
- Create a circular base with 6 short stitches.
- Round 2:
- Add one short stitch into each previous stitch = 12 stitches.
- Rounds 3-15:
- Continue without changing the stitch count—this will create the lamp's "tube" shape.
- Round 16:
- 1 short stitch, then add 1 stitch. Repeat for 3 patterns = 9 stitches.
- Round 17:
- Make 9 short stitches, then fasten off with a slip stitch.
- Insert a 7 cm long thin wire inside for structure, then sew the lamp securely.

Step 4: Crochet the Mouth
- Row 1:
- Make a slip knot, then 19 chain stitches.
- Twist the fabric to pick the back loop of the chains.
- Work 18 short stitches back across the row.
- Row 2:
- Chain 1 and turn the work.
- Create 18 short stitches.
- Finish off the row, leaving enough yarn to sew.

Step 5: Create the Teeth
- Start by making the first tooth:
- Slip knot, then three chain stitches.
- Pick the back loop of the second stitch and make one pull stitch followed by one short stitch.
- Repeat the tooth pattern:
- 3 chain stitches > pull stitch > short stitch.
- Create 8 teeth in total.
- Fasten off and leave enough thread for sewing.
Step 6: Crochet the Whites of the Eyes
- Create a circular base with 6 short stitches.
- Slip stitch to finish the circle, then fasten off.
- You'll need 2 eye whites in total.

Step 7: Assemble the Lantern Fish
- Use the existing threads to sew all the pieces together:
- Attach the fins to the sides and the tail in the appropriate position.
- Sew the lamp to the top of the fish's head.
- Stitch the teeth around the crocheted mouth.
- Finally, attach the eyes.
Once everything is securely sewn together, the deep-sea lantern fish is complete!

Optional Finishes
- Add filling to parts of the body for a more 3D effect.
- Use embellishments, like fabric paint or small buttons, for finer details (e.g., pupils).
If you'd like more clarification or visuals, feel free to ask! 😊