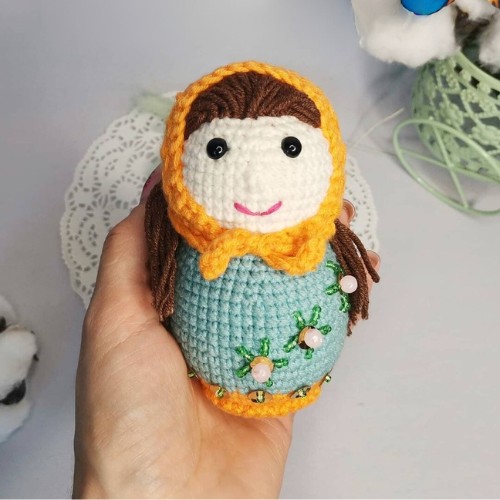
Inspired by the traditional Russian nesting doll, this crochet Matryoshka pattern infuses unique charm into craft collections. It spotlights a yellow headscarf and a blue body embellished with floral patterns, revealing the crocheter's meticulous attention to detail. Brown threads skillfully emulate hair, enhancing realism. This handmade item stands as a culturally rich masterpiece, harmoniously merging artistry with heritage, and captures the essence of traditional beauty through contemporary crocheting.
Materials:
1. Plush Yarn (100 G/ 120 M):
You Are Welcome To Use Any Color That You Like
- Head (No. 80303) ~ 16-20 G
- Edging - 10 G
- Dress-30 G
- Hairdress 12-30 G
- Shawl-11-15 G
2. Hook Size 3.5 Mm (Or Suitable Size For You)
3. Safety Eyes (I Have Size 10 Mm)
4. Polyester Toy Filling
5. Yarn Vita Coco (Or Analogue) For Decoration
6. Yarn Vita Cосо Розовая Для Рта
7. Needle With Wide Eye And Needle For Sewing Pieces
8. Scissors
9. Crochet Markers
10. Plastic Base To Make The Toy More Stable. I Have A Sculpting Board.
When Using These Materials, The Size Of The Finished Toy Is ~15-17 Cm, It Is Possible To Crochet With Semi-cotton Yarn, Crochet 2 Mm Height - 10-11 Cm. Work In A Spiral. Please note that The Size Of Your Toy Depends On Your Crocheting Density And The Size Of Your Hook. Body And Head Are Crocheted As One Piece.
Abbreviations:
- Mr - Magic Ring
- Ch-chain Stitch
- Sc - Single Crochet
- Sl St - Slip Stitch
- Inc - Increase
- Dec - Decrease
- Hdc - half Double Crochet
- (Sc, Inc) *n - Repeat Instruction In Brackets N Times
- 2 Dc Cluster - Crochet 2 Dc In One Stitch With A Common Top
- Blo-back Loop Only
- Flo-front Loop Only
Step By Step Pattern
Head-body:

Begin crocheting from the body.
- 1. 6 sc in MR(6)
- 2. 6 inc (12)
- 3. (sc, inc)*6 (18)
- 4. (2 sc, inc)*6 (24)
- 5. (3 sc, inc)*6 (30)
- 6. BLO 30 sc (30)
- 7. (4 sc, inc)*6 (36)
- 8.36 sc (36)
Change color
- 9.36 sc (36)
- 10. (5 sc, inc)*6 (42)
- 11-12. 42 sc (42)
- 13. (6 sc, inc)*6 (48)
- 14-17.48 sc (48)
- 18. (6 sc, dec)*6 (42)
- 19. 42 sc (42)
- 20. (5 sc, dec)*6 (36)
- 21.36 sc (36)
- 22. (4 sc, dec)*6 (30)
- 23.30 sc (30)
Start crocheting the head.
- 24. (4 sc, inc)*6 (36)
- 25. (5 sc, inc)*6 (42)
- 26-28.42 sc (42)
- 29.21 sc, 2 dc cluster, 20 sc (42)
- 30-31. 42 sc (42)
- 32. (5 sc, dec)*6 (36)
- 33. (4 sc, dec)*6 (30)
Insert safety eyes between rounds 31-32. Distance between them - 8 sts.
- 34. (3 sc, dec)*6 (24)
- 35. (2 sc, dec) 6 (18)
- 36. (sc, dec)*6 (12) 37.6 dec
Fasten off, cut the yarn and weave in the yarn ends. Attach the thread to Rnd 6 and crochet through front loops: 30 reverse sc. If you do want to do the edging with reverse sc, then strengthen the bottom with a piece of plastic. I have a sculpting board.
Face Decoration:
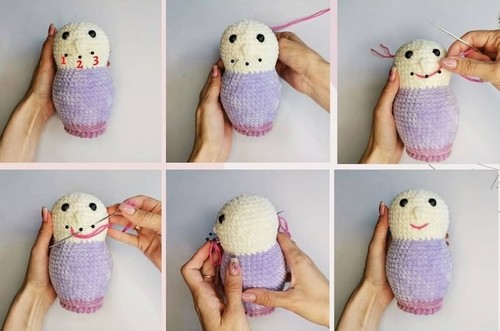
Let's make a smile. Mark the smile with pins. Insert the needle at the back of the head and exit it through point 1, insert at point 3, exit through point 2. Again, insert at point 2, making a stitch, to secure the thread. Remove the needle from the back of the head, tighten and make a knot. Hide the thread.
Hair Wig:
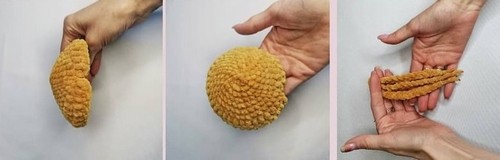
1st option
- 1. 6 sc in MR(6)
- 2. 6 inc (12)
- 3. (sc, inc)*6 (18)
- 4. (2 sc, inc)*6 (24)
- 5. (3 sc, inc)*6 (30)
- 6. (4 sc, inc)*6 (36)
- 7.36 sc (36)
- 8. sc, 2 hdc, 30 dc, 2 hdc, sc, ch, turn (36)
- 9. Hdc, 34 dc, hdc (36)
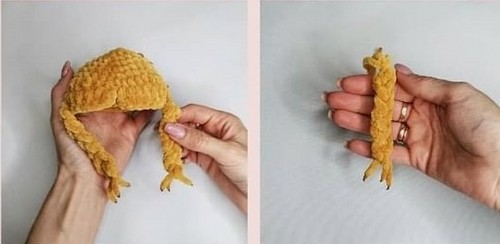
Fasten off, cut the yarn and weave in the yarn ends. Make braids. 3 chains from 15ch. Then braid it and sew to the 7th stitch from the bang.
2nd option:
- 1. 6 sc in MR(6)
- 2. 6 inc (12)
- 3. (sc, inc)*6 (18)
- 4. (2 sc, inc)*6 (24)
- 5. (3 sc, inc)*6 (30)
Then make strands in a circle.
- 6. (sc, 16 ch, from the second chain on the hook: 15 sc)*16, sc, 13 reverse sc
Fasten off, cut the yarn and weave in the yarn ends. You can make tails.
3rd option: (not suitable for semi-cotton yarn)

- 1. 15 ch + ch1, from the second chain on the hook: 15 sc, turn (15) Then crochet BLO.
- 2. skip 1 stitch, 14 sc, ch1, turn (14)
- 3. 15 sc, turn (15)
- 4. skip 1 stitch, 14 sc, ch1, turn (14)
- 5. 15 sc, turn (15)
- 6. skip 1 stitch, 14 sc, ch1, turn (14)
- 7. 15 sc, turn (15)
- 8. skip 1 stitch, 14 sc, ch1, turn (14)
- 9. 15 sc, turn(15)
- 10. skip 1 stitch, 14 sc, ch1, turn (14)
- 11. 15 sc, turn (15)
- 12. skip 1 stitch, 14 sc, ch1, turn (14)
- 13. 15 sc, turn (15)
- 14. skip 1 stitch, 14 sc, ch1, turn (14)
- 15. 15 sc, turn (15)
- 16. skip 1 stitch, 14 sc, ch1, turn (14)
- 17. 15 sc, turn (15)
- 18. skip 1 stitch, 14 sc, ch1, turn (14)
- 19. 15 sc, turn (15)
- 20. skip 1 stitch, 14 sc, ch1, turn (14)
- 21. 15 sc, turn (15)
- 22. skip 1 stitch, 14 sc, ch1, turn (14)
- 23. 15 sc, turn (15)
- 24. skip 1 stitch, 14 sc, ch1, turn (14)
- 25. 15 sc, turn (15)
- 26. skip 1 stitch, 5 sc, ch1, turn (5)
- 27. 6 sc, turn (6)
- 28. skip 1 stitch, 5 sc, ch1, turnt (5)
- 29. 6 sc, turn (6)
- 30. skip 1 stitch, 5 sc, ch1, turn (5)
- 31. 6 sc, turn (6)
- 32. skip 1 stitch, 5 sc, ch1, turn (5)
- 33. 6 sc, turn (6)
Sew together. Pull the thread between the loops and tighten the ring.
Shawl:
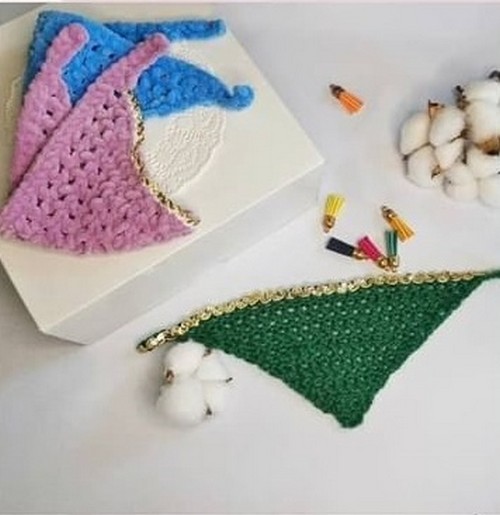
- 1. 4 ch, (hdc, ch, hdc) in the first chain, turn
- 2. 4 ch, in the first stitch: hdc, ch, (hdc, ch, hdc) in one stitch, turn
- 3. 4 ch, in the first stitch: (hdc, ch)*3, (hdc, ch, hdc) in one stitch, turn
- 4. 4 ch, in the first stitch: (hdc, ch)*5, (hdc, ch, hdc) in one stitch, turn
- 5. 4 ch, in the first stitch: (hdc, ch)*7, (hdc, ch, hdc) in one stitch, turn
- 6. 4 ch, in the first stitch: (hdc, ch)*9, (hdc, ch, hdc) in one stitch, turn
- 7. 4 ch, in the first stitch: (hdc, ch)*11, (hdc, ch, hdc) in one stitch, turn
- 8. 4 ch, in the first stitch: (hdc, ch)*13, (hdc, ch, hdc) in one stitch, turn
- 9. 4 ch, in the first stitch: (hdc, ch)*15, (hdc, ch, hdc) in one stitch, turn
- 10. 4 ch, in the first stitch: (hdc, ch)*17, (hdc, ch, hdc) in one stitch, 6 ch, turn
- 11. 4 ch, in the first stitch: (hdc, ch)*19, (hdc, ch, hdc) in one stitch, 6 ch, turn
- 12. start in the second chain from the hook 5 sc, 42 sc, 6 ch, start in the second chain from the hook: 5 sc.
If the shawl is small, then you can add 1 more row.
Fasten off, cut the yarn and weave in the yarn ends.
Decorate the shawl as you like.
Assembly And Decoration:
Sew on the hair. Sew the shawl in front only. Decorate the dress the way you like.You can use ribbons, beads, or seed beads. All those that your imagination is rich in.

Designer: Konyshevatoys On Instagram


