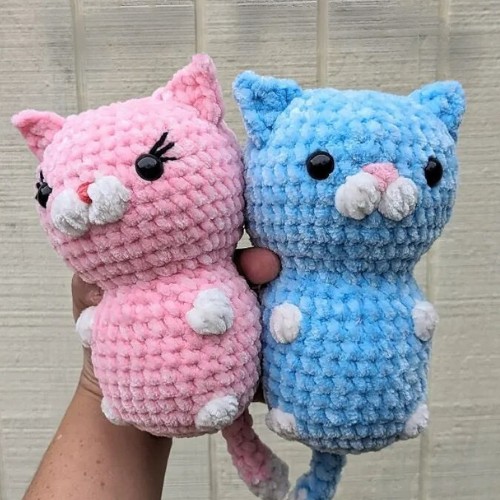
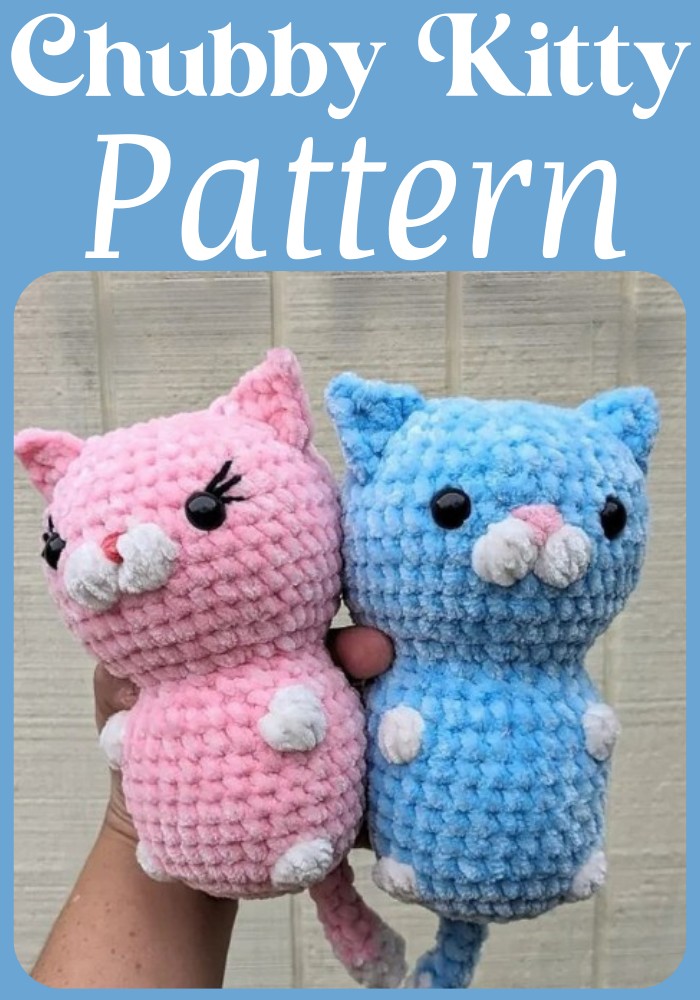
Bring the cuteness and chubbiness of a cat into your space with this Crochet No-sew Chubby Kitty Pattern. This pattern showcases two adorable kitties, one in pink and one in blue, designed to capture the heart of any cat lover. With white spots to represent their small legs, hands, and mouth, plus expressive eyebrows on their eyes, these kitties come to life. Their cute tails add the final touch, making them irresistibly huggable. Ideal for gifting or decorating, these crochet kitties are the perfect addition to any room, inviting smiles and adding a cozy, playful vibe.
Can I customize the colors on the Crochet Chubby Kitty Pattern?
Yes, you can choose any color yarn to personalize your chubby kitties to match your decor or preferences.
Materials:
- 4.5mm Hook #5 Bulky Weight Chenille Yarn
- White For Paws And Face
- Pink For Nose
- Color Of Choice For Body
- Black For Eyelashes (Optional)
- Poly-fil Stuffing
- 12mm Safety Eyes
- Yarn Needle
- Stitch Markers
Abbreviations:
- Rnd-round
- Mr- Magic Ring
- Sl St-slip Stitch
- Sc- Single Crochet
- Hdc- Half Double Crochet
- Dc- Double Crochet
- Inc- Increase
- Dec- Decrease
- Ch-chain
- St/sts- Stitch/stitches
- Fo- Fasten Off
- Bo- Bobble Stitch
- Cc- Color Change
special notes:
- This pattern is written in US terminology, using continuous rounds unless otherwise noted. I recommend using a stitch marker to mark the first stitch of each round.
- When making the body of the kitty, the bobble stitches will be done in white. These color changes will be bolded and in [brackets].
- Due to variations in tension and yarn. weights, you may need to adjust where you place your bobble stitches in Rnds 11 and 20. In Rnd 11, the bobble stitches should line up with the bobble stitches in Rnd 5. In Rnd 20, the bobble stitches should be centered between the bobble stitches in Rnd 11.
Step By Step Pattern
Tail:
Begin with white yarn
- Rnd 1: 4 sc in MR (4)
- Rnd 2: (sc, inc) x2 (6)
- Rnd 3: sc around (6)
CC to body color
- Rnd 4: sc around (6)
- Rnd 5: (sc, dec) x2 (4)
Rnds 6-10: sc around (4) [5 rounds]
- Rnd 11: ch 1, pinch tail opening closed to line up the top stitches, insert hook through both sides and sc opposite sides together for 2 sc
Fo and set aside.
Body:
- Begin in body color.
- Rnd 1: 8 sc in mr (8)
- Rnd 2: inc around (16)
- Rnd 3: (sc, inc) x8 (24
- Rnd 4: (3 sc, inc) x6 (30)
You will attach the tail at the end of the next round.Rnd 5: 8 sc, [bo], 8 sc, [bo], 10 sc, 2 sc through the tail and the body together (30)
- Rnd 6-10: sc around (36) [5 rounds] See Special Notes for notes on
- Rnd 11. Rnd 11: 9 sc, [bo], 8 sc, [bo], 11 sc (30) Rnd 12: sc around (30)
- Rnd 13: (sc, dec) x10 (20) Begin stuffing firmly as you go.
- Rnd 14: sc around (20)
- Rnd 15: (sc, inc) x10 (30)
- Rnd 16: (2 sc, inc) x10 (40)
- Rnd 17-19: sc around (40) [3 rounds] See Special Notes for notes on Rnd 20.
- Rnd 20: 18 sc, [bo, sc, bo], 19 sc (40)
- Rnd 21-23: sc around (40) [3 rounds]
- Rnd 24: (3 sc, dec) x8 (32) Insert safety eyes between Rnds 21 and 22, about 6 stitches apart and about 1 st outside of the bobble stitches in Rnd 20. (Optional: Embroider eyelashes before inserting safety eyes.)
With pink yarn, embroider a nose between the 2 bobble stitches on Rnd 20.
- Rnd 25: (2 sc, dec) x8 (24)
- Rnd 26: (2 sc, dec) x6 (18)
- Rnd 27: (sc, dec) x6 (12) Finish stuffing.
- Rnd 28: dec around (6) Fo and sew closed.
Ears:
The following stitches will be done across Rnds 24-26, in a total of 3 stitches set of stitches in parentheses will be completed in the same stitch. The next slide includes photos of how to complete the ears.
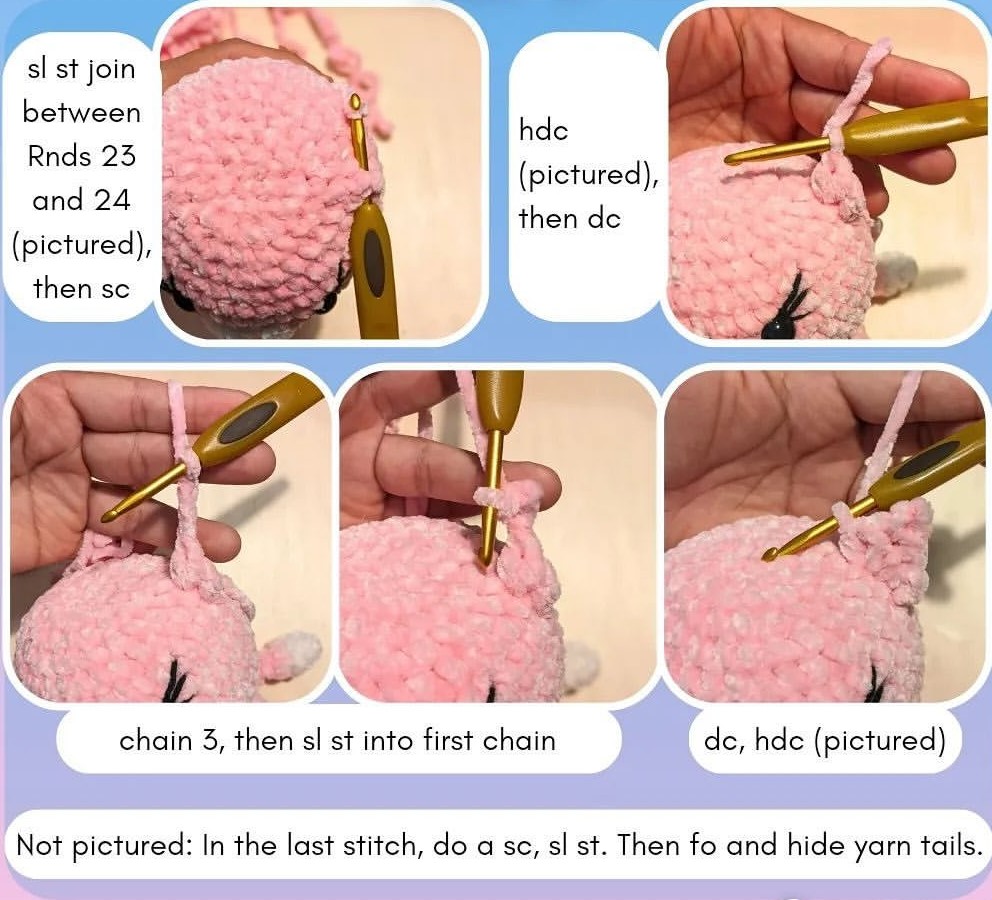
- For the right ear: Insert your hook horizontally between Rnds 23 and 24 approximately 6 sts from the eyes, then do the following: (sl st join, sc), (hdc, dc, ch 3, sl st into the 1st ch, dc, hdc), (sc, sl st)
- For the left ear: Insert your hook horizontally between Rnds 26 and 27 across from the right ear, and repeat the same process. Fo and hide yarn tails.
Designer: Knottyknat On Instagram


