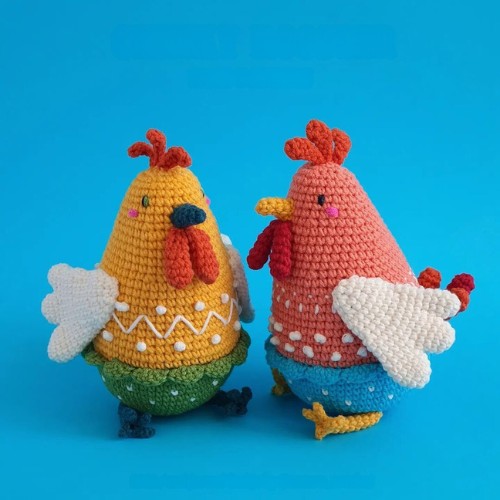
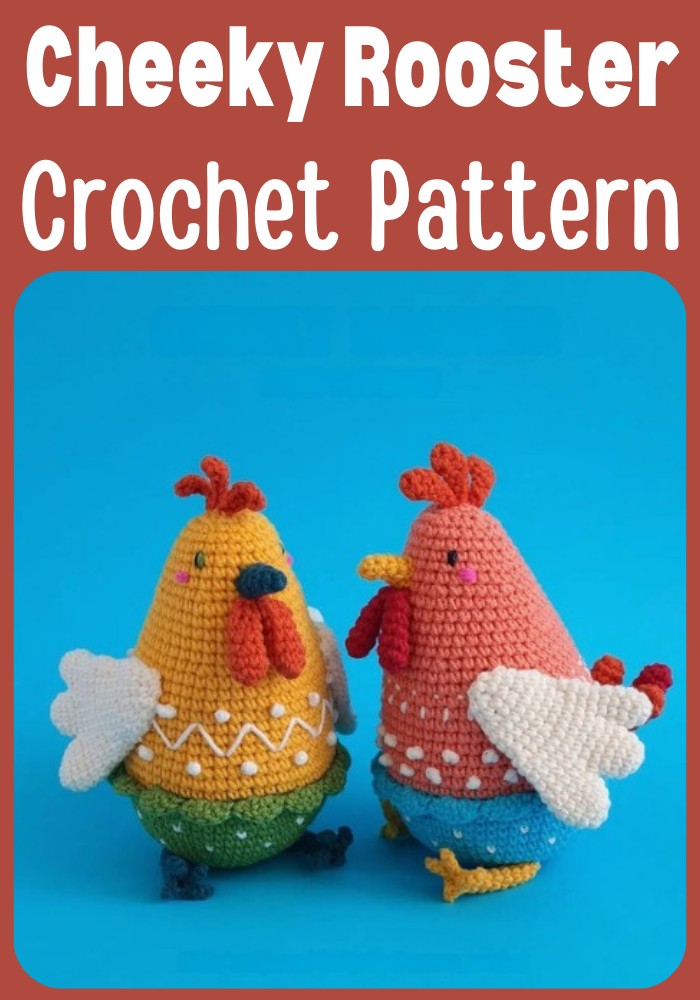
It's just amazing how these cute crochet rooster amigurumi look in gradient colours like brown, yellow, blue, green, white, and black. These handmade crochet roosters are ready to add extra decor elements to your room with their creative design. Both amigurumis features charming white wings and cute red filaments, making them perfect as adorable companions or unique decorative accents in any space.
Abbreviations:
- MR - magic ring;
- ch - chain;
- st - stitch;
- sc - single crochet;
- dc - double crochet;
- inc - increase;
- dec - decrease;
- sl st - slip stitch;
- FLO-front loops only;
- BLO - back loops only;
- (n) -- number of stitches in round.
Skill level:
- ** Size: approx. 14 cm tall if made with similar yarn.
You Will Need:
- yarn (GAZZAL JEANS or any other yarn 70-185 m/50 g, cotton/acrylic);
- 2,0 mm crochet hook; sewing and tapestry needles;
- toy stuffing (fiberfill);
- stitch marker;
- scraps of yarn in different colors for embroidery (you may want to use embroidery thread);
- pins;
- fiberfill for stuffing.
Step By Step pattern
Head And Body:
Start in blue.
- 1: 6 sc in a MR [6]
- 2: inc in all 6 st [12]
- 3: (sc, inc) x 6 [18]
- 4: sc, (inc, 2 sc) x 5, inc, sc [24]
- 5: (3 sc, inc) x 6 [30]
- 6: 2 sc, (inc, 4 sc) x 5, inc, 2 sc [36]
- 7: (5 sc, inc) x 6 [42]
- 8:3 sc, (inc, 6 sc) x 5, inc, 3 sc [48]
- 9: (7 sc, inc) x 6 [54]
- 10: 4 sc, (inc, 8 sc) x 5, inc, 4 sc [60]
- 11: working with alternating yarns,(1 sc in off-white, 5 sc in blue) x 10 [60]
- 12: sc in each st around in blue [60]
- 13: working with alternating yarns, 3 sc in blue,(1 sc in off-white, 5 sc in blue) x 9,1 sc in off-white, 2 sc in blue [60]
- 14: sc in each st around in blue [60]
- 15: working with alternating yarns,(1 sc in off-white, 5 sc in blue) x 10 [60], cut the off-white yarn
- 16: sc in each st around [60]
Stuff your work and continue stuffing as you go. Change to coral. Don't cut the blue yarn, leave it hanging on the outside.
- 17: working BLO, sc in each st around [60]
- 18: sc in each st around [60]
- 19: 4 sc, (dec, 8 sc) x 5, dec, 4 sc [54]
- 20-21: sc in each st around [54]
- 22: (6 sc, dec) x 3, 30 sc [51]
- 23-24: sc in each st around [51]
- 25: (6 sc, dec) x 3, 27 sc [48]
- 26-27: sc in each st around [48]
- 28: 3 sc, (dec, 6 sc) x 5, dec, 3 sc [42]
- 29: sc in each st around [42]
- 30: (5 sc, dec) x 3, 21 sc [39]
- 31: sc in each st around [39]
- 32: (4 sc, dec) x 3, 21 sc [36]
- 33: sc in each st around [36]
- 34: 2 sc, (dec, 4 sc) x 5, dec, 2 sc [30]
- 35: sc in each st around [30]
- If you use safety eyes, insert them between rounds 36 and 37.
The distance between the eyes should be approx. 8 stitches.A water-soluble marker or sewing pins will come in handy to map out the position on the eyes first. If you have chosen to make embroidering or gluing the eye, just skip this step.
- 36: (3 sc, dec) x 3, 15 sc [27]
- 37: sc in each st around [27]
- 38: (2 sc, dec) x 3, 15 sc [24]
- 39: sc in each st around [24]
- 40: sc, (dec, 2 sc) x 5, dec, sc [18]
- 41: (sc, dec) x 6 [12]
- 42: 6 dec [6]
Fasten off leaving a tail about 10 cm long and cut the yarn. Using a tapestry needle, weave the yarn tail through the front loops of each of the six stitches and pull tight to close. Weave in the end.Go back to round 16 of the body. Crochet the frill on pants using blue yarn.
1: working FLO (1sl st, skip 1 st, 5 dc in the same st, skip 1 st, sl st) x 14, skip 1 st, 5 dc in the same st, skip 1 st, sl st in first st of round 1
Fasten off, cut the yarn, weave the end in between the stitches.
Wings:(make 2)
- In off-white. Don't stuff. First, to make the wing, you need to crochet three parts, which will be then joined together.
Part 1:
- 1: 8 sc in a MR [8]
- 2-3: sc in each st around [8]
Finish it with a slip stitch and
then an invisible finish, cut the yarn, weave the end in between the stitches.
Part 2
- 1: 8 sc in a MR [8]
- 2: (3 sc, inc) x 2 [10]
- 3-4: sc in each st around [10]
Finish it with a slip stitch and then an invisible finish, cut the yarn, weave the end in between the stitches.
Part 3:
- 1: 8 sc in a MR [8]
- 2: (sc, inc) x 4 [12]
- 3-4: sc in each st around [12] Don't fasten off, as you will now join the parts together.
- 5: working on Part 3, 6 sc; join Part 2 with a sc, 4 more sc along Part 2; join Part 1 with a sc, 7 more sc along Part 1, 5 sc along Part 2, 6 sc along Part 3. Now the parts are joined and you have 30 sc in the round [30]
- 6: (3 sc, dec) x 6 [24]
- 7-9: (3 rounds) sc in each st around [24]
- 10: sc, (dec, 2 sc) x 5, dec, sc [18]
- 11-13: (3 rounds) sc in each st around [18]
- 14: (sc, dec) x 6 [12]
- 15: sc in each st around [12]
- 16: (2 sc, dec) x 3 [9]
- 17: (1 sc, dec) x 3 [6]
Fasten off leaving a tail about 10 cm long and cut the yarn. Using a tapestry needle, weave the yarn tail through the front loops of each of the six stitches and pull tight to close. Weave in the end.
Legs: (make 2)
In yellow. Don't stuff.
- 1: 6 sc in a MR [6]
- 2-9: (8 rounds) sc in each st around [6]
- 10: sl st, (chain 4, in second ch from the hook, sl st in next 3 ch, sl st in next 1 st) x 3, sl st in next 1 st, chain 2, in second ch from the hook, sl st in next ch, sl st in next st Fasten off and weave in the yarn end.
Comb:
In Orange.(Chain 7. Crochet from the third chain from the hook. 3 dc in the same st, 1 hdc, 1 sc, 2 sl st) x 3
Fasten off, leaving a tail about 10 cm long for sewing and cut the yarn.
WATTLE (make 2)In red. Don't stuff.
- 1: 8 sc in a MR [8]
- 2-3: sc in each st around [8]
- 4: dec, 6 sc [7]
- 5: sc in each st around [7]
- 6: dec, 5 sc [6]
Flatten your work and crochet through both layers. Last row: skip 1 sc, 2 sc [2]
Fasten off, leaving a tail about 10 cm long for sewing and cut the yarn.
Tail:
Part 1 (make 2)
In orange. Don't stuff.
- 1: 8 sc in a MR [8]
- 2-3: sc in each st around [8]
- 4: dec, 6 sc [7]
- 5: sc in each st around [7] 6: dec, 5 sc [6]
Flatten your work and crochet through both layers.
Last row: skip 1 sc, 2 sc [2]
Fasten off, leaving a tail about 10 cm long for sewing and cut the yarn.
Part 2:
In red. Don't stuff.
- 1: 8 sc in a MR [8]
- 2-3: sc in each st around [8]
- 4: dec, 6 sc [7]
- 5-6: sc in each st around [7]
- 7: dec, 5 sc [6]
- 8: sc in each st around [6] Flatten your work and crochet through both layers.
Last row: skip 1 sc, 2 sc [2]
Fasten off, leaving a tail about 10 cm long for sewing and cut the yarn.
Beak:
In yellow. Don't stuff.
- 1:4 sc in a MR [4]
- 2: inc, 3 sc [5]
- 3: inc, 4 sc [6]
- 4: inc, 5 sc [7]
- 5: inc, 6 sc [8]
Fasten off, leaving a tail about 10 cm long for sewing and cut the yarn.
Assembly Finishing Touches:
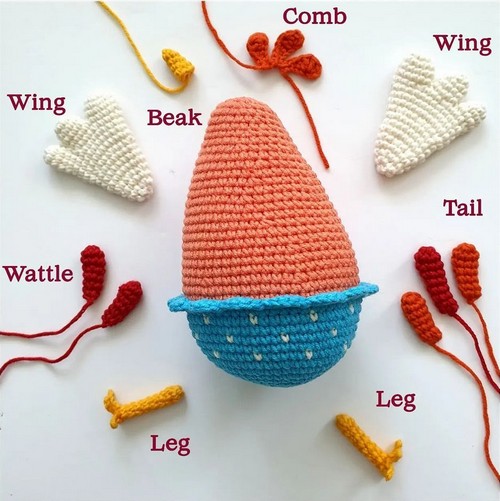
- Sew the beak between rounds 33 and 37 of the head and body, in the center of the face.
- Sew the wattle under the beak.
- Sew the tail to the back of the body.
- Sew the comb to the top of the body.
- Using scraps of yarn in matching color, sew wings and legs as you like, or as shown in the pictures below.
- Embroider cheeks under the eyes with pink yarn.
Designer: Natura_crochet On Instagram


