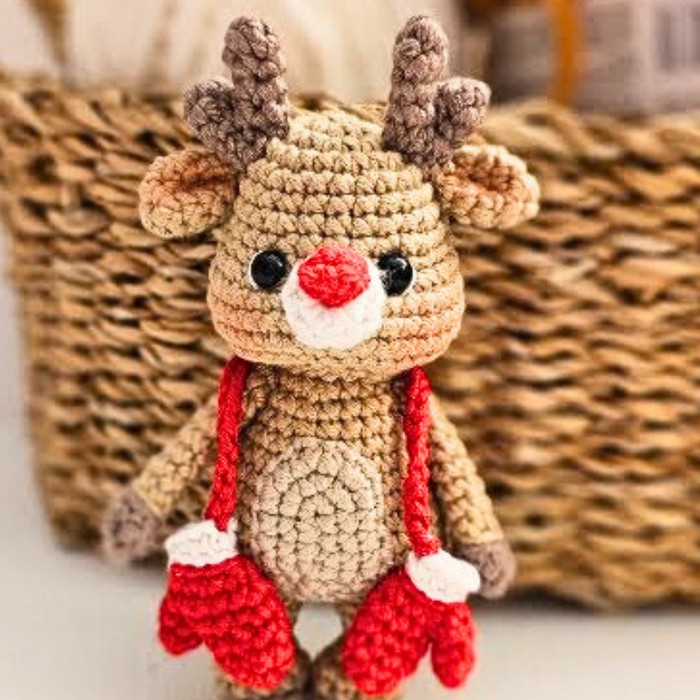
Express your creativity with this charming crochet reindeer design! Complete with adorable mittens, safety eyes, and detailed antlers, this project is ideal for the holiday season or as a lovable gift. Made with DK-weight yarn and easy techniques, it's perfect for cozy craft sessions with endless creative possibilities.

This crochet reindeer is a versatile creation that serves as a cute addition to festive decor, a unique gift, or even a child's soft toy. With sturdy single crochets, the design ensures durability. Features like lightweight DK yarn, detailed antlers, and safety eyes make it appealing, functional, and easily customizable for any holiday theme.
Crochet Cute Reindeer
Crafting the reindeer combines basic skills like magic rings, single crochets, slip stitching, and color changes. The step-by-step instructions ensure a smooth process, and adding personalized touches, such as embroidered eyes or different yarn weights, adds flexibility. Beginners and experts alike can create this playful design with ease.
Credit The Kindness Company
Materials and Preparation
Materials Needed:
To make your Crochet Reindeer, you'll need the following:
- Yarn:
- DK weight yarn (or any comparable weight)
- Approximate yardage:
- 21g Beige (Head and body)
- 1.5g Mastic (Belly)
- 3.5g Red (Nose)
- 2g White (Details around eyes and mittens)
- 4g Light brown (Horns and other accents)
- Hook:
- 3mm crochet hook
- Alternatively, you can use a larger hook size (e.g., 4mm) with worsted weight yarn, but you will need to adjust the yardage and use larger safety eyes.
- Other Materials:
- 7mm safety eyes (or larger, depending on yarn size)
- Yarn Needle (for sewing pieces together and weaving in ends)
- Stitch markers (to mark the first stitch in each round)
- Embroidery floss (black for details such as the nose or additional face elements)
- Stuffing
Abbreviations and Notes
Crochet Abbreviations:
- MR = Magic Ring
- CH = Chain Stitch
- SC = Single Crochet
- Dec = Decrease (Single Crochet Decrease in front loops)
- Inc = Increase (2 SC in the same stitch)
- Sl St = Slip Stitch
Pattern Notes:
- Skill Level: Intermediate crochet; basic knowledge of amigurumi techniques is recommended.
- Most of the pattern is worked in continuous rounds unless otherwise stated, so it’s essential to mark the first stitch of each round with a stitch marker.
- The Magic Ring technique is used to start multiple parts of the pattern, including the head, body, horns, and other small features. Practice this technique if unfamiliar before starting.
- Safety precaution: If creating this for babies or pets, consider using embroidery instead of safety eyes.
- Customizing size: You can use thicker yarn or a larger hook to make a larger Reindeer, but ensure you use appropriately sized safety eyes and adjust the stuffing quantity accordingly.
Gauge, Approximate Size, and Pattern Notes
Gauge:
Gauge is not critical for this project. However, it is essential to maintain uniform tension throughout the work to ensure proper proportions.
Finished Measurements:
- Height: Approx. 6–7 inches when worked with DK-weight yarn and a 3mm hook. Size will vary depending on yarn and hook size.
Techniques Used:
- Magic Ring
- Working in the back loops (BL)
- Single crochet increases and decreases
- Sewing pieces together
- Adding details using embroidery and sewing
Step-by-Step Pattern
Part 1: The Head
- Foundation (Magic Ring and Round 1):
- Create a Magic Ring using Beige yarn.
- Work 8 SC into the ring, pull the tail tight to close the round. Place a stitch marker in the first stitch to mark the beginning of the round.
- Round 2: Work 1 Inc in every stitch around (16 SC total).
- Round 3: Alternating pattern of SC, Inc all the way around (24 SC total).
- Rounds 4–9: Work 1 SC in every stitch for these six rounds (no increases).
- Round 10: Alternate 1 SC, 1 Inc around (36 SC total).
- Rounds 11–13: Work 1 SC in every stitch.
- Place Safety Eyes:
- Between Rounds 8 and 9, spaced 3 stitches apart, centered between the increases from Round 9 for proper alignment.
- Snap the safety backing onto the eyes.
- Round 14:
- Alternate SC, Dec (front loops only) all the way around (24 SC total).
- Round 15:
- Alternate 2 SC, Dec for six repetitions (18 SC total).
- Fasten off head; leave a 24-inch tail for sewing later. Stuff the head.
Part 2: The Mouth and Nose
- Mouth:
- Using White yarn, create a Magic Ring.
- Round 1: Work 10 SC into the ring.
- Round 2: Work 1 SC in every stitch (10 SC total).
- Round 3: Alternate SC, Dec (8 SC total).
- Fasten off and leave an 18-inch tail for sewing. Stuff lightly.
- Nose:
- Using Red yarn, create a Magic Ring.
- Round 1: Work 5 SC into the ring.
- Slip stitch to the first stitch, fasten off, and leave a tail for sewing.
- Attach Mouth and Nose:
- Position the red nose on the top center of the white mouth and sew into place.
- Stuff the back of the mouth lightly and sew onto the head below the eyes, centering it.

Part 3: The Horns
- Large Horn (Light Brown Yarn):
- Create a Magic Ring.
- Round 1: Work 5 SC into the ring.
- Rounds 2–3: Work 1 SC in every stitch (5 SC per round).
- Fasten off and weave in ends.
- Small Horn (Light Brown Yarn):
- Create a Magic Ring.
- Round 1: Work 5 SC into the ring.
- Round 2: Work 1 SC in every stitch (5 SC total).
- Fasten off.
- Attach Horns:
- Use round 3 of the Large Horn to join the Small Horn on top. Sew securely.
- Attach the combined horns to the top of the reindeer’s head in the desired position.
Part 4: The Body
- Legs
- Begin both legs separately using a Magic Ring with white yarn.
- Follow the instructions for rounds until round 7 (alternating SC and Inc).
- For the right leg, continue directly to round 8. For the left leg, fasten off with a tail.
- Attach both legs using Chain 2, then crochet around both legs to form the belly and continue with the body.
- Body
- Continue working in Beige yarn.
- Follow the crochet pattern for rounds 11–23, alternating SCs with decreases to gradually shape the torso. Stuff as you go to maintain the correct shape.
Part 5: The Arms and Belly
- Arms: Create two. Start and repeat similar techniques (using white and beige yarn) for rounds 1–11. Stuff lightly and leave tails. Sew them to the body.
- Belly: Chain 5 stitches with Mastic yarn, and crochet rows for a rounded belly piece. Sew the belly onto the front-center of the body.
Part 6: Finishing Touches
- Attach Head to Body:
- Position the head securely on top of the body. Use the tails to carefully sew around the circumference. Pull tight and weave in ends inside the body.
- Position and Attach Details:
- Attach the ears and horns symmetrically to the top of the head. Ensure the larger horn is on the inner side of the forehead and the smaller horn slightly on the outside.
- Sew the arms to both sides of the upper torso, angling them slightly outward.
- Add Eye Shines:
- Using white yarn, stitch small details around the safety eyes to give the reindeer a cute expression. Follow instructions for wrapping and securing the yarn around the eyes with surface knots.
Pattern Question:
Question: Can I make the reindeer using a different yarn or hook size?
Answer: Absolutely! While the tutorial uses DK yarn and a 3mm hook, feel free to adjust. Using larger yarn requires a bigger hook and more yardage. Just ensure your safety eyes are proportional to your final reindeer size.
Conclusion:
This tutorial inspires and guides crafters to create a lovable crochet reindeer that blends festive charm with handmade warmth. With straightforward techniques and thoughtful details like mittens and antlers, this pattern is a joy to make and share during the holiday season


