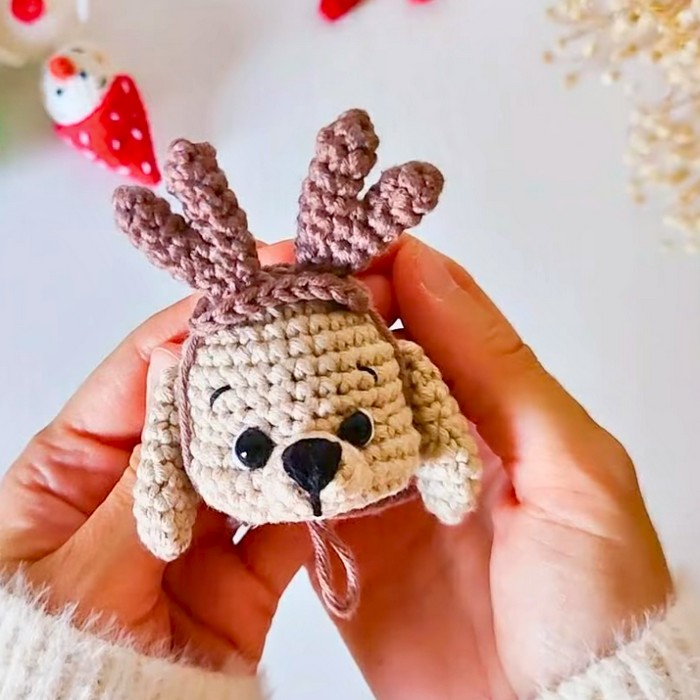
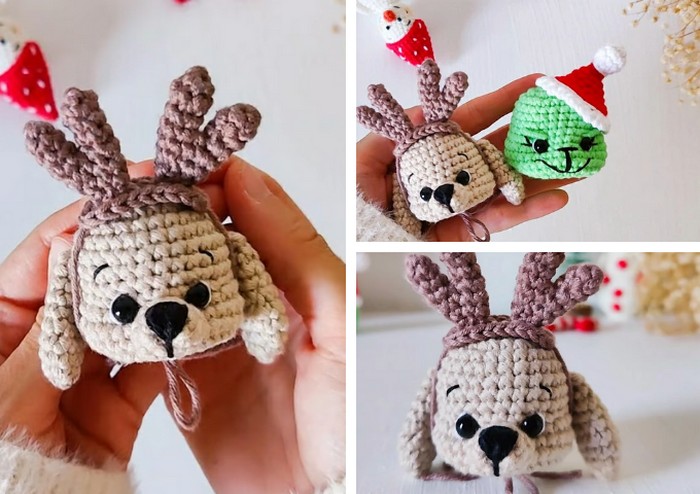
Create a delightful Crochet Dog with Reindeer Ears Christmas Ornament that brings festive cheer to any holiday setting. Featuring cute antlers, floppy ears, and a bow-tied band, this adorable design doubles as a unique holiday decoration or thoughtful gift. With customizable features, it’s a fun and versatile craft to make for loved ones of all ages!

This Crochet Dog with Reindeer Ears is a perfect keepsake or seasonal decor item. Made with DK or worsted-weight yarn, safety eyes, and sturdy stitches, it’s both playful and durable. Adorable antlers, embroidered facial details, and festive embellishments make this ornament charming and practical for Christmas celebrations.
Crochet Dog With Reindeer Ears Christmas Ornament
With a 3mm or 4mm hook, this project is achievable for beginners and experienced crocheters alike. You’ll stitch creative details like ears, antlers, and a cheerful bowtie using magic rings, single crochets, and structured increases/decreases. The step-by-step guidance ensures an enjoyable and rewarding crafting experience.
Credit The Kindness Company
Materials and Preparation
Materials
- Yarn:
- DK weight yarn (or comparable weight yarn). Approximate yardage required:
- Beige yarn: 12g (Head, body, ears, and nose).
- Light brown yarn: 3g (Reindeer ears/band).
- Black embroidery floss or black yarn (for eyes and mouth details).
- White yarn (for eye shines).
- DK weight yarn (or comparable weight yarn). Approximate yardage required:
- Hook: 3mm crochet hook (or adjust to match your yarn).
- Optional: If using worsted weight yarn, use a 4mm hook. Adjust your safety eye size and yardage accordingly.
- Other Tools:
- Safety eyes: 7mm (or larger for heavier yarn).
- Yarn needle (for sewing parts together and weaving in ends).
- Stitch markers (to track the start of each round).
- Scissors.
- Polyester fiberfill stuffing.
- Straight pins (optional for positioning and pinning pieces before sewing).
Abbreviations and Notes
Crochet Abbreviations
- MR = Magic Ring
- CH = Chain Stitch
- SC = Single Crochet
- Inc = Increase (2 SC in one stitch)
- Dec = Decrease (single crochet decrease, worked into front loops only).
- Sl St = Slip Stitch
Pattern Notes:
- Skill Level: Intermediate; basic amigurumi techniques required.
- Most of the project is worked in continuous rounds unless specified otherwise (use stitch markers to keep track of the first stitch of each round).
- Magic Ring Technique: This is critical for starting the head, body, nose, horns, and ears. If you’re unfamiliar with the magic ring, refer to the detailed explanation and video tutorial.
- Safety precautions: If gifting to babies or pets, opt for embroidered eyes rather than safety eyes.
- You can use larger hooks and yarn for a bigger ornament, but adjust yarn yardage and stuffing accordingly.
- Remember to work over the tail of the magic ring for secure stitches.
Gauge, Approximate Size, and Pattern Notes
Gauge
- Gauge is not essential for this project, but ensure consistent tension for proper proportions.
Finished Measurements
- Height: 6–7 inches (when using DK-weight yarn and a 3mm hook). Size will vary based on the chosen hook and yarn weight.
Special Techniques
- Magic Ring.
- Working into front loops for decreases.
- Surface knots for finishing.
- Embroidering with yarn for facial details.
Step-by-Step Pattern
Part 1: Body and Head
- Round 1:
- Beige yarn: Create a Magic Ring. Work 8 SC into the ring. Pull the tail tightly to close.
- Round 2:
- Inc in each stitch around (16 SC).
- Round 3:
- Alternate SC, Inc around (24 SC).
- Round 4:
- Work 1 SC in each stitch (24 SC total).
- Round 5:
- (SC in next 5 stitches, Inc) x4 (28 SC total).
- Rounds 6–9:
- Work 1 SC in each stitch around (28 SC per round).
- Round 10:
- Work SC in next 9 stitches.
- Work Inc in next 3 stitches.
- Work SC in next 5 stitches.
- Work Inc in next 3 stitches.
- Work SC in remaining 8 stitches (38 SC total).
- Rounds 11–13:
- Work 1 SC in each stitch around (38 SC per round).
- Place Safety Eyes:
- Between Rounds 9 and 10, positioned about 3 stitches apart. Ensure alignment. Snap safety backings into place.
- Round 14:
- (SC, Dec) x11 (27 SC total).
- Round 15:
- (Dec) x11, SC (16 SC total).
- Stuff the head at this point using polyester fiberfill.
- Round 16:
- Work Dec in every stitch (8 SC total).
- Slip stitch to the next stitch and leave a long tail for sewing. Then pull and tighten the loop.
- Close the Head:
- Using the tail you reserved, thread your needle and sew the remaining stitches using front loops only. Pull tightly to close the hole and secure with a surface knot from the inside. Trim remaining ends and weave in.
Part 2: Nose and Face Details
- Nose:
- Use Beige yarn and create a Magic Ring. Work:
- Round 1: 5 SC into the ring.
- Round 2: Inc in every stitch (10 SC total).
- Round 3: Work 1 SC in each stitch (10 SC total).
- Slip stitch to the next stitch, leave a long tail for sewing, and fasten off.
- Use Beige yarn and create a Magic Ring. Work:
- Embroidery Details:
- Use black yarn to add nose details:
- Pull black yarn through the center of the magic ring and create a small triangle on top. Fill the triangle with stitches to create a solid shape.
- Add a small straight stitch underneath to represent the mouth.
- Attach the nose securely to the body under the safety eyes, ensuring it is centered. Use pins to prevent twisting and sew with the tail that was left for attachment.
- Use black yarn to add nose details:
- Add Eye Shines:
- Using white yarn, embroider small stitches above each safety eye for extra shine. Tie the yarn off at the back and weave in the remaining ends.
- Add Eyebrows:
- Using black yarn, create small straight stitches above each eye. Fix the threads carefully using surface knots and weave the tail into the inside of the head.
Part 3: Band
- Using Light Brown yarn, create a slip knot with a long tail. Chain 10 CH.
- Row 1: Work Inc in 2nd CH from the hook, then SC in next 7 stitches. In the last CH, work 3 SC.
- Row 2:
- Turn and work the other side of the chain. Work SC in next 8 stitches. Slip stitch to the first SC and leave a long tail. Fasten off.
Part 4: Reindeer Antlers
Small Horn
- Round 1:
- Create a Magic Ring and work 5 SC inside.
- Rounds 2–3:
- Work 1 SC in each stitch for two rounds. Fasten off and leave a short tail.
Big Horn
- Round 1:
- Create a Magic Ring and work 5 SC inside.
- Rounds 2–4:
- Work 1 SC in each stitch for three rounds.
Joining the Horns:
- Round 5 & 6:
- Join small and big horns together by directly working into their stitches. Start with the small horn and place SC stitches in the first horn to connect both completely.
- Continue working rounds as instructed to shape the horn.
Part 5: Ears
- Create two identical ears using Beige yarn:
- Round 1: Create a Magic Ring and work 6 SC inside.
- Round 2: (SC, Inc) x3 (9 SC total).
- Round 3: (SC in next 2 stitches, Inc) x3 (12 SC total).
- Round 4: Work 1 SC in each stitch.
- Round 5: (SC in next 2 stitches, Dec) x3 (9 SC total).
- Rounds 6–7: Work 1 SC in each stitch (9 SC total).
- Round 8: (SC, Dec) x3 (6 SC total).
- Round 9: Work 1 SC in each stitch, slip stitch in the next stitch and leave a long tail for sewing.
Assembly
- Attach Ears:
- Flatten the ears and sew them, with their tails, onto Round 6 of the head on both sides. Sew through both layers for a secure attachment. Tie a surface knot and weave ends into the head.
- Attach Horns:
- Using the band's antler tails, align and attach the antlers to both ends of the band, following the video tutorial. Sew securely onto the band and knot the tail below the head.
- Tie and Finish Band:
- Place the band with antlers on the top of the dog’s head. Using the long tails left from the band, tie it into a secure square knot at the bottom of the head. For a festive touch, tie the ends into a bow. Trim excess yarn tails.
Pattern Question:
Can I use larger yarn and a larger hook for this ornament?
Answer: Yes, but account for increased yardage and use larger safety eyes to keep proportions correct. Adjust details such as antlers and ears to achieve a balanced look.
Conclusion:
This Crochet Dog With Reindeer Ears is a festive addition to your holiday collection. Its adorable face, embroidered nose, and charming reindeer antlers make it a satisfying project to craft. Perfect for gifting, decorating, or cherishing, follow the straightforward tutorial to create your own spirited holiday helper!


