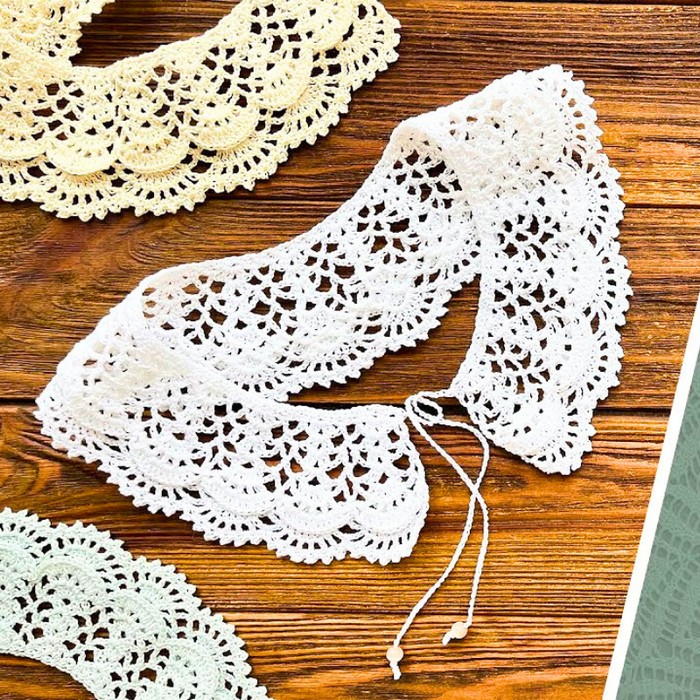
Crochet a lovely 2-layer collar that is both stylish and functional. Its elegant layered design and delicate details make it a versatile accessory, perfect for enhancing everyday outfits or adding charm to special occasion attire, all while staying lightweight and comfortable.

The 2-layer collar offers durability, a sophisticated aesthetic, and comfort. Perfect for enhancing casual or formal wear, it’s versatile and easy to pair. Crafted from resilient YarnArt Violet thread, this collar is lightweight yet strong, making it a timeless accessory for your wardrobe.
Crochet 2-layer Collar
This crochet project is suitable for crafters of all skill levels. With detailed instructions like chain-stitches (ch), single crochet (sc), and double crochet (dc), you can fully customize it. Adapt the size, color, and layering style to unleash your creativity and make something truly unique.
Credit Irina Tsokalo
Materials and Preparation
To create this elegant 2-layer collar, you will need:
- Yarn: YarnArt Violet (50g/282m) in the color Winter Sky. This is a lightweight cotton thread ideal for delicate projects.
- Crochet Hook: 1.25mm hook for precise stitches.
- Additional Tools: Scissors, stitch marker (optional), and a tapestry needle for weaving ends.
- Yarn Weight: This project uses a fine thread (#2 weight).
Preparation Tip: Ensure you have a clean, flat workspace for easy handling of fine thread. A good lighting setup will help make the intricate stitches easier to spot.
Abbreviations and Notes
Here are the key abbreviations used in the pattern:
- Ch: Chain
- SC: Single Crochet
- DC: Double Crochet
- Sl St: Slip Stitch
- Picot: A decorative stitch consisting of small chains, usually made as (Ch 3, Sl St into the first chain).
Notes:
- The pattern involves repeating rapports, which consist of small, structured stitch sequences.
- Ensure the number of rapports (pattern repeats) is divisible by 3 for symmetry.
- For clarity, always count stitches and chains carefully to avoid errors in alignment.
- Use a gauge swatch if needed to match your desired collar size.
Gauge, Approximate Size, and Pattern Notes
- Gauge: Not explicitly mentioned, but recommended to work closely to tight stitches for a neat appearance.
- Finished Size: Approximately 40cm collar circumference (54-repeats of stitch patterns).
- Special Techniques: Includes shell stitches (structured clusters of DCs), picots for decorative edging, and working in windows/chains.
Step-by-Step Pattern
Foundation/Base Layer
- Begin by creating 54 rapports (40cm):
- Make a knot or simple loop.
- Ch 3, then work 1 DC into the base loop.
- Repeat: Ch 3, 1 DC into the base, until your chain length reaches the necessary size divisible by 3.
Row 1: Shell Layer Setup
- Ch 5, turn your work.
- 1 SC under the 1st chain.
- Ch 1, work 2 DC under the next chain, followed by Ch 1, 2 DC under the same chain.
- Ch 1, 1 SC under the next chain.
- Ch 5, 1 SC under the next chain.
- Repeat the sequence for the entire row:
- [2 DC / Ch 1 / 2 DC] under the next chain, followed by Ch 1, 1 SC under the next chain, etc.

Row 2: Shell Layer Expansion
- Turn your work, Ch 2.
- 1 DC, then repeat 1 SC under the 1st chain, Ch 2, and work [2 DC / Ch 1 / 2 DC] into the shell spaces.
- Repeat the row pattern, alternating Ch 2, SC, and shell expansions until the layer is complete.
Row 3: Upper Layer Base
- Create shell spacing by working Ch 5, DCs into shells, and SC for structure:
- Ch 5, SC under the next chain, followed by the sequence of Ch 1, DC clusters (e.g., 6 DCs) within shell chains.
Decorative Edging: Picots
- To create the picot edge:
- For decorative finish, repeat (1 Picot, 1 SC) into designated stitches/windows for a neat collar edge.
Inner Collar Connection
- Ch 60, attach with SC into the inner loops/collar edge.
- Repeat a sequence of Ch 2 / SC, then secure and finish with Ch 60, cut the yarn.
Finishing Touches
After completing the two layers:
- Check the final structure to ensure symmetry.
- Weave in the loose ends with a tapestry needle.
- Block the collar lightly if needed (spray with water, shape, and let it dry flat).
Pattern Question:
Question: How can I adjust the collar size to fit perfectly?
Answer: Adjust the number of "rapports" in the pattern to suit your desired length. Ensure the total is a multiple of 3 for consistent results.
Conclusion
Crocheting this 2-layer collar is a delightful and rewarding experience! Its beauty, functionality, and endless ways to customize make it a worthwhile addition to your crochet projects. Enjoy creating a stylish, durable accessory that highlights your creative skills.


