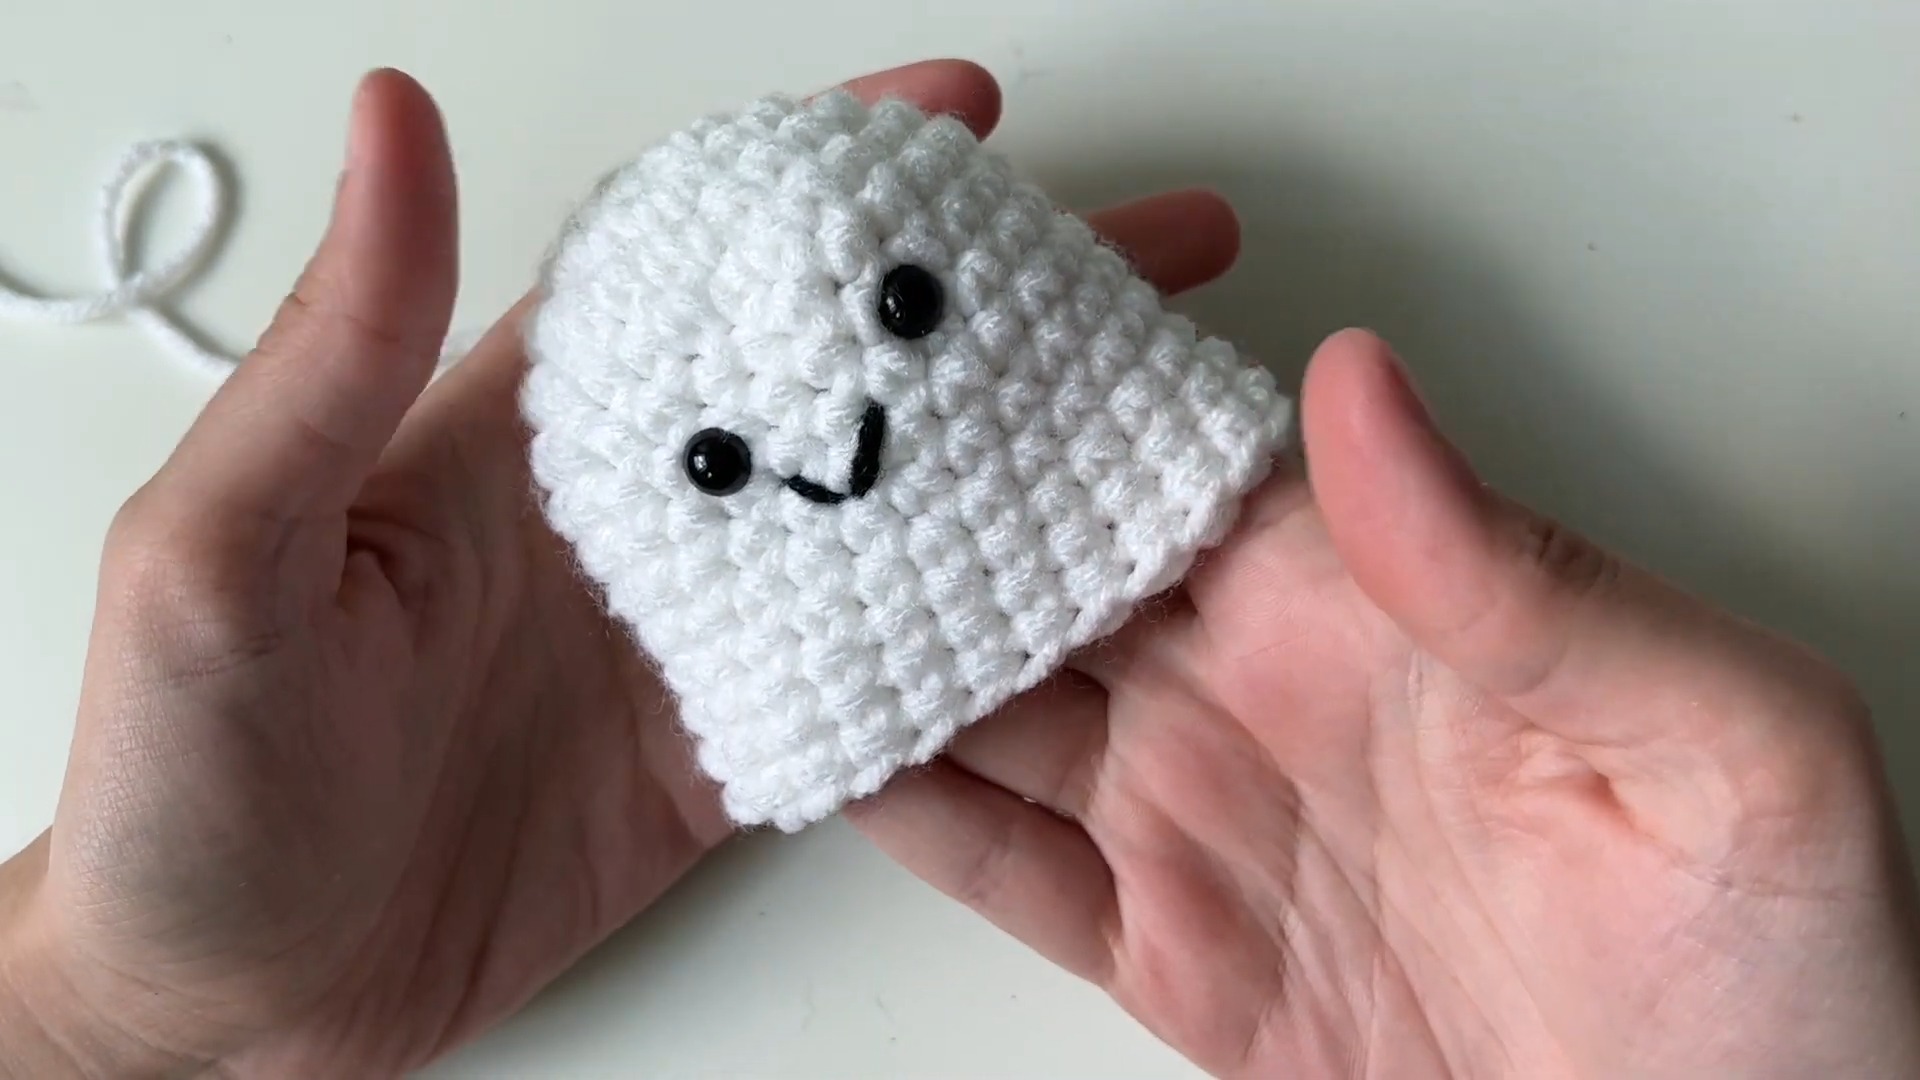
Make an adorable crochet ghost with this beginner-friendly tutorial! Perfect as a festive decoration, cute gift, or part of a crochet collection, this ghost is charming and versatile. Using simple materials and techniques, you'll create a handmade piece that’s fun and satisfying.

These crochet ghosts are durable, compact, and irresistibly charming. Use them as festive Halloween decorations, desk companions, or playful keepsakes. Their solid construction and thoughtful details, like safety eyes and customizable bows, make them both functional and adorable!
Crochet Ghost
Crafting this ghost is easy and enjoyable, even for complete beginners! With clear instructions, it can be customized with different colors, embellishments, and facial expressions. It’s the perfect project to spark creativity and build confidence in your crochet skills!
Materials and Preparation
To create these adorable crochet ghosts, you'll need the following materials:
- Yarn: Medium weight (Size 4) yarn in the following colors:
- White (for the body)
- Orange (for the bow)
- Black (for the smile)
- Crochet Hook: 5mm crochet hook
- Safety Eyes: 8mm safety eyes (with backs)
- Other Tools:
- Tapestry needle
- Scissors
- Stuffing (polyfill or fiberfill)
- Stitch markers
If you're using a crochet kit, ensure all necessary materials are included. If a hook isn't included, purchase a 5mm hook to get started.
Abbreviations and Notes
Abbreviations:
- MR – Magic Ring
- CH – Chain
- SC – Single Crochet
- HDC – Half Double Crochet
- INC – Increase (2 SC in the same stitch)
- ST – Stitch
- SL ST – Slip Stitch

Notes:
- Magic Ring Alternative: If the magic ring technique feels challenging, you can use the "chain 2" method to begin the project. Work the starting stitches into the second chain from the hook.
- Yarn Over (YO): Ensure each yarn over is smooth and consistent to maintain even tension.
- Move the stitch marker up at the end of each round to track progress.
- This tutorial is beginner-friendly—don't stress if your stitches don't look perfect at first!
- Safety Reminder: Safety eyes are small parts. This project is not recommended for children under 3 years old.
Gauge, Approximate Size, and Pattern Notes
Gauge:
Gauge is not crucial for this project due to its decorative nature. However, for reference: using the specified materials and hook size, you should achieve approximately 14 stitches by 16 rows for a 4x4 inch swatch in SC.
Finished Size:
The completed ghost will stand approximately 4-5 inches tall, depending on your tension.
Special Techniques:
- Magic Ring: Used to begin the ghost's head. Allows for a tight, seamless start.
- Working in the Round: The ghost is created in a continuous spiral, so be sure to use a stitch marker to keep track of each round.
Step-by-Step Pattern
Ghost Body (Head and Cylinder):
-
Round 1: Create a Magic Ring. Work 6 SC into the ring. (6 ST)
- Alternative: CH 2 and work 6 SC into the second chain from the hook.
- Pull the tail to close the ring. Use a stitch marker to mark the start of the next round.
-
Round 2: INC in each ST around. (12 ST)
-
Round 3: (SC, INC) around. Repeat the sequence 6 times. (18 ST)
-
Round 4: (SC, SC, INC) around. Repeat the sequence 6 times. (24 ST)
-
Rounds 5–13: SC in each ST around. (24 ST per round)
- Total of 9 rounds to build the height of the ghost. Use a tally sheet or notes app to track your progress.
-
Fasten off and leave a long tail if you prefer to sew the bottom later.

Add Details (Eyes and Smile):
-
Attach Safety Eyes:
- Place the eyes between Rounds 6 and 7, approximately 1-2 stitches apart.
- Do not secure with the backs yet—you’ll make adjustments after adding the smile.
-
Add a Smile:
- With black yarn, thread your tapestry needle and embroider the smile.
- Start from the back, bring the yarn through the front, and create a curve by anchoring at the midpoint (1 round below the straight line).
- Make small adjustments until the smile is even.
-
Secure the Eyes and Knot the Smile:
- Add the safety backs to the eyes (facing the correct direction).
- Secure all black yarn tails with a square knot inside the ghost and trim the excess.
Ghost Ruffles (Base of Ghost):
-
Attach yarn at the base of the ghost body (before the cylinder ends).
- Use the "front loop only" stitches from the last round of the body.
-
Follow the Ruffle Sequence:
- Skip 1 ST, work 5 HDC in the next ST, skip 1 ST, work 1 SC in the next ST.
- Repeat around until you've created ruffles all the way around.
-
Fasten off and weave in the yarn tail.

Ghost Base (Bottom Circle):
-
Create a Magic Ring, and work the following increases to form a flat disk:
- Round 1: 6 SC into the ring. (6 ST)
- Round 2: INC in each ST around. (12 ST)
- Round 3: (SC, INC) around. Repeat this sequence 6 times. (18 ST)
- Round 4: (SC, SC, INC) around. Repeat this sequence 6 times. (24 ST)
-
Fasten off the circle, leaving a long tail for sewing.
-
Align the circle with the bottom of the ghost and begin sewing it securely in place, leaving space to stuff the ghost.
-
Stuff the Ghost: Gently fill the ghost with small pieces of stuffing, ensuring even distribution and roundness.
-
Finish sewing the bottom circle closed, secure with a knot, and weave in any remaining tails.
Bow (Optional):
-
Bow Base:
- CH 6.
- Row 1: SC in the 2nd CH from hook and in the next 5 CH. (5 SC)
- Row 2-4: CH 1, turn, and SC across. (5 SC per row)
- Fasten off, leaving a long tail.
-
Wrap Bow Center:
- Use a long piece of black or orange yarn to wrap around the middle of the rectangle, shaping the bow.
- Secure with a square knot at the back.
-
Attach Bow:
- Sew the bow to the top of the ghost (hair bow) or under the face (bowtie).

Finishing the Ghost
- If any yarn tails remain, weave them into the ghost securely.
- Shape the ghost as desired, fluffing out the ruffles or adjusting the smile.
- Your ghost should now stand upright and look adorable!

Pattern Question
Question: Can I skip the magic circle if it seems too tricky?
Answer: Yes! You can use a simple slip knot and chain 2 method to start your ghost. Your final result may have a tiny hole, but you can sew it closed if desired.
Conclusion
Creating these crochet ghosts is a fun and rewarding experience. They’re versatile, easy to personalize, and make great seasonal decorations or gifts. Once you finish one, you’ll want to crochet a whole friendly ghost family!