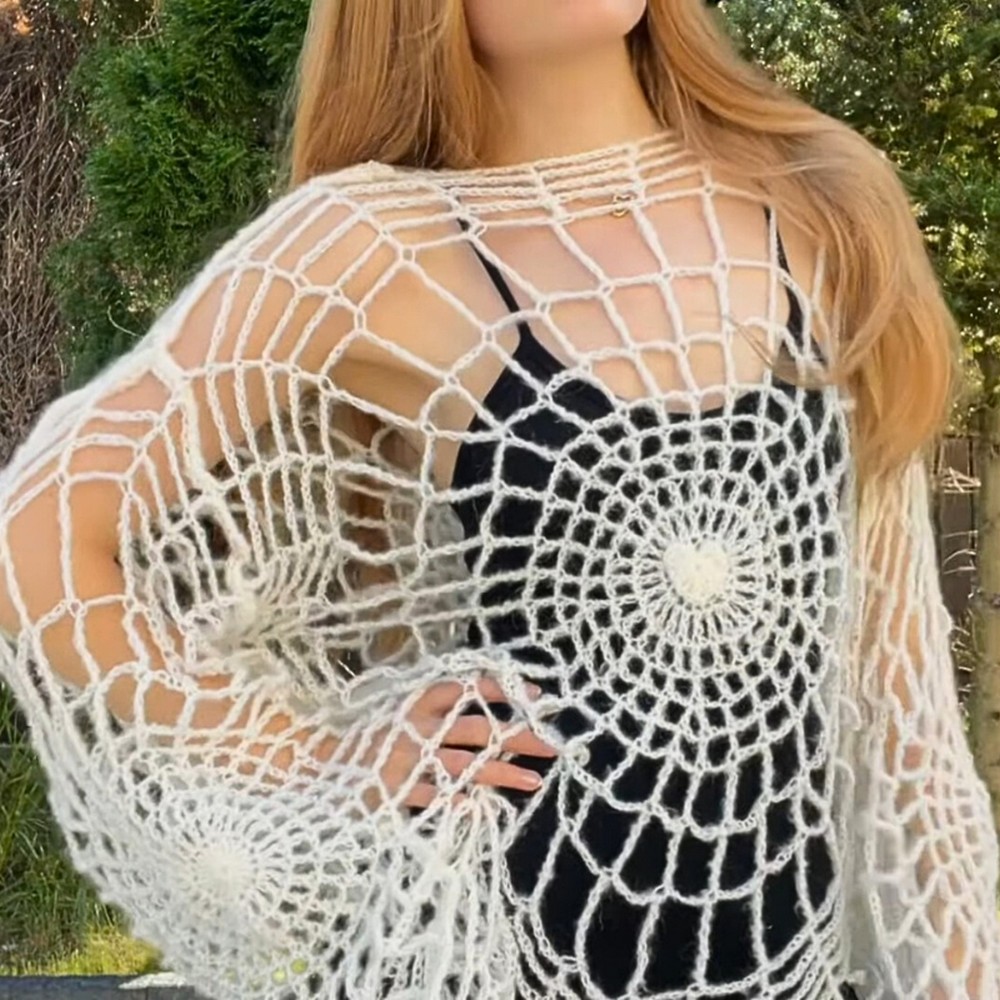
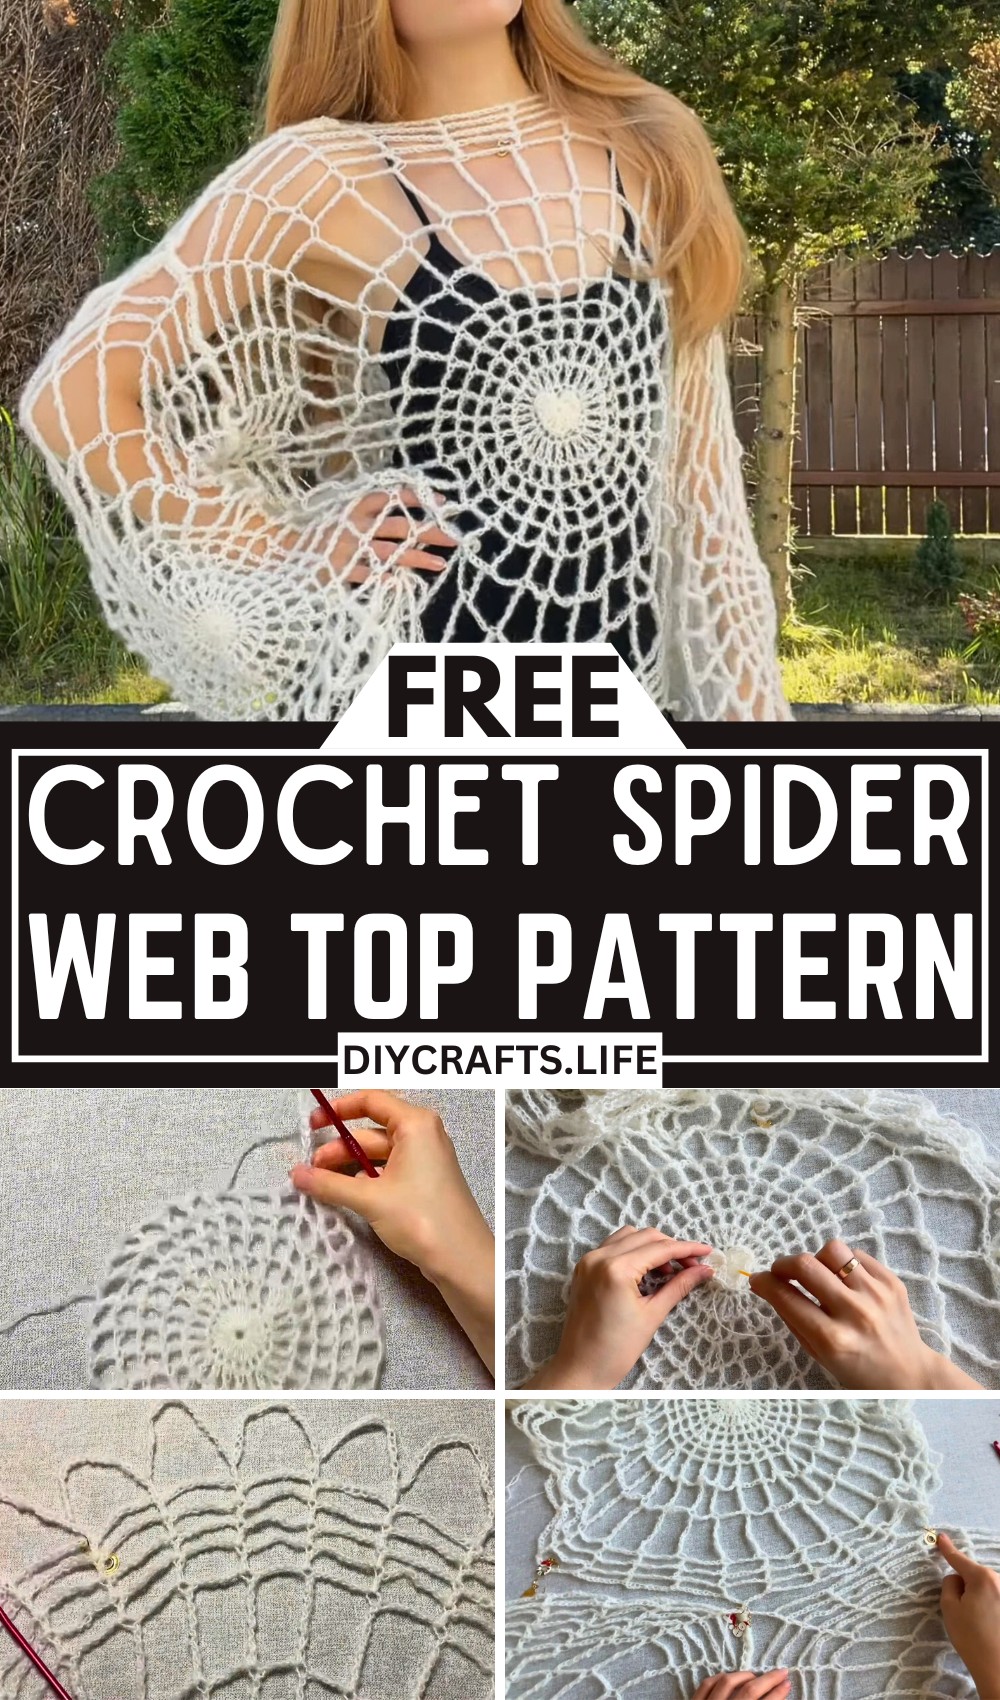
Create a stylish yet fun crochet spider web top that’s perfect for Halloween parties or everyday wear. Featuring a cute heart detail in the center, this trendy design is easy to customize for any size. Whether you’re a beginner or a pro, this eye-catching project offers both beauty and practicality.

The spider web top combines flair with functionality, making it a durable, lightweight addition to your wardrobe. Its airy, versatile design is perfect for layering or standalone wear, ensuring appeal for casual outings or festive events. Adjust the sleeve length or neckline to match your personal style effortlessly.
Crochet Spider Web Top
This project is beginner-friendly and fully customizable! With simple patterns and easy-to-follow steps, you’ll craft a spider web top that reflects your creativity. From heart embellishments to sleeve adjustments, the design invites endless personal touches to make it uniquely yours.
Materials and Preparation
For this crochet spider web top, you'll need the following materials:
- Yarn: Any fine yarn, approximately 130 grams. Suggestion: Mohair yarn, 150 grams (570 meters). Cotton or acrylic yarn can also work.
- Crochet hook: 5 mm (recommended for the yarn used in the tutorial); smaller 4 mm hook for the heart detail.
- Other tools: Scissors, needle for sewing ends, markers.
Tip: If you're a beginner, opt for cotton or acrylic yarn, as mohair can be tricky to work with.
Abbreviations and Notes
Abbreviations:
- CH: Chain
- DC: Double crochet
- TR: Treble crochet
- MR: Magic Ring
- SL ST: Slip stitch
- YO: Yarn over
Notes:
- Adjust the sleeve length or top dimensions as desired. Reduce rows for shorter sleeves or a more cropped fit.
- The heart in the middle of the top is optional and can be skipped.
- Blocking your work can help open up the stitches and showcase the web design.
Gauge, Approximate Size, and Pattern Notes
- Gauge: Follow the foundation rows to test; approximately 10 double crochet stitches per 5 cm.
- Finished Size: Top is adjustable. Sleeves and body length can be tailored to your preferences.
- Techniques:
- Magic ring to start the web pattern foundation.
- Increases at consistent points in the pattern to shape the web.
- Stretched "arches" are used for the neckline design.
- The top is worked flat for both the front and back, then seamed together.
Step-by-Step Pattern
Front and Back Panels
Row 1:
- Create a Magic Ring (MR).
- CH 3 (counts as DC), then work 19 DC into the ring. Tighten the ring to close. (20 DC total, including CH 3).
- SL ST into the third loop of the starting CH to close the round.
Row 2:
- CH 4 (counts as DC + CH 1). DC in the next stitch, CH 1. Repeat [DC, CH 1] in each stitch around.
- Join with SL ST to the third loop of the starting CH.

Row 3:
- CH 4. DC above the previous row's DC, CH 1. Continue [DC, CH 1] without increases for a complete round.
- SL ST to the third loop of the starting CH.
Row 4 (with increases):
- CH 5 (counts as DC + CH 2). DC in the next stitch, CH 2. After every six DCs, create an increase: [DC, CH 2, DC] all in the same stitch.
- Repeat this pattern of increases: 6 stitches followed by an increase.
Rows 5–11:
- Continue working in the established pattern, gradually increasing after every 7 stitches in Row 6, after 8 stitches in Row 7, and so on.
- Adjust the chain spaces between double crochets to create an open web design. For example:
- Row 5: CH 2 between DCs.
- Row 6: CH 3 between DCs.
Row 12–14 (Final Web Rows):
- By Row 12, stretch the stitches further to create the large arches: CH 9 or CH 10 between DCs.
- In Row 13, create markers for the neckline—place markers along the desired rows in the arch for the open neckline. Use CH 18–25 for these stretched arches.
- Slip stitch to secure at the end of each row.

Note: Both the front and back panels are worked the same way for Rows 1–14.
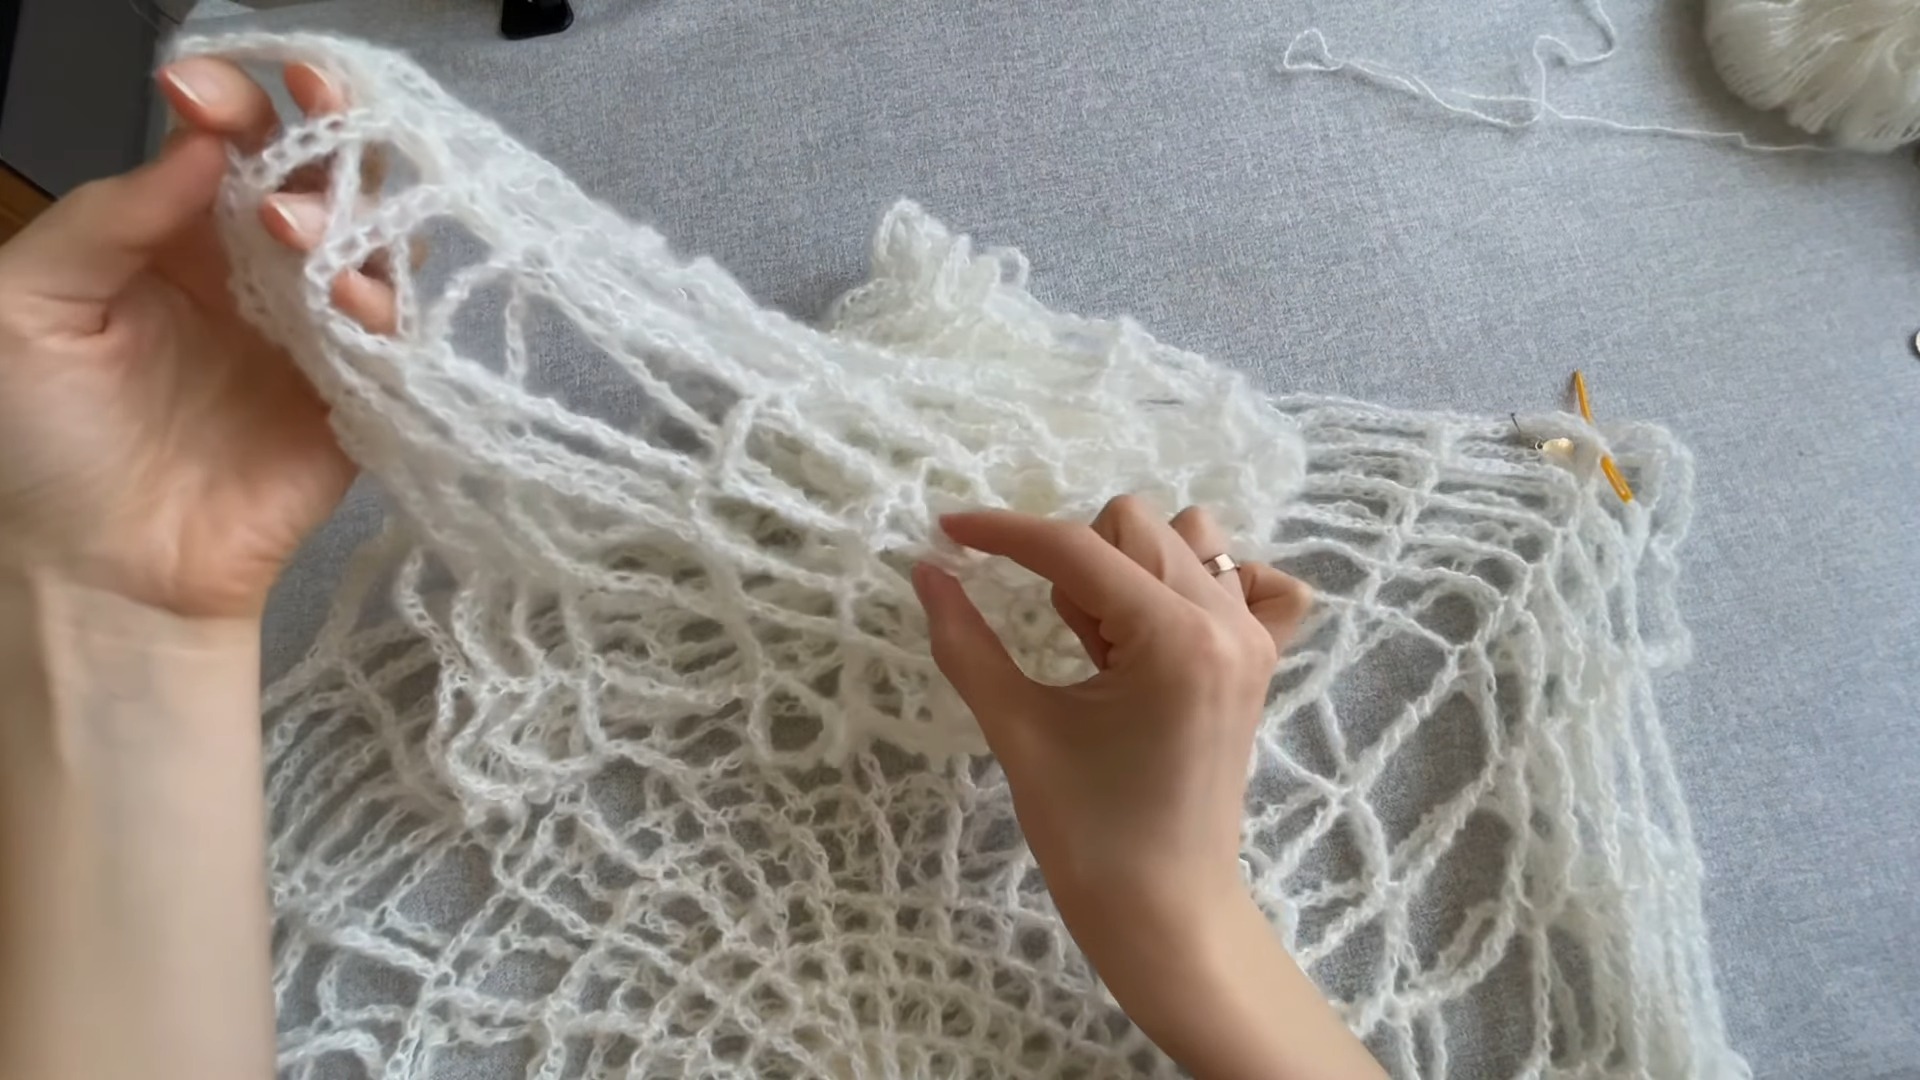
Sleeves
- Begin with a Magic Ring. Work the circular web pattern as per the front/back panel instructions.
- Work the sleeves to 9–12 rows, depending on your preferred sleeve length. Add fewer rows if you want short sleeves.
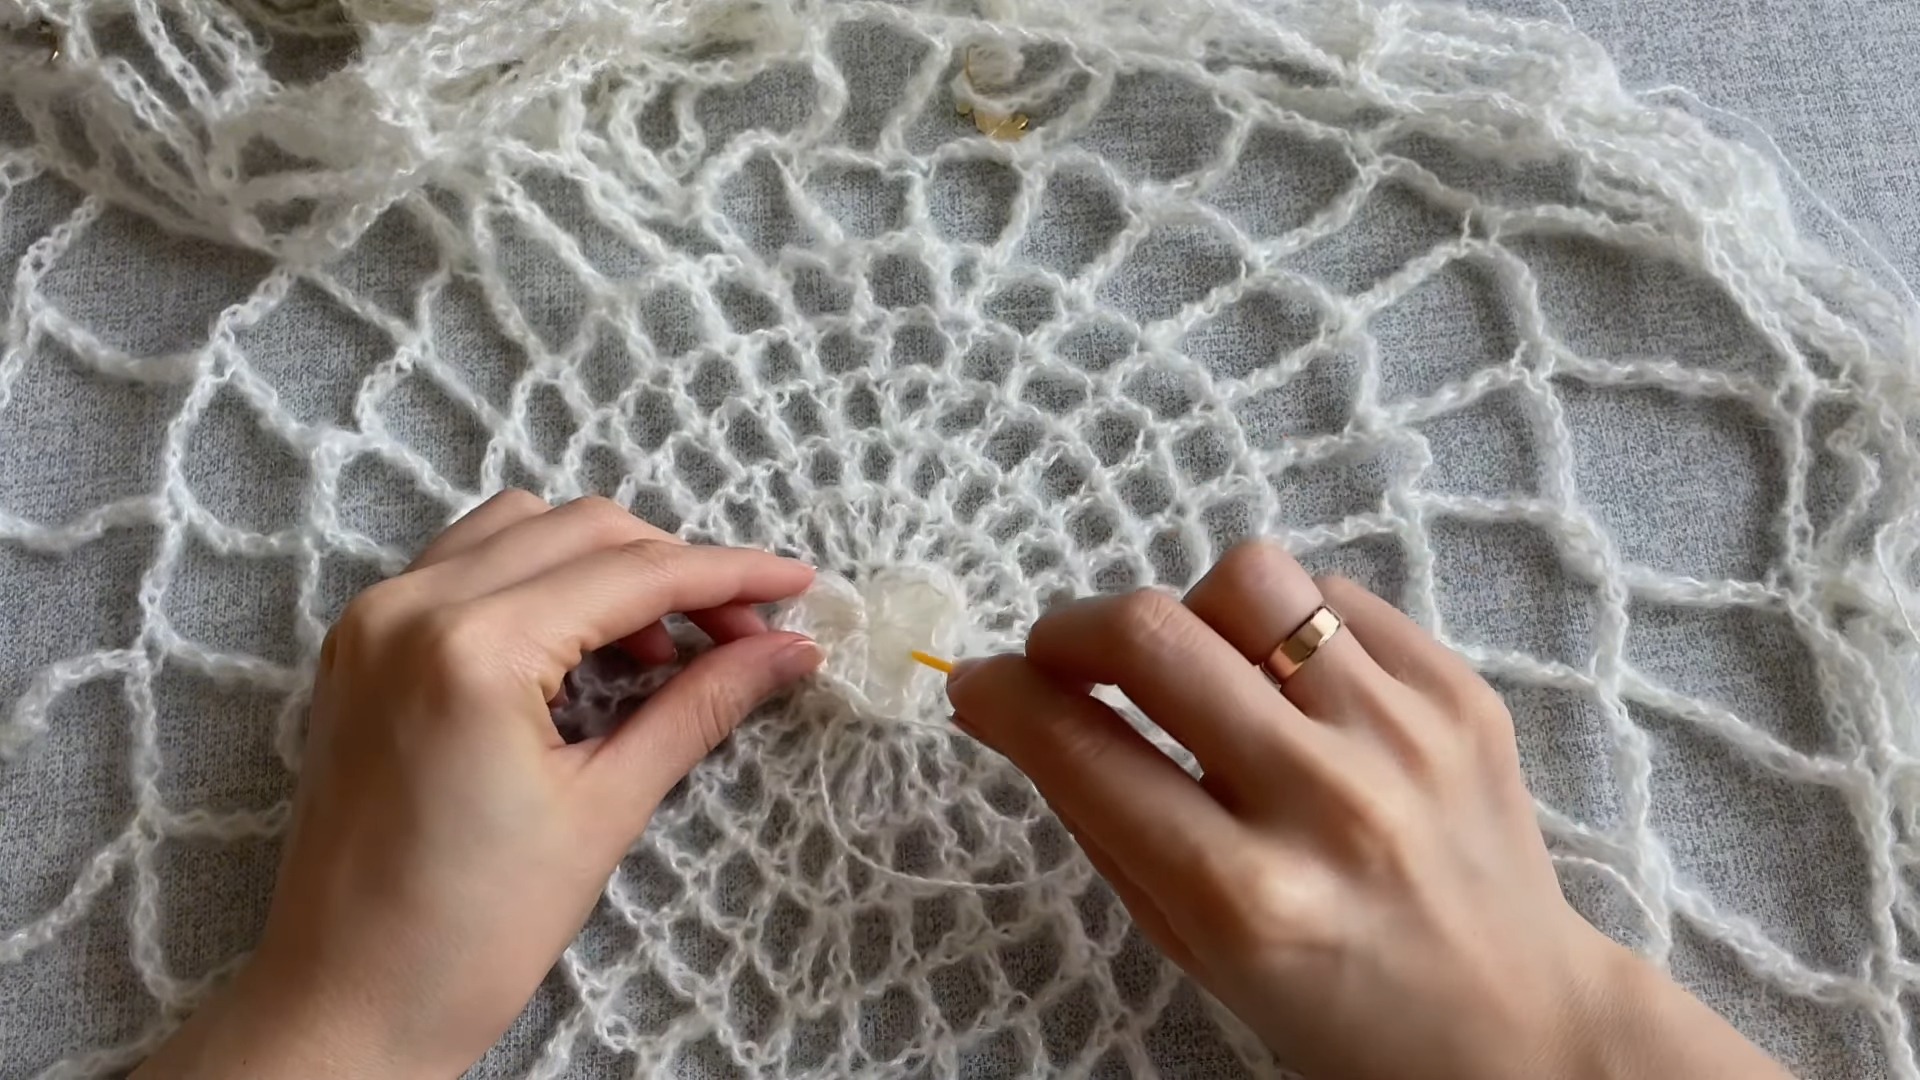
Heart Detail (Optional)
- Using the 4 mm hook, create a Magic Ring and CH 3.
- Work the following into the ring:
- 3 TR, 3 DC, CH 1, 1 TR, CH 1, 3 DC, 3 TR.
- CH 2 and secure with a SL ST into the ring.
- Tighten the ring, cut the yarn, and sew it into the center of your web design with a needle.
Assembly
-
Seaming Shoulders:
- With the front and back panels facing outward, align the shoulder seams (3 arches on each side). Seam them together using markers and single crochets to join.
-
Side Seams and Sleeves:
- Seam the top sides of the front and back panels together, leaving space for armholes.
- Attach the sleeves, working single crochets around the edges.
Finishing Touches
- Weave in all loose ends using a needle.
- Steam block or wet block the final top to open up the stitches and perfect the web pattern.
Pattern Question
Question: How do I adjust the length of the sleeves or fit of the top?
Answer: Adjust sleeve length by reducing the rows during the sleeve-making process. For overall fit, measure the arches to ensure proper alignment before crocheting the neckline or sleeves.
Conclusion
Crocheting the spider web top is an enjoyable and rewarding experience! Its trendy design, customizable features, and everyday usability make it a must-try project for crochet enthusiasts. Perfect for seasonal themes or year-round wear, craft one today and elevate your style!