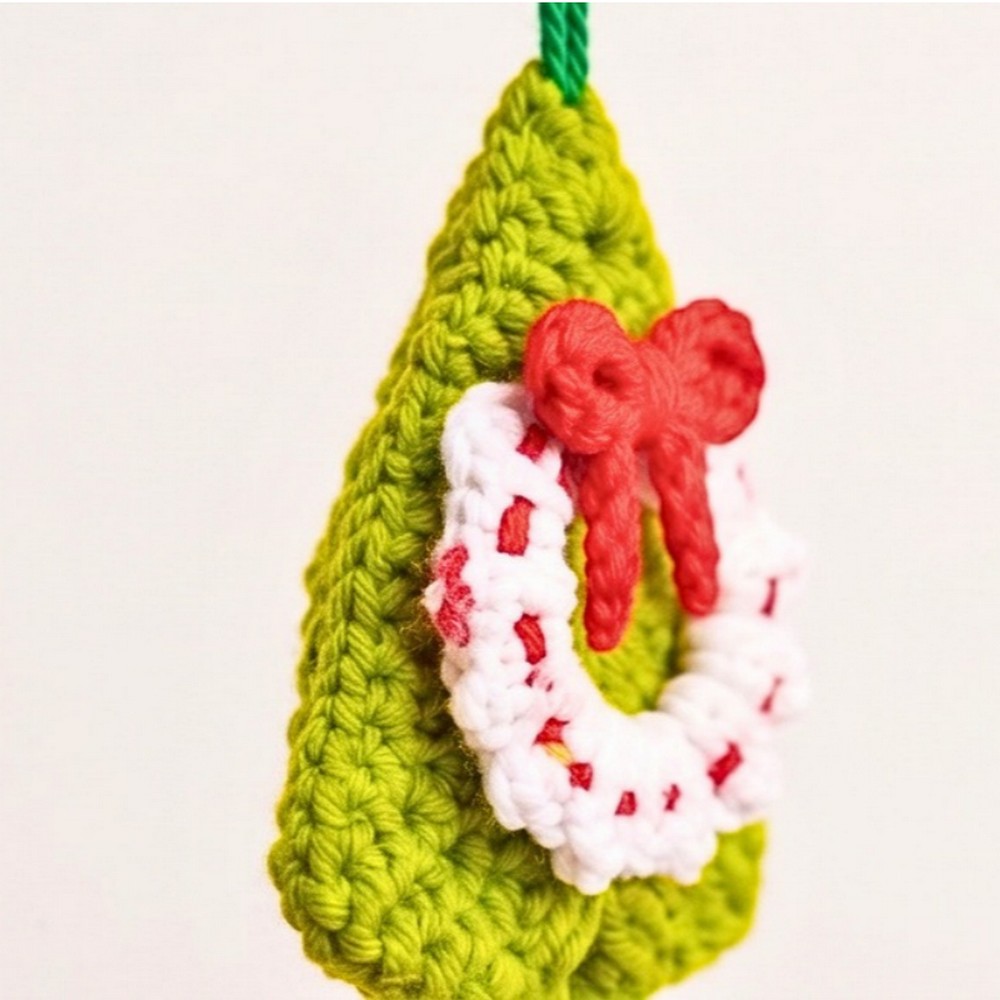
This small triangular tree is worked in green, white, red, and brown yarn, giving it the look of a tiny decorated Christmas crochet tree without making the ornament complicated. The white popcorn stitches create the wreath detail, while the red garland and bow add the festive finishing touches.
The crochet shape develops gradually from a magic ring into a three-sided tree, so the corner spaces become especially important as you move into the shaping rounds. Once the green border is finished, the decoration comes together with a threaded red garland, a small bow, a brown trunk, and a loop for hanging.
Credit Crochet Patterns Free
Materials & Tools Needed
- Yarn: 3-ply yarn in Green, White, Red, and Brown
- Crochet hooks: 3.5 mm hook for the main tree and 3.0 mm hook for the bow
- Tapestry/yarn needle: For weaving the red garland, attaching the bow, and hiding ends
- Scissors
Finished Size & Customization Ideas
The finished ornament is a small, flat triangular tree, approximately palm-sized depending on your tension.
You can easily change the decorative look without changing the basic tree shape:
- Swap the red garland yarn for metallic gold or silver for a sparkly finish.
- Sew small seed beads onto the green border to look like tiny ornaments.
- Adjust the bow's starting chain—25 ch or according to your size—to make the bow larger or smaller.
Crochet Christmas Tree Pattern
The tree begins with a magic ring and a round of double crochet. The next round adds the white popcorn detail, and the following green round turns that circular base into the triangular tree shape.
Tree Base
Using the 3.5 mm hook and Green yarn, make a magic ring.
Round 1: Ch 3, counting as the first double crochet. Work 11 dc into the center of the magic ring. Pull the yarn tight to close the ring. Sl st into the top of the beginning ch 3 to join. Cut the yarn and fasten off.
Important stitch-count note: The supplied on-screen text says 11 dc, which would create 12 total stitches when the beginning ch 3 is counted. However, the video itself works 8 dc for a total of 9 stitches, which produces the three corners used in the finished triangular tree and gives 9 popcorns in Round 2.
If you want the written stitch math to match the three-sided shape shown in the video, the 9-stitch base is the version to check against the original tutorial.

Add the Popcorn Wreath
The white round sits directly over the green base and creates the decorative wreath around the center of the tree.
Wreath Detail
Switch to White yarn and start from any stitch.
Round 2: Ch 3, then work 2 dc in the same stitch to make the first popcorn. Drop the loop, insert the hook into the top of the beginning ch 3, pull the dropped loop through, then ch 1 to secure. Work 1 popcorn, 1 ch in each stitch around the circle. To end, ch 1 and sl st into the first popcorn. Cut the yarn and fasten off.
Popcorn check: This tutorial's popcorn is formed from the beginning ch 3 or dc plus 2 dc in the same stitch. After dropping the loop, you return to the first stitch of the group and pull the loop through to gather the stitches together. The finished popcorn should sit as a raised bump rather than remaining as three separate dc stitches.

Turn the Circle into a Triangle
The next green round is where the tree's recognizable triangular shape starts to appear. The popcorns have created spaces around the circle, and those spaces are now used to form the three corners.
Squaring the Triangle
Switch back to Green yarn and start between the popcorns in any ch-1 space.
Round 3: Ch 3, 1 dc in the same space to form the first half of the starting corner. Work 2 dc in each of the next 2 spaces. Work 2 dc, ch 2, 2 dc in the same space for the corner. Repeat by working 2 dc in each of the next 2 spaces, then 2 dc, ch 2, 2 dc in the same space for the next corner. Work 2 dc in each of the next 2 spaces. In the first space, work 2 dc, ch 2, then sl st to end the round. Do not cut the yarn.
Corner check: Each corner is made with 2 dc, ch 2, 2 dc. The ch-2 spaces are important because they become the turning points used again in the next border round.

Create the Green Tree Border
The following round follows the three straight sides of the tree and expands each corner while keeping the triangular outline.
Tree Border
Round 4: Ch 3, dc in each stitch across the straight edge of the triangle. Work 2 dc, ch 2, 2 dc in the corner ch-2 space. Dc in each space or stitch across the next side. Work 2 dc, ch 2, 2 dc in the corner. Repeat for the final side and corner. Sl st to the top of the beginning ch 3 to join. Cut the yarn and fasten off.
Shape check: Lay the tree flat after this round. You should be able to clearly see the three straight sides and three pointed corners. If a corner looks rounded or uneven, check that the full 2 dc, ch 2, 2 dc sequence was worked into the corner space.
Add the Brown Tree Trunk
The trunk is added to the center of the flat bottom edge after the green border is complete.
Find the 2 center stitches on the bottom edge of the tree.
Using Brown yarn, attach to the first center stitch.
Trunk: Ch 3, 2 dc, ch 3, sl st into the same stitch across the center edge to form a small square trunk. Cut the yarn and fasten off.
The small brown section should sit centered along the flat bottom edge rather than toward either corner.

Decorate the Tree with Red Garland
Now that the crocheted tree shape is finished, the red yarn can be used as a decorative garland over the white popcorn wreath.
Make the Bow
Switch to the 3.0 mm hook and Red yarn.
Bow chain: Ch 25, or according to your desired bow size. Cut the yarn and fasten off.
Loop the chain into a classic bow shape and knot it tightly using the tail ends to hold the shape.
Bow size tip: A longer starting chain will give you a fuller bow, while a shorter chain creates a smaller accent. Keep the chain length proportional to the palm-sized tree.
Thread the Garland
Double the red yarn in the tapestry needle and knot it.
Weave the threaded needle in and out through the center gaps of the white popcorn stitches from Round 2. Continue around the wreath so the red yarn creates a threaded garland effect.
Once the garland is complete, use the remaining red yarn on the needle to sew the red chain bow directly to the top center of the popcorn wreath. Secure it tightly at the back.
Follow the popcorn centers: Keeping the needle passing through the center gaps of the white popcorns helps the red garland follow the circular wreath instead of drifting across the green tree.

Add the Hanging Loop
The final functional detail is a simple green yarn loop at the top point of the tree.
Take a piece of Green yarn and insert your hook through the top pointed corner of the tree. Pull the green yarn through to form a loop.
Tie a tight knot at the top to secure the loop.
Check the attachment: Pull gently on the loop before trimming or hiding the ends. It should feel firmly attached to the pointed corner and large enough to fit over your tree branch or ornament hook.
Finish the Ornament
Weave in all remaining loose yarn tails at the back of the ornament so the reverse side stays neat.
With the green triangular shape, raised white popcorn wreath, red garland and bow, and small brown trunk in place, the flat ornament is ready to hang on the Christmas tree.