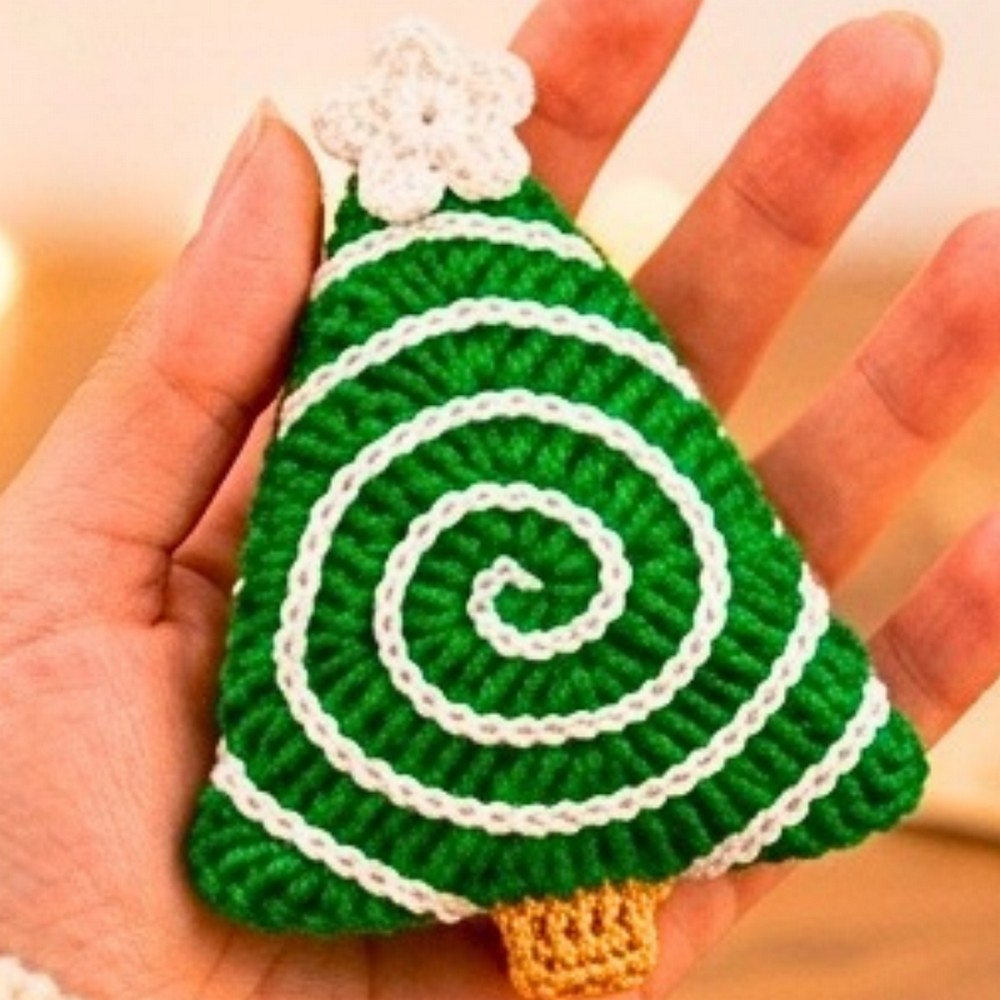
Add a handmade touch to your holiday tree with a folded crochet Christmas tree, finished with a graceful white spiral and an optional star for extra sparkle.

A crochet Christmas tree ornament can start from a surprisingly simple shape and become something much more recognizable with a few careful finishing steps. This design uses a square-like crocheted base that is folded inward to create the triangular outline of a Christmas tree.
The crochet details are kept playful with a white spiral across the green body, while an optional star, brown trunk, and hanging loop complete the decoration. The main point to watch is the shaping stage: the tree does not look triangular when the crocheted base is finished, because its final silhouette comes from folding and securing the lower corners.
Credit Crochet Patterns Free
Materials & Tools Needed
- Crochet hook: 3.0 mm
- 3-ply yarn: Green for the tree, white for the decorative spiral, and brown for the trunk
- Glue or sewing needle: For securing the folded tree and attaching details
- Optional yellow or white yarn: For the star topper
- Scissors
Finished Size & Customization Ideas
The finished Christmas tree measures approximately 5 inches tall, depending on your tension and the number of rounds worked.
You can change the look of the ornament with simple decorative choices:
- Use variegated yarn for a multicolored tree.
- Add beads or mini pom-poms as tiny ornaments.
- Use gold or silver yarn for a sparkling star topper.
- Change the color of the spiral for a stronger contrast against the tree.
- Make several ornaments in different color combinations to coordinate with your holiday décor.
Pattern Abbreviations & Terminology
- MR: Magic Ring
- ch: Chain
- dc: Double Crochet
- sl st: Slip Stitch
- sp: Space
- [ ]: Repeat the instructions inside the brackets
Before Crocheting the Tree Body
The green tree body may look like a square rather than a Christmas tree when you finish the rounds. That is expected.
The triangular silhouette is created later by folding the bottom corners inward, so there is no need to reshape the green piece while crocheting the rounds.
Before moving forward, make sure the corner spaces are easy to identify and that the finished piece lies reasonably flat. These corners will help you understand where the folds will be positioned later.
Step-by-Step Crochet Instructions
Tree Body
The main tree begins with a Magic Ring and expands through four corner sections. The corner spaces are important because each following round increases around these points.
Round 1: Begin with a Magic Ring (MR), ch 3 (counts as 1 dc), work 2 dc into the MR, ch 2, then 3 dc into the MR; [ch 2, 3 dc into the MR] repeat 2 more times for a total of 4 sets of 3 dc separated by ch-2 spaces; tighten the magic ring, then ch 2 and sl st into the top of the beginning ch-3.

Why the Corner Spaces Are Important
The ch-2 spaces separate the four groups of dc and establish the corners of the initial shape. In the next rounds, these spaces are where the increases are made.
After completing Round 1, check that you can clearly see the four ch-2 spaces. If a corner space is missed, the following increases will not sit in the intended position.
Round 2: Ch 3 (counts as 1 dc), work 1 dc into the next dc twice for a total of 3 consecutive dc including the beginning ch-3; in the corner ch-2 space, work 2 dc, ch 1, 2 dc; continue working dc into each dc across and repeat 2 dc, ch 1, 2 dc in each corner space; finish with a sl st into the top of the beginning ch-3.
What the Corner Increase Creates
The 2 dc, ch 1, 2 dc sequence expands each corner while keeping the shape defined. As the rounds continue, these increases allow the square-like body to grow evenly.
When working into a corner, place the complete increase sequence inside the ch-2 space rather than accidentally splitting it between neighboring stitches.
Rounds 3-5: Repeat Round 2 to build the tree body; the number of dc per side increases by 2 after every round because of the corner increases; after completing Round 5, fasten off and weave in the ends.
Check the Green Body Before Shaping
Place the finished green piece flat and look at all four sides.
The piece should have a consistent overall shape with recognizable corners. Do not worry if it still looks like a square. The next stage is what changes its appearance into a tree.

Add the Decorative Spiral
The white spiral is worked onto the completed green body, starting from the center and moving outward.
Attach the White Yarn
Create a slip knot with White yarn.
Insert the hook into the center of the tree at Round 1’s Magic Ring and attach the yarn with a sl st.
Why the Spiral Starts in the Center
The Magic Ring provides a natural central starting point for the decorative line. Working outward from there allows the spiral to travel across the tree instead of beginning from one outer edge.

Work the Spiral
Use sl st to outline the edges of the tree at the tops of the dc stitches. Continue in a continuous spiral from the center outward, transitioning upward through each row.
Keep the slip stitches evenly spaced as much as possible.
What to Watch While Spiraling
The spiral should gradually travel outward while remaining visually smooth. Pause occasionally to look at the complete shape rather than concentrating only on the stitch immediately under your hook.
If the spacing becomes noticeably uneven, correcting it before reaching the outer edge can help keep the finished decoration looking balanced.
Finish the Spiral
Once you reach the top of the tree, fasten off and weave in the yarn end.
The completed white spiral now provides a continuous decorative accent across the green body.
Fold the Tree Into Shape
This is the step that changes the flat crocheted base into the recognizable Christmas tree silhouette.
Fold the Bottom Corners Inward
Fold the bottom corners inward to form the sides of the tree and create a triangular shape.
Adjust both folds until the tree looks symmetrical.
Why the Folding Creates the Tree Shape
The green body was crocheted as a square-like form with four corners. Folding the lower corners inward reduces the width along the lower sides and changes the outline into a triangle.
This means the shape is created through the position of the crocheted fabric, rather than through triangular decreases in the rounds.

Check the Shape Before Securing It
Hold the folded tree facing you and compare the two sides.
If one corner is folded farther inward than the other, the tree can appear tilted or lopsided. Adjust the folds now, while they are still easy to move.
Secure the Folds
Use glue or a sewing needle to attach the layers and preserve the triangular tree shape.
Make sure the secured folds remain in their intended position before attaching the remaining details.
Add the Optional Star Topper
The star topper can be made with yellow or white yarn.
Crochet the Five-Point Star
Star: Begin with MR, work ch 2 into the MR, 1 dc into the MR, ch 2, then sl st into the MR to complete one point; [ch 2, 1 dc, ch 2, sl st into MR] repeat 4 more times; tighten the ring and adjust the star shape.
How the Star Takes Shape
Each repeated sequence forms one point around the Magic Ring. Repeating it five times creates the five-point outline.
After tightening the ring, gently arrange the points so they remain separated and recognizable.

Attach the Star
Glue or sew the star securely to the top of the tree.
Before making the final attachment, check that it is centered over the pointed tree shape.
Add the Optional Brown Trunk
The brown trunk gives the bottom of the tree a small finishing detail.
Join the Brown Yarn
Attach Brown yarn in the center bottom stitches.
Crochet the Trunk
Trunk: Ch 3 (counts as 1 dc), work 3 dc across the next 2 stitches, ch 3, then sl st to the last st of the round; fasten off and weave in the end.
Check the Trunk Position
Look at the tree from the front after attaching the trunk.
The trunk should appear beneath the center of the tree. Because the green body has been folded, checking its position now helps prevent the trunk from appearing noticeably off-center.

Attach the Hanging Loop
Use Green yarn to make the hanging loop.
Hanging Loop: Ch approximately 15 and attach the chain to the top of the tree using a sl st or glue.
Why the Loop Needs a Secure Attachment
The loop carries the weight of the ornament when it is hanging. A secure attachment prevents the chain from pulling away from the top of the tree during use.
Check Before Finishing
Gently test the loop by pulling it upward. The attachment should remain firm, and the tree should hang in a natural upright position.
Final Finishing Check
Before displaying the ornament, inspect the complete piece from the front:
- The folded corners should create a clear triangular tree shape.
- The white spiral should be securely attached.
- The optional star should sit neatly at the top.
- The brown trunk should be centered along the bottom.
- The hanging loop should be firmly attached.
- All loose yarn ends should be woven in and trimmed neatly.
Once everything is secure, the finished ornament is ready for a Christmas tree, garland, gift package, or other holiday display.