Explore the fun and quirky world of crochet with our NO SEW Axolotl project! This cute and creative design is easy to make and doesn’t require sewing. Its simple style makes putting it together a breeze, and you can personalize it in endless ways to make it your own.
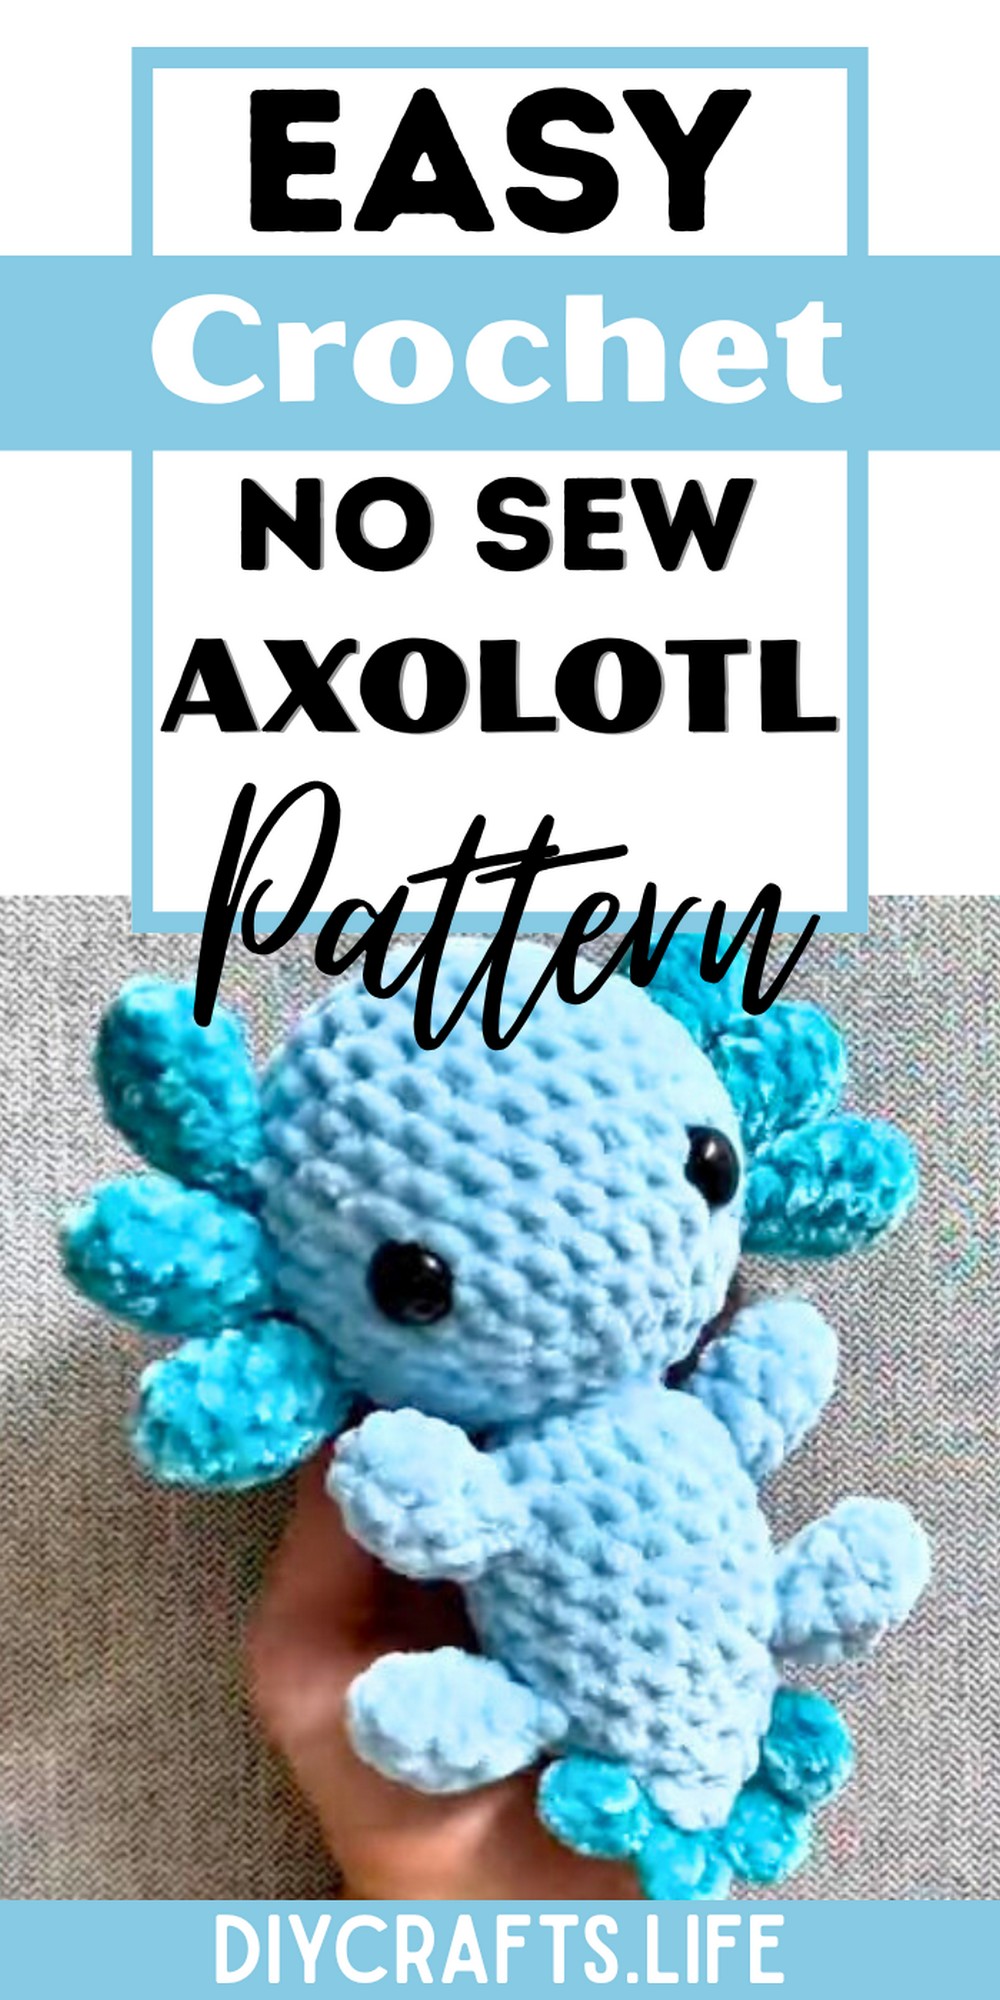
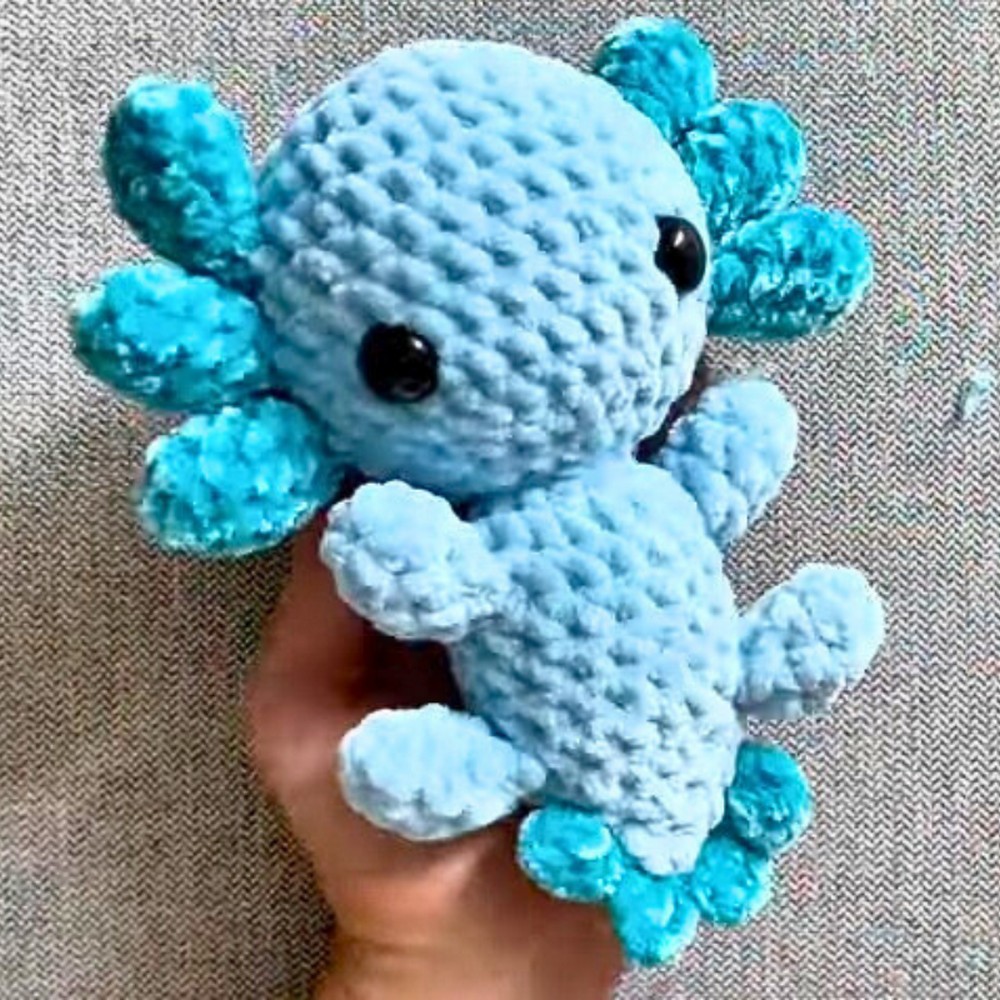
The NO SEW Axolotl stands out with its sturdy, compact design, making it the perfect companion for both play and display. Crafted with durable yarn, this axolotl withstands the test of time, maintaining its appeal and usability. Its cute aesthetic adds character to any space or collection.
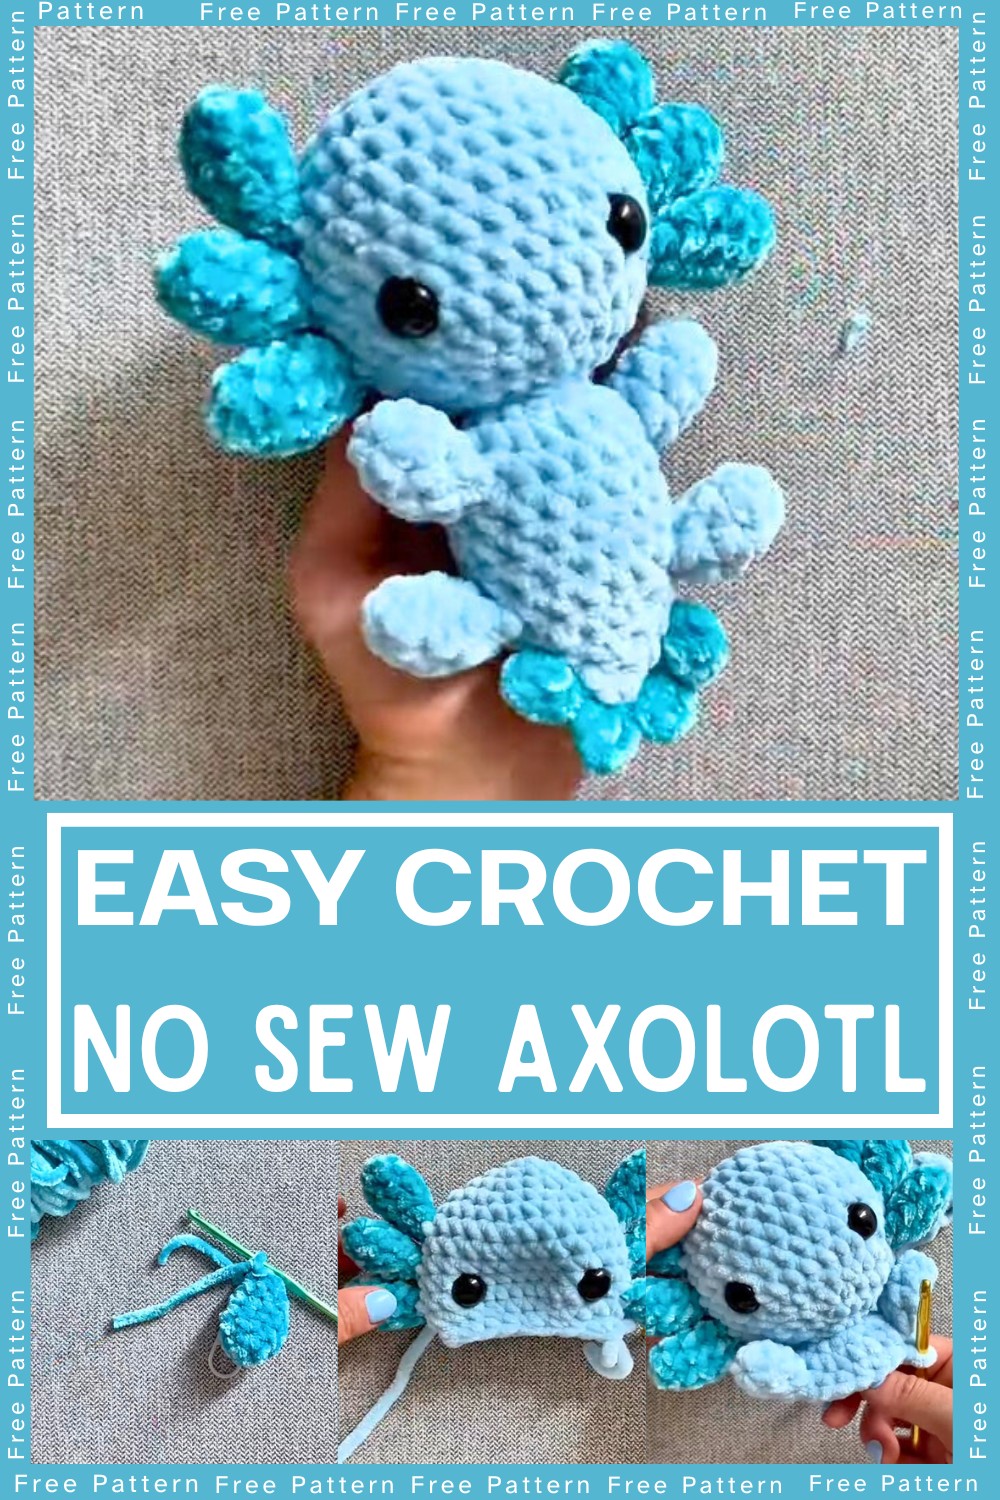
Crochet NO SEW Axolotl
Creating the NO SEW Axolotl is a rewarding experience for beginners and experts alike. The pattern allows for limitless customizations, inviting creativity at every stitch. Whether you're exploring crochet for the first time or enhancing your skills, this project provides a fulfilling, adaptable crafting journey.
Materials and Preparation
To create your adorable no-sew axolotl, you’ll need the following materials:
Materials:
- Yarns:
- Loops & Threads Sweet Snuggles Light yarn (or other No. 5 bulky yarn) in aqua blue (or color of your choice).
- Velvet yarn in a coordinating color for the gills and tail accents.
- Polyfill: Used to stuff the axolotl plush.
Tools:
- Crochet Hooks:
- 6 mm hook (main body, legs, and arms).
- 4.25 mm hook (gills and tail accents).
- Yarn Needle: For weaving in ends and securing the shape.
- Stitch Marker: To track row beginnings.
- Scissors: For cutting yarn.
- Safety Eyes: 16 mm safety eyes with plastic washers for securing the eyes.
Preparation Notes:
- You should have basic knowledge of crochet techniques, including magic rings and slip stitching.
- Take your time when working with chenille yarns, as they can fray easily. If the yarn breaks, simply start again and knot as needed for security.
Abbreviations and Notes
Abbreviations:
- CH: Chain
- SC: Single Crochet
- HDC: Half Double Crochet
- DC: Double Crochet
- INC: Increase (2 single crochets in the same stitch)
- DEC: Decrease (single crochet two stitches together)
- SS: Slip Stitch
Pattern Notes:
- No-sew technique: This tutorial attaches parts (gills and limbs) during the crochet process using a "no sew" method for seamless assembly.
- Magic Circle: Used as the foundation for creating the gills, limbs, head, and body.
- Gauge: There’s no strict gauge; however, try to maintain consistent tension for proportional results.
Gauge, Approximate Size, and Pattern Notes
Gauge:
Not crucial for this project but aim for firm stitches to avoid gaps or stuffing showing.
Finished Size:
The axolotl measures approximately 6-8 inches tall when finished, depending on yarn and tension.
Special Techniques:
- No Sew Attachment Method: Insert your hook into the piece being attached (e.g., gill) and then into the base piece (e.g., body/head). Secure by pulling the working yarn through all layers and single crocheting.
- Pulling Tight on Decreases: Pulling the yarn tight during decreases avoids gaps or holes.
Step-by-Step Pattern
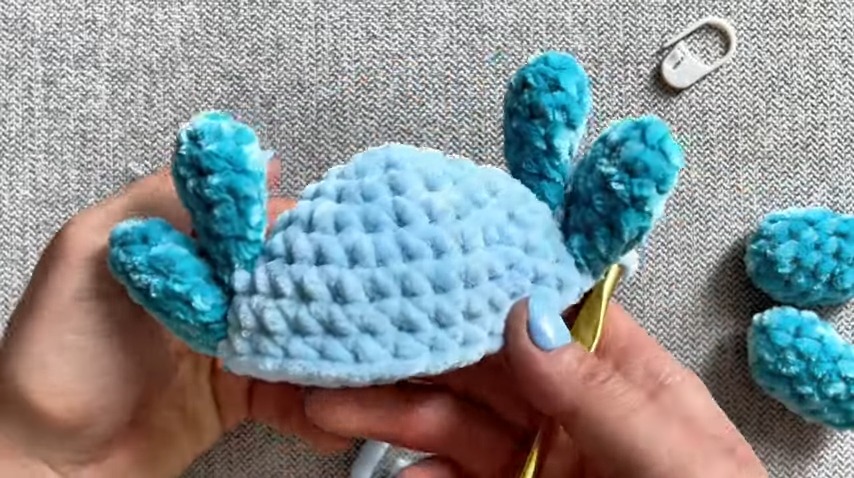
Part 1: Gills
- Hook: Use the 4.25 mm hook and velvet yarn.
- Row 1: Start with a magic circle; SC 6 into the circle. Tighten the circle.
- Row 2: [SC 1, INC] x 3 (9 SC total).
- Rows 3-4: SC around (9 SC per row).
- Row 5: [SC1, DEC] x 3 (6 SC total).
- Row 6: SC around (6 SC total).
- Fasten Off: Slip stitch into the next stitch and finish off. Make 6 gills in total.
Part 2: Arms and Legs
- Hook: Use the 6 mm hook and bulky yarn.
- Row 1: Start with a magic circle; SC 6 into the circle. Tighten the circle.
- Rows 2-4: SC around (6 SC per row).
- Fasten Off: Finish the first arm/leg. Make 4 limbs in total.

Part 3: Head and Body
Head:
- Hook: Use the 6 mm hook and bulky yarn.
- Row 1: Magic circle; SC 6 into the circle. Tighten the circle and slip stitch to close.
- Row 2: INC x 6 (12 SC total).
- Row 3: [SC 1, INC] x 6 (18 SC total).
- Row 4: [SC 2, INC] x 6 (24 SC total).
- Row 5: [SC 3, INC] x 6 (30 SC total).
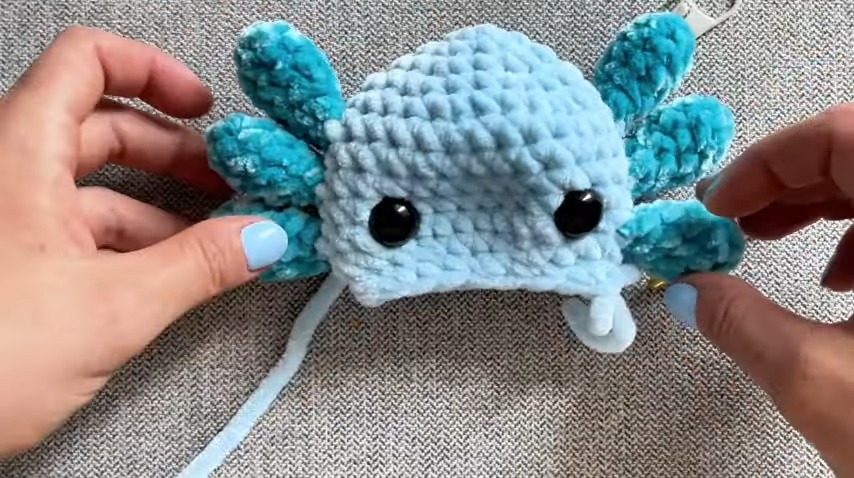
- Row 6: Attach 2 gills using the no sew method: SC 12, attach first gill with 3 SCs into the head, SC 12, attach second gill with 3 SCs. (30 SC total).
- Row 7: SC around (30 SC total).
- Row 8: Repeat Row 6 for 2 additional gills. (30 SC total).
- Row 9: SC around (30 SC total).
- Row 10: Repeat Row 6 for the final 2 gills. (30 SC total).
- Row 11-14: Begin decreasing:
- Row 11: [SC 3, DEC] x 6 (24 SC total).
- Row 12: [SC 2, DEC] x 6 (18 SC total).
- Insert safety eyes between rows 9-10 (about 8 stitches apart).
- Row 13: [SC 1, DEC] x 6 (12 SC total). Add stuffing.
- Row 14: DEC x 6 (6 SC total).
Body:
- Row 15: Work into front loops only; INC x 6 (12 SC total).
- Row 16: [SC 1, INC] x 6 (18 SC total).
- Row 17: Attach arms: Attach first arm with 3 SC, SC 7, attach second arm with 3 SC, SC 5 (18 SC total).
- Rows 18-20: SC around (18 SC per row).
- Row 21: Attach legs: Attach first leg with 3 SC, SC 7, attach second leg with 3 SC, SC 5 (18 SC total).
- Row 22-25: Begin decreasing:
- Row 22: [SC 1, DEC] x 6 (12 SC total).
- Row 23: [SC 2, DEC] x 3 (9 SC total).
- Insert polyfill into the body.
- Row 24: [SC 1, DEC] x 3 (6 SC total).
- Row 25: DEC x 3 (3 SC total).
Part 4: Tail Details
- Hook: Use the 4.25 mm hook and velvet yarn. Attach the yarn to one side of the tail.
- Slip Stitch Around: Create 9 slip stitches across the edge of the tail.
- Row 2: Begin forming gills:
- In the first stitch: SC 1, HDC 1, DC 1, HDC 1, SC 1.
- Slip stitch into the next stitch. Repeat 4 times.
- Fasten Off: Secure ends with knots and weave yarn tails into the plush.
Pattern Question:
Q: How do I customize the colors of my axolotl?
A: To personalize your axolotl, simply choose different yarn colors and follow the pattern as usual. You can switch colors as desired around the legs, body, or head to create a unique, colorful creature.
Conclusion
Embrace the joy of crafting with the Crochet NO SEW Axolotl. Its easy no-sew assembly paired with endless customization possibilities make it an enjoyable and highly rewarding project. Perfect for gift-giving or personal use, this axolotl is sure to delight.


