Brighten up your holiday season with Percy the Christmas Bear—an adorable crochet creation and versatile ornament! With its lovable snout, cozy hat, and festive light string, this bear is perfect for adding charm to your décor or gifting a handmade treasure to loved ones.
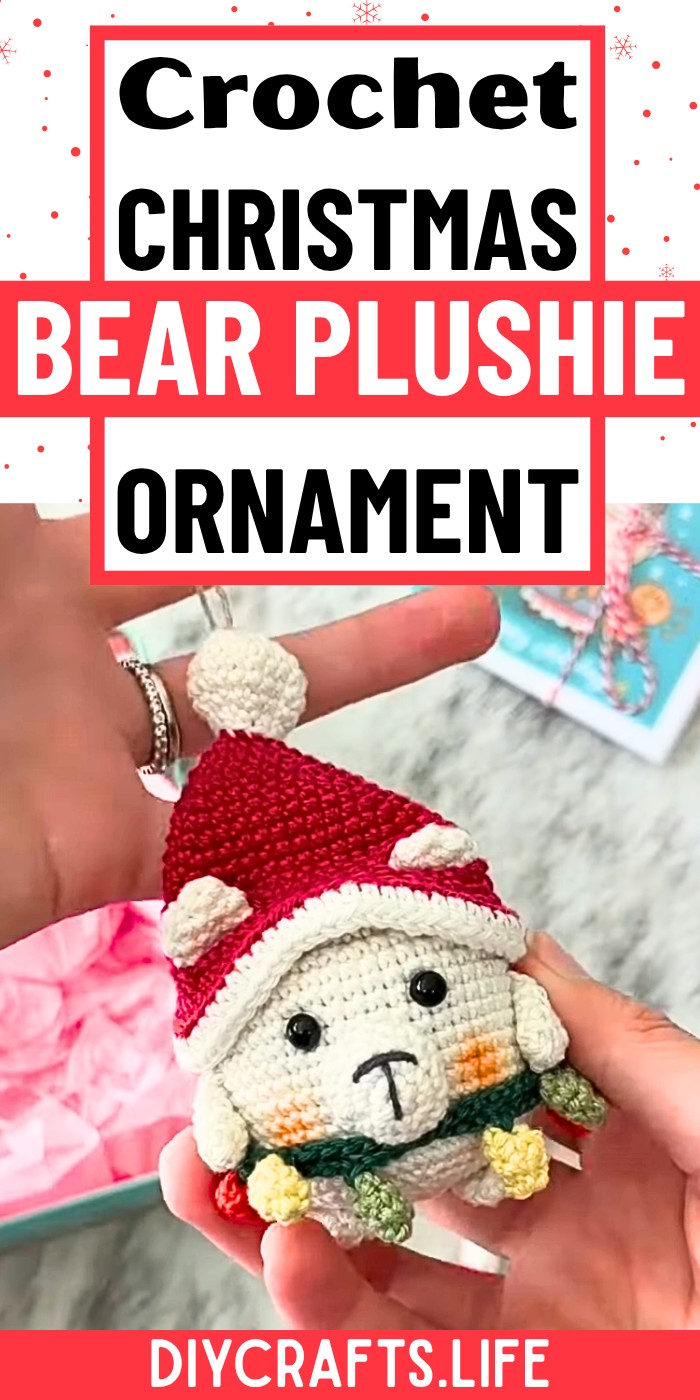
Percy the Bear doubles as both a plushie and an ornament, showcasing detail and durability. Made with worsted, DK, or plush yarn, Percy retains his vibrant charm year after year. His tiny hat and light strands can be customized for a festive look that works as cozy décor or a thoughtful holiday gift.
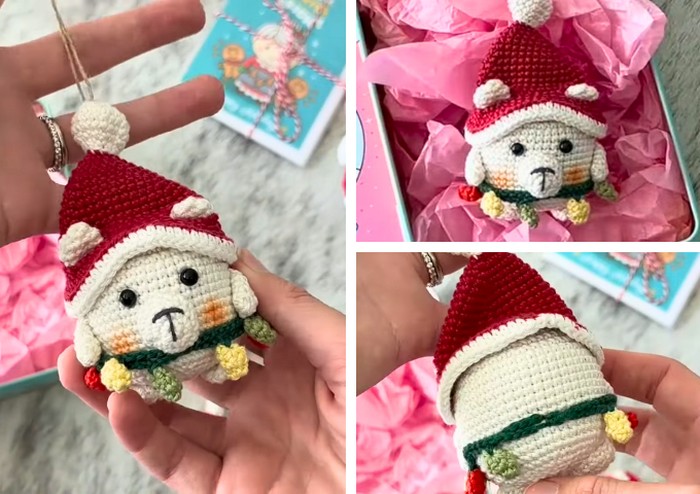
Crochet Percy the Christmas Bear Plushie
Crocheting Percy the Christmas Bear is an enjoyable project suitable for crafters at various skill levels. Starting with simple stitches such as magic rings and single crochet, this pattern combines clear instructions and easy assembly techniques to create an adorable centerpiece for any occasion.
Credit The Kindness Company
Materials and Preparation
To crochet Percy the Christmas Bear, you will need:
- Yarn:
- Worsted weight yarn in white (body parts like head, limbs, ears, and snout)
- Worsted weight yarn in red (hat and light bulbs)
- Worsted weight yarn in yellow (light bulbs)
- Worsted weight yarn in khaki green (light bulbs)
- Hook: 4mm crochet hook
- Stuffing: Polyester or fiberfill stuffing for the bear’s body, snout, arms, and legs.
- Safety Eyes: Two 9-12mm safety eyes (you can sew the eyes instead if gifting to young children or pets).
- Embroidery thread or black yarn: For the bear’s nose.
- Tapestry needle: For sewing.
- Scissors: For trimming excess yarn.
- Stitch markers: mark your first stitch in each round to ensure precision in your pattern.
Abbreviations and Notes
Here are the standard crochet abbreviations used:
- SC = Single Crochet
- Inc = Increase (2 single crochet stitches in the same stitch)
- Dec = Decrease (crochet two stitches together)
- YO = Yarn Over
- Ch = Chain
- Sl St = Slip Stitch
- St(s) = Stitch(es)
- Rnd = Round
Notes:
- The project begins with a magic ring, a foundational technique in amigurumi that creates tight, round bases. If the magic ring feels tricky, practicing beforehand is recommended.
- Color changes are used in the hat and light strands. Always keep the unused yarn tails neatly tucked away and trimmed.
- Use stitch markers to mark the first stitch of each round. This will help you maintain accuracy when working in rounds.
- Safety eyes are placed between the 11th and 12th rounds, spaced four stitches apart.
Gauge, Approximate Size, and Pattern Notes
- Gauge: This isn’t crucial for this project, but tight stitches are ideal for amigurumi. To achieve this, ensure your hook size and tension prevent gaps in your stitching.
- Finished Size: Percy measures approximately 12 inches tall (depending on your yarn and tension).
- Special Techniques:
- Magic Ring: Used to create tight circular bases.
- Working in the back loops: This creates texture in the hat brim, making it stand out.
- Surface Knot: Used to finish off rounds securely or attach pieces to the body.

Step-by-Step Pattern
Head and Body
- Form a Magic Ring with white yarn.
- Reserve a 5-inch tail to secure your ring.
- Refer to the video for a detailed step-by-step demonstration.
- Rnd 1: Crochet 8 SC in the Magic Ring. Pull the tail to tighten the ring completely into a neat circle. Place a stitch marker in the first SC of the round.
- Rnd 2: Work 2 SC (increase) into each stitch from Rnd 1. You’ll have 16 stitches total by the end of this round.
- Rnd 3: Crochet (1 SC, Inc) across the round. You’ll make 2 SC in every 2nd stitch. Repeat this pattern 8 times for a total of 24 stitches.
- Rnd 4: Crochet (1 SC, 1 SC, Inc) around the round. You’ll make a regular SC in the first 2 stitches, then increase in the 3rd stitch. Repeat this 7 times for 32 stitches total.
- Rnd 5: Work 1 SC in each stitch (32 SC total) around the round.
- Continue Working Rounds 6-20: Use the pattern 1 SC in each stitch for all these rounds, maintaining 32 stitches per round.
- Insert Safety Eyes: After finishing Rnd 20, flip the work over and insert the safety eyes between the 11th and 12th rounds, spaced 4 stitches apart. Secure the eyes firmly using their backs, or sew on eyes for safety (if gifting to children or pets).
- Stuff the Head and Body: Pull your last stitch long, remove your hook, and insert stuffing through the body opening. Stuff it firmly, but avoid overstuffing.
- Create Rounds 21-24: Start decreasing to close off the body:
- Rnd 21: Work (4 SC, Dec) around the round. Repeat the parentheses pattern 8 times for a total of 40 stitches.
- Rnd 22: Work (3 SC, Dec) across each repetition for 32 stitches.
- Rnd 23: Work (2 SC, Dec) across each repetition for 24 stitches.
- Rnd 24: Work (1 SC, Dec) across each repetition for 16 stitches.
- Fasten Off the Body: Slip stitch into the next stitch, cut a medium tail (6–8 inches), and pull it through the last stitch to secure. Use the tail to sew the opening closed by stitching across the last round’s front loops. Tie a surface knot when finished and weave the tail into the fabric.
Snout
- Magic Ring: Create a magic ring with white yarn.
- Rnd 1: Work 6 SC into the magic ring and pull the tail tight.
- Rnd 2: Increase in each of the 6 stitches made in Rnd 1 (12 stitches total).
- Rnd 3: Crochet (3 SC, Inc) around the round for a total of 15 stitches.
- Sew the snout onto Percy’s face, ensuring the nose is centered properly. Use straight pins as needed for alignment.
Arms, Legs, and Ears
For the arms, legs, and ears, follow similar steps:
- Create a magic ring and begin with 6 single crochet stitches.
- Follow the pattern in the video (each varies slightly in length and rounds).
- Use the tail to sew each piece to the body (arms between Rnds 14 and 26, legs at the bottom of the body, ears between Rnds 5 and 7). Attach flatter sections to keep pieces securely in place.
Hat
- Start with white yarn and create a magic ring.
- Begin Rnds 1-2 with single crochets, then move onto increases:
- Rnd 3: Work (1 SC, Inc) across.
- Rnd 10: Work (3 SC, Inc) across.
- Gradually increase stitch counts per round, following the parentheses patterns for Rnds 16-19. At Rnd 20, begin chain stitches:
- Chain 6, skip 6, SC, and repeat. This will create gaps for Percy’s ears to stick through when worn.
- Switch to red yarn on Rnd 22 to form the body of the hat. Adjust the brim by crocheting over back loops only with half-double crochet stitches.
Light Bulbs
- Create a magic ring using either red, yellow, or light green yarn.
- Work 4 SC into the magic ring, tighten, and add an increase round to make the bulb shape.
- Tidy up the edges by sewing the top closed. Repeat for each color, following the given counts.
Pattern Question:
Question: Can I use a lighter or heavier yarn for Percy?
Answer: Absolutely! You can use sport, DK, or plush-weight yarn for Percy. Just adjust your hook size to maintain a durable, well-structured result.
Conclusion:
Percy the Christmas Bear is a festive crochet gem that combines heartwarming details with meticulous craftsmanship. With easy-to-follow steps, vibrant holiday colors, and adorable light embellishments, this crochet plushie will quickly become a favorite for creating holiday cheer.