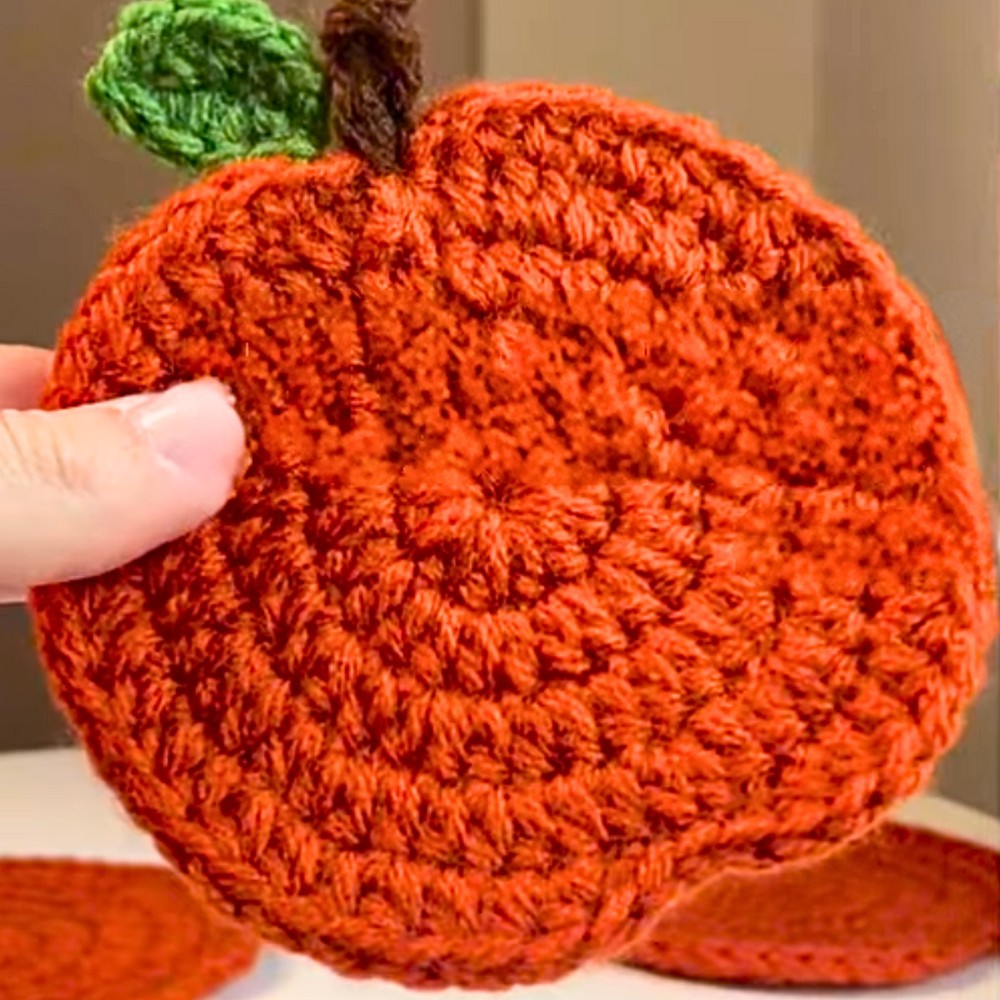
Few handmade pieces combine seasonal charm and everyday usefulness as beautifully as a pumpkin crochet coaster. A pumpkin coaster is not just a cute decoration; it is a functional and festive way to bring autumn charm into your home. These charming pumpkin-shaped coasters are perfect for holding your drinks while also doubling as lovely table decor. They are ideal for cozy coffee breaks, hot cocoa evenings, or even as a thoughtful, handmade gift for loved ones. And once you see how a few simple crochet steps bring this seasonal piece to life, you will be curious to explore the process that follows.
Free Crochet Pumpkin Coaster Tutorial

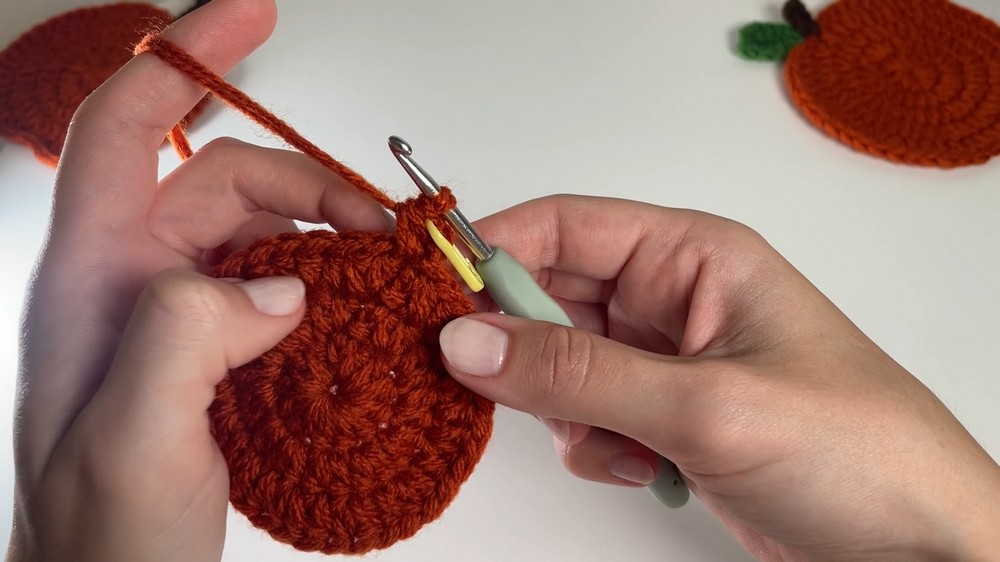
No magic ring is needed to begin this Coaster design, making the starting process simple and approachable for crocheters of all skill levels. You start with a basic slip knot and crochet in a circular pattern to form the pumpkin base. A simple stem and leaf complete the look, giving the finished piece an extra touch of seasonal character. Whether you choose cotton yarn for durability or acrylic yarn for personal preference, these sturdy and adorable coasters make a delightful addition to any autumn setting. The crochet process is easy enough for beginners, yet still satisfying for experienced makers looking to create something practical and festive. The step-by-step pattern below makes it easy to recreate this charming autumn piece with confidence and enjoyment.
Credit madebymara
Materials & Tools Needed
- Yarn:
- Yarn Art 100% acrylic yarn (or any yarn you have).
- Important: Use cotton yarn if coasters will be used for hot drinks.
- If your yarn is thin, double-strand it to make it thicker.
- Hook Size:
- For thin yarn: Size 4 crochet hook. Adjust hook size to match the yarn thickness.
- Other Tools:
- Pair of scissors.
- Yarn needle.
- Stitch marker.

Finished Size
The finished pumpkin coaster size will depend on the yarn and hook size.
For thicker yarn, the coaster can be larger. Customize sizing by modifying stitch counts or using alternate rows.
Customization Ideas
- Colors:
- Use orange for the pumpkin body.
- Brown for the stem.
- Green for the leaf.
- Embroidery/Details:
- Decorate the pumpkin with embroidered veins or swirls.
- Advanced Modifications:
- Increase row counts for a larger pumpkin.
- Add surface crochet for texture.
Pattern Abbreviations & Terminology
- HDC: Half Double Crochet
- SC: Single Crochet
- SL ST: Slip Stitch
- CH: Chain
- YO: Yarn Over
Terminology is based on US Crochet Terms.
Step-by-Step Detailed Crochet Instructions
Pumpkin Body:
Round 1: Create a Circle
- Start with a Slip Knot:
- Make a loop, insert the hook, yarn over, and pull through to create the slip knot.
- Chain 5:
- YO, pull through the loop on the hook; repeat for 5 chains.
- Form the Circle:
- Insert the hook into the first chain.
- YO and pull through all loops on the hook for a slip stitch.
- Pull the center apart to reveal the circle.
- Chain 2 for Height (does not count as a stitch).
- Inside Circle: Work 12 HDCs:
- YO, insert hook into the center (not outer chains).
- Ensure the tail is crocheted over for closure later.
- YO, pull through, YO, and pull through all 3 loops on the hook.
- Use a stitch marker on the first HDC.
- Repeat for a total of 12 HDCs.
- Close the Loop:
- Hold the tail and pull tightly to close the circle. Leave this string for weaving later.

Round 2: Increase to 24 Stitches
- Slip Stitch into First HDC:
- Remove stitch marker, insert hook into the first stitch, YO, pull through all loops.
- Chain 2 for Height (does not count as a stitch).
- 2 HDC in Each Stitch:
- Place 2 HDCs into the same stitch as the slip stitch.
- Mark the first stitch of this round.
- Work 2 HDC into each stitch to reach 24 stitches.
- End of Round 2:
- Slip Stitch into the first HDC to close the round.
Round 3: Follow the Pattern Increase to 36 Stitches
- Slip Stitch into First Stitch and Chain 2 (does not count as a stitch).
- Pattern:
- Work 2 HDC into the first stitch and mark it.
- Next stitch: 1 HDC.
- Repeat 2 HDC, 1 HDC around the circle.
- Total Stitches at End of Round:
- You should have 36 HDCs.
- Slip Stitch to join and finish the round.
Round 4: Follow the Pattern Increase to 48 Stitches
- Slip Stitch into First Stitch and Chain 2 to create height.
- Pattern:
- Work 2 HDC into the first stitch and mark it.
- Next 2 stitches: 1 HDC each.
- Continue with 2 HDC, 1 HDC, 1 HDC around the circle.
- Total Stitches at End of Round:
- You should have 48 HDCs.
- Slip Stitch to join and finish the round.
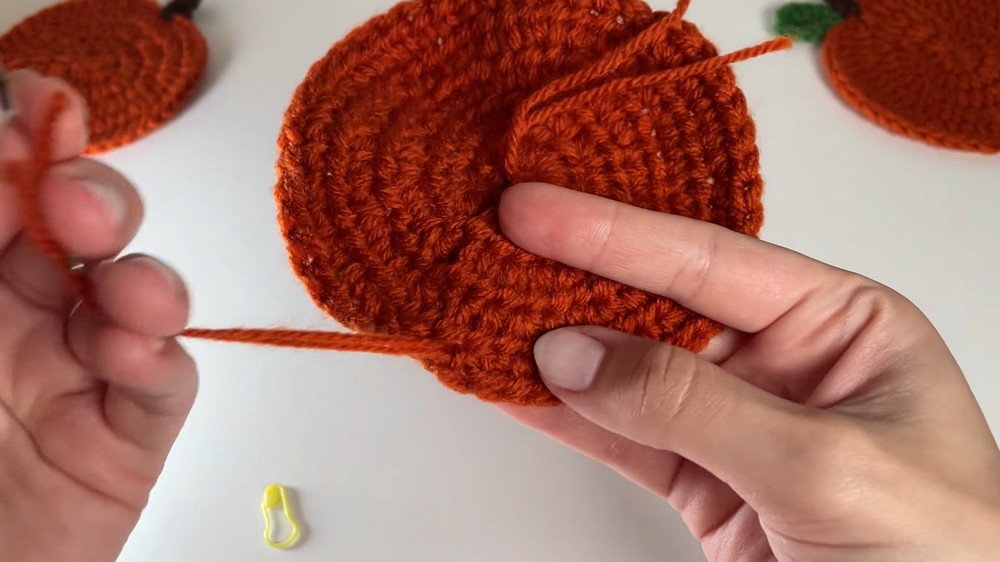
Shaping the Pumpkin
Round 5: Adding Dimension
- Start with a Slip Stitch:
- Slip Stitch into the first stitch and place a stitch marker.
- Pattern:
- First stitch: SL ST.
- Second stitch: SC.
- Next 20 stitches: HDC.
- Next Stitch: SC.
- Next 2 Stitches: SL ST.
- Next Stitch: SC.
- Next 20 stitches: HDC.
- Final stitches: SC, SL ST.
- Finish Off:
- Cut yarn after completing the last SL ST.
- Pull through tail and weave it into the stitches using a yarn needle.
Stem:
- Attach Brown Yarn:
- Insert hook into the center of pumpkin between two stitches at the top.
- Pull yarn through to attach.
- Stem Setup:
- CH 4 from the starting point.
- Work 3 SC Down the Chain:
- Insert hook into the second chain and work 1 SC.
- Continue SC for the next 2 chains.
- Slip Stitch to Finish:
- Insert hook into the pumpkin near the starting point.
- Slip Stitch, cut yarn, pull through, and weave in ends.

Leaf (Optional):
- Attach Green Yarn:
- Work a Slip Knot and pull through near the stem.
- Make Leaf Base:
- CH 6.
- Work Across Chain:
- First chain: SC.
- Second chain: HDC.
- Third chain: 2 DC.
- Fourth chain: HDC.
- Fifth chain: SC.
- Turn Work to Opposite Side:
- Repeat stitches on opposite side of chain (SC, HDC, 2 DC, HDC, SC).
- Attach Leaf:
- SL ST leaf base to pumpkin near stem.
- Cut yarn, pull through, and weave ends into the back of coaster.

Final Steps
- Weave in all loose ends using the yarn needle.
- Ensure tightness and secure all finishing stitches.
- Admire your beautiful pumpkin coaster!
Notes:
Be sure to check stitch counts after each round and double-check joins to maintain uniformity