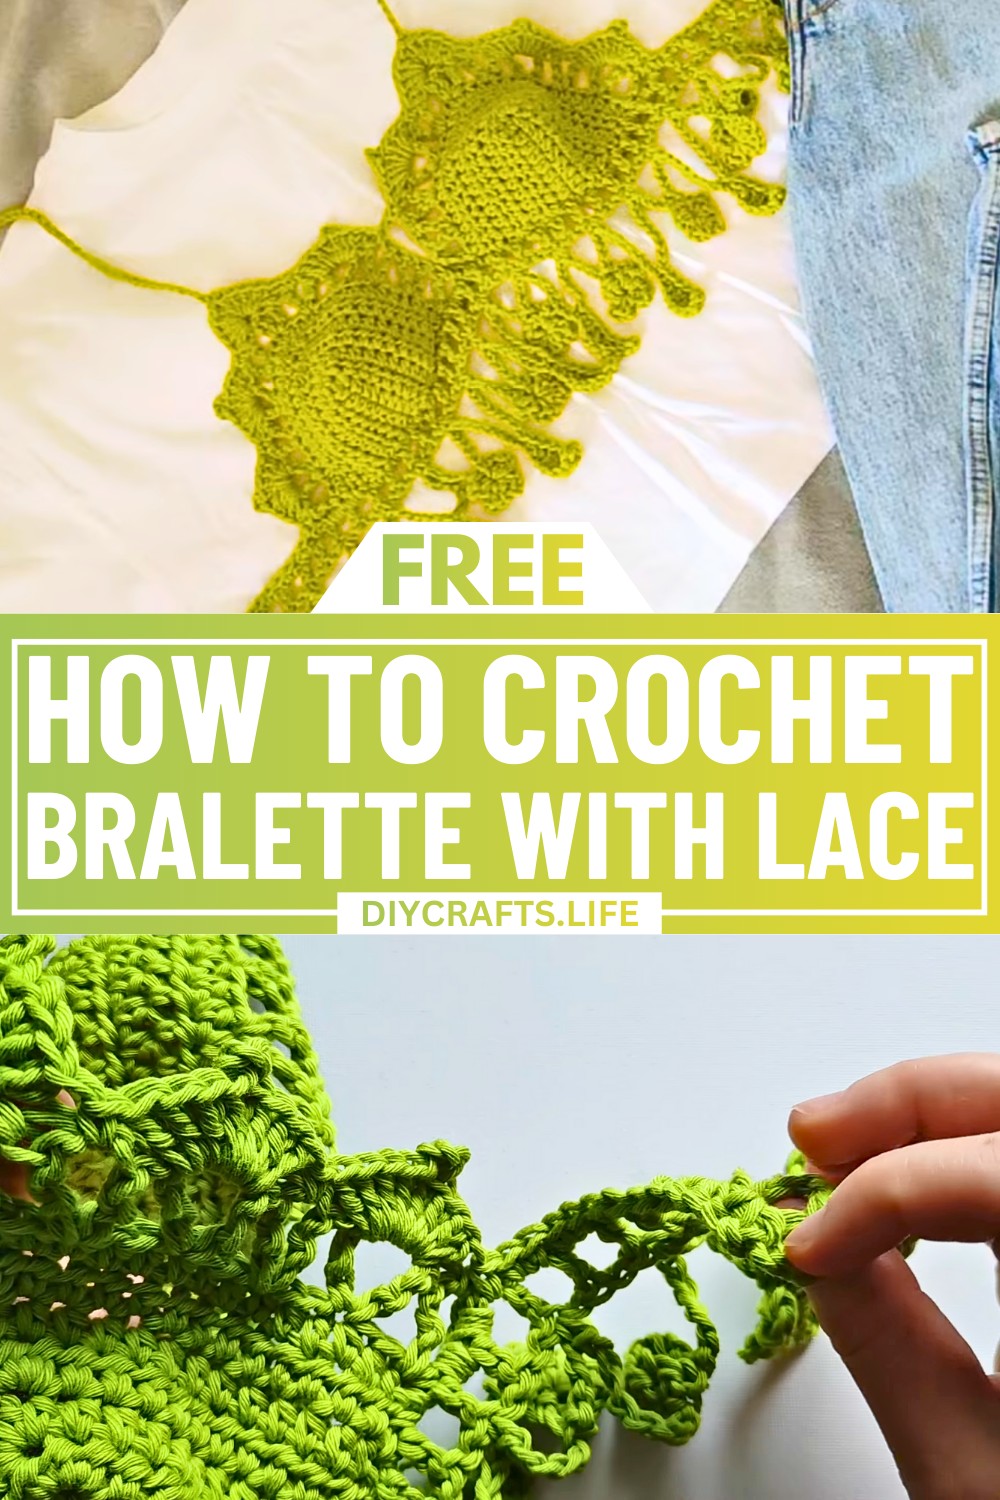
Step into summer style with a crochet bralette that’s as bold as it is beautiful. Perfect for warm-weather days, this design pairs timeless crochet techniques with a touch of modern elegance. Whether you’re wearing it on the beach or layered with your favorite outfit, this bralette promises to make a statement wherever you go. Every detail in this design is crafted to celebrate the confidence and individuality of its maker.
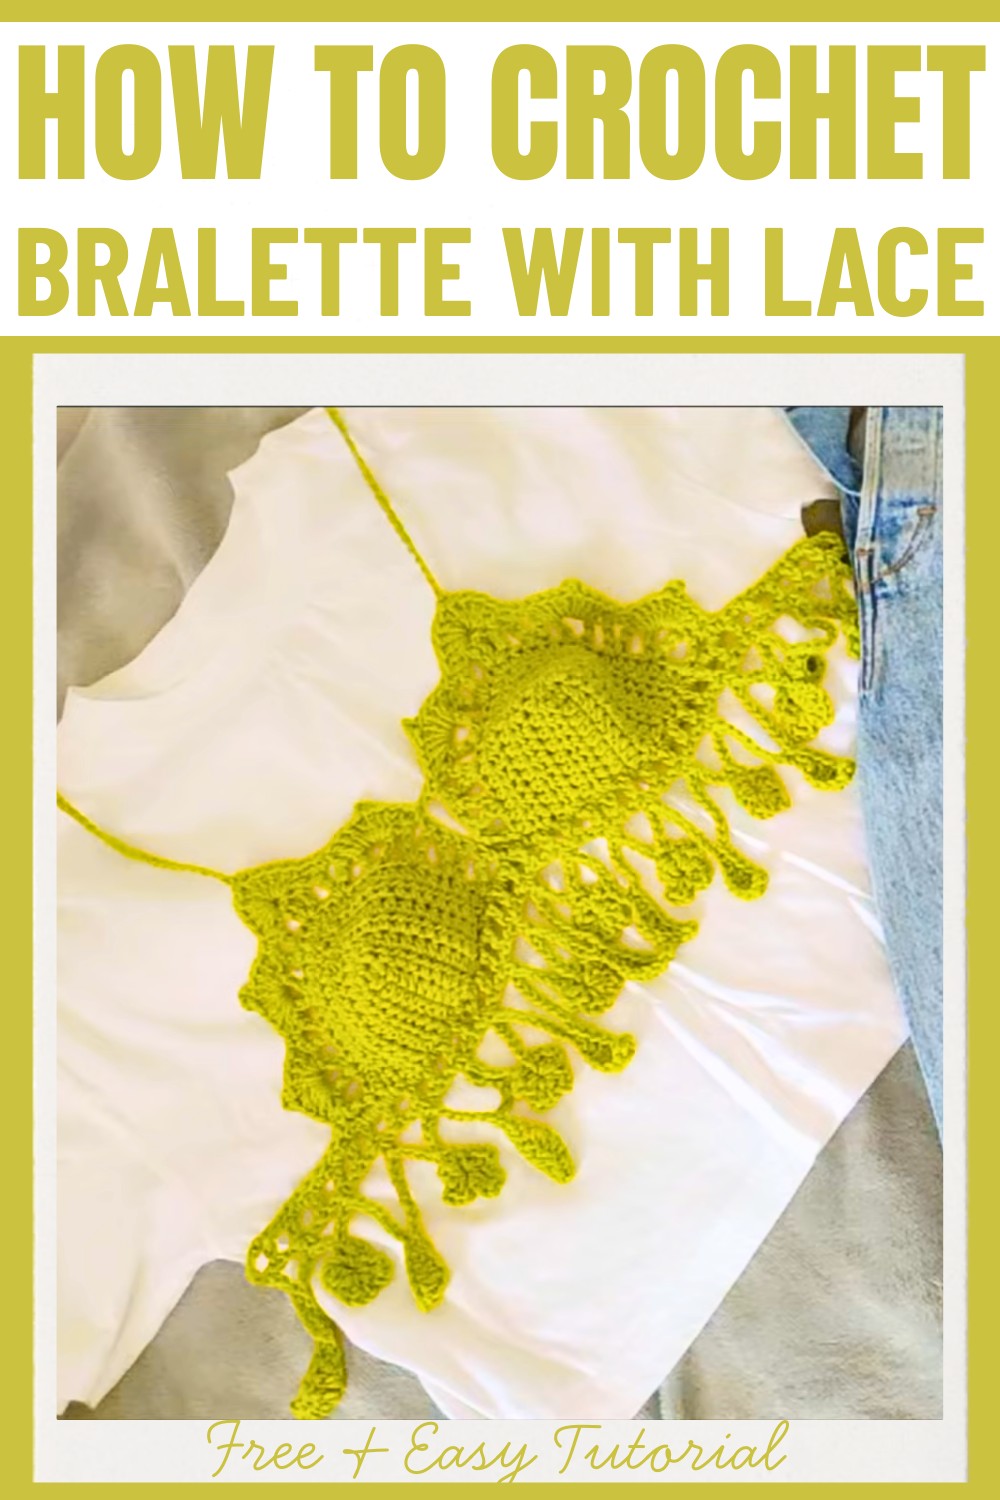
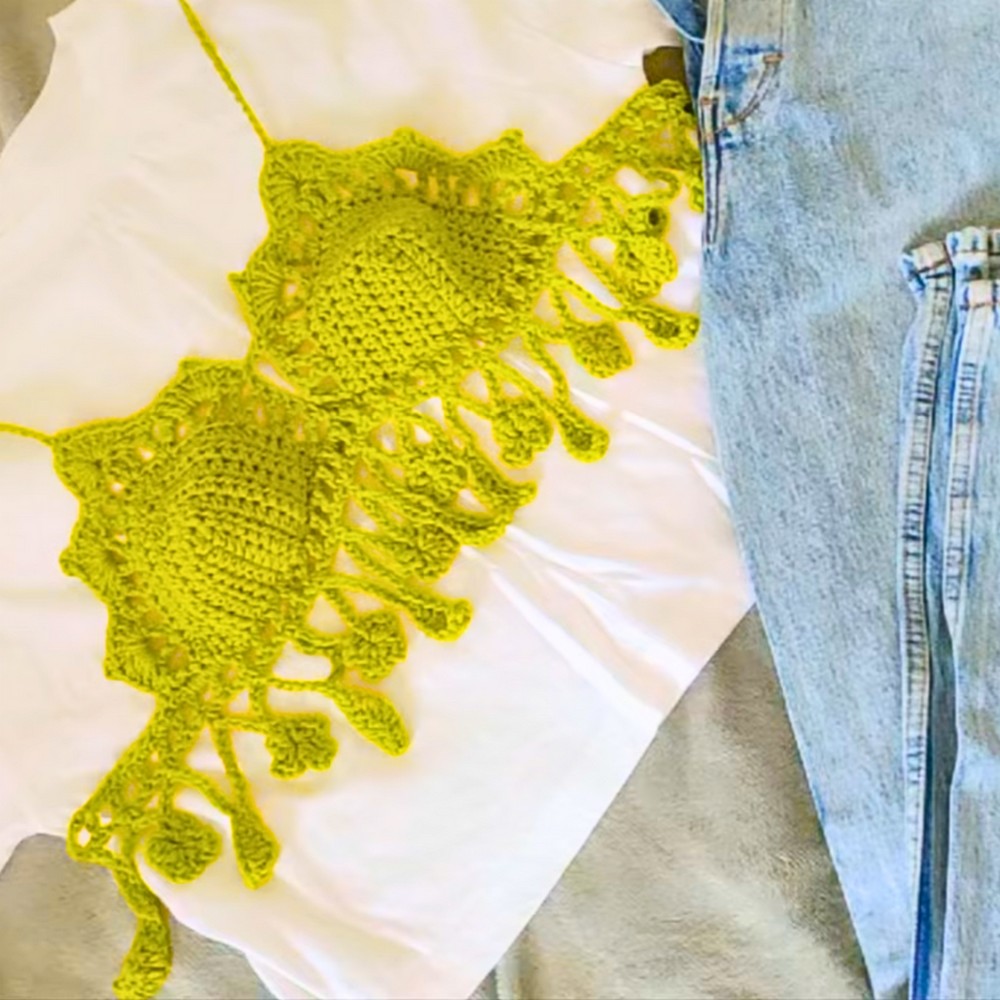
This crochet bralette features a classic cup design combined with lace accents that create a delicate yet striking under-bust pattern. With its simple yet versatile construction, you can adjust the size and pattern rows to suit your unique needs. From intricate leaf and flower stitches to refined scallops along the edges, every element of this pattern is designed for both beauty and functionality. The tie-back straps ensure a perfect and adjustable fit, allowing the bralette to seamlessly adapt to any style or size. Make it your own by experimenting with colors or adding personal touches to reflect your creative vision.
Credit Hobbi CROCHET
Required Materials
- Yarn of your choice (choose a lightweight cotton or similar yarn for summer wear)
- Crochet hook appropriate for the yarn (check your yarn label for size recommendations)
- Stitch markers
- Scissors
- Measuring tape
- Tapestry needle (for weaving in ends)
Important Notes
- The starting chain for the cup depends on your size. For “Size S,” chain 10. For larger bust sizes, increase the chain to suit your measurements (e.g., chain 12 or 14).
- The pattern uses US crochet terms.
- The basic stitches include:
- Half Double Crochet (HDC): Yarn over, insert hook, yarn over, pull up a loop, yarn over, and pull through all three loops on the hook.
- Treble Crochet (TR): Yarn over twice, insert hook, yarn over, pull up a loop, yarn over, pull through two loops (repeat twice more).
- Slip Stitch (SL ST)
- Single Crochet (SC)
- Use stitch markers to mark key spots, especially the top stitch of the cups where increases are made. This ensures even shaping.
- The bralette consists of three components:
- Classic crochet cups (base)
- Underbust lace pattern
- Decorative scallop edging and straps
Step-by-Step Crochet Instructions:
Part 1: Crochet Cups (Make Two)
- Foundation:
- Chain 10 (for size S). Adjust length for larger sizes.
- In the second chain from the hook, make 1 HDC. Continue making 1 HDC in each chain across. You should have 8 Half Double Crochets in total.
- Top of the Cup (Increase Area):
- In the last chain stitch, make 3 HDCs (this forms the rounded top of the cup). Use a stitch marker to mark the second HDC in this group as it’s the top of the cup where increases will occur.
- First Row:
- Chain 1, turn your work, and work 9 HDCs on the other side of the foundation chain (including the last stitch from the previous row).
- In the marked stitch (top of the cup), make 3 HDCs and mark the middle stitch again.
- Finish with 9 HDCs down the other side.
- Subsequent Rows:
- Chain 1, turn, and increase in the top marked stitch of the cup by making 3 HDCs in that stitch.
- Add one HDC per side for each row (rows progressively include more stitches as the cup grows).
- For size S, repeat this process for 7 rows in total (adjust the number of rows as needed for larger coverage).
- Lace Edging (Optional):
- To create a lace pattern on top of the cup, start a new row:
- Chain 4, turn, and work 1 TR + chain 1 in the same stitch. Skip 2 stitches and repeat (1 TR, chain 1) across the edge.
- At the middle stitch, make 3 TRs in the same stitch to keep the rounded curve.
- Continue this pattern down the other side of the cup.
- To create a lace pattern on top of the cup, start a new row:
- Make Second Cup:
- Follow the same steps to crochet the second cup.
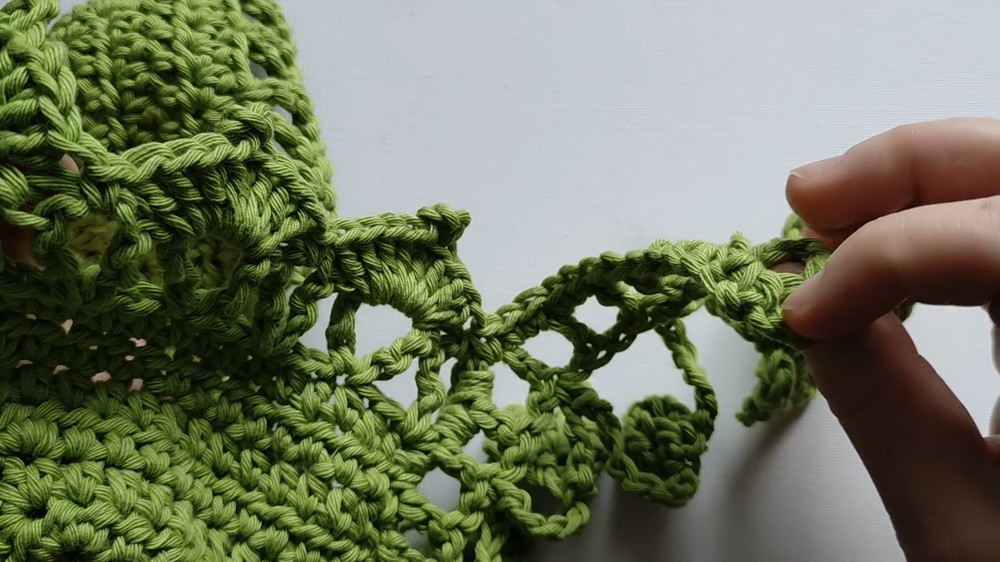
Part 2: Underbust Lace Pattern
- Foundation:
- Attach the yarn at the base of one cup and chain a length to span your underbust. This chain should equal the desired width of the bralette.
- Work 1 SC in the first chain, then alternate between 1 DC, chain 1, 1 DC across.
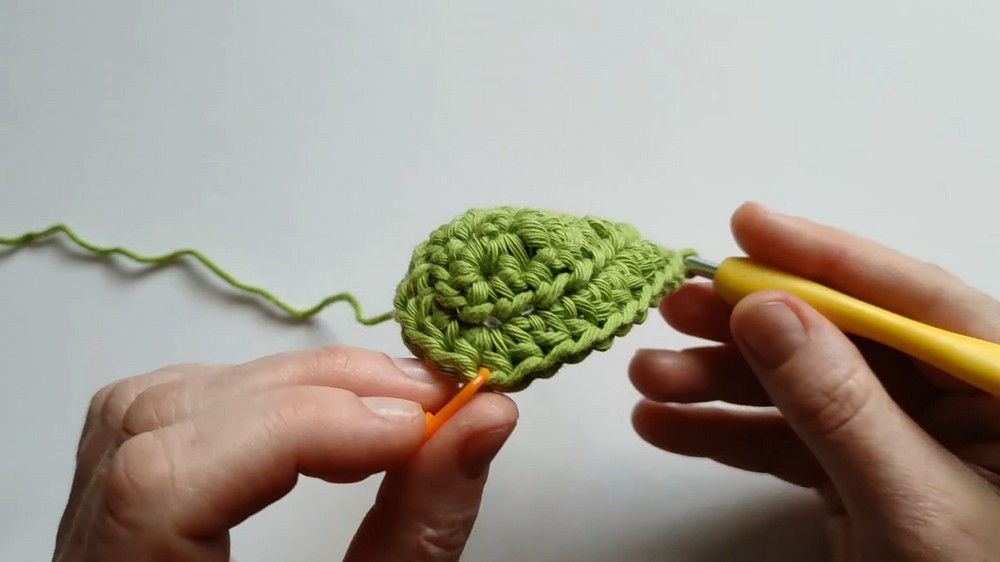
- Decorative Leaf and Flower Motif:
(Alternating between leaves and flowers for the lace pattern.)- Leaf:
- Chain 16.
- Single crochet back along the chain:
- 1 SC,
- 1 HDC,
- 1 DC,
- 2 DCs together,
- 1 DC,
- 1 HDC,
- 1 SC,
- Slip Stitch.
- Flower:
- Chain 6.
- Slip stitch to the third chain from the hook to form a small circle.
- Create petals:
- Chain 2, HDC into the circle, chain 2, slip stitch into the circle. Repeat for 4 petals.
- Attach the flower to the lace foundation with a slip stitch.
- Leaf:
- Alternating Leaf/Flower Pattern:
- Once the first leaf is complete, chain 8 to start the next motif (alternating leaf, flower, leaf, etc.). Attach to the underbust foundation.

Part 3: Scallop Edging & Straps
- Scalloped Edge Around Cups:
- Single crochet around the cups to smooth the edges. Then, work the scallop pattern:
- (Shell Stitch): 4 DC in the same stitch, chain 3, slip stitch into the last DC to form a picot, 4 DC in the same space.
- Single crochet into the next chain space, then repeat the shell stitch.
- Single crochet around the cups to smooth the edges. Then, work the scallop pattern:
- Scallop Tips (Top of Cups):
- At the top of the cup, make a more pronounced scallop:
- 5 DC, chain 3 (picot), 5 DC in the same stitch.
- At the top of the cup, make a more pronounced scallop:
- Straps:
- Attach yarn to the upper corners of each cup and chain a long tie for the straps. (Adjust length based on your measurements and how you plan to tie it.)
- Make additional ties at the bottom of the underbust lace for the back closure.
Finishing
- Weave in all loose ends using a tapestry needle.
- Block the bralette gently (if desired) to smooth stitches and enhance the lace pattern.
- Wear and enjoy your handmade crochet bralette!