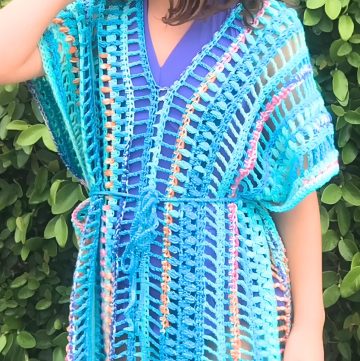
Wrap yourself in effortless comfort and charm with the Crochet Mesh Sweater, a design that merges casual coziness with contemporary flair. A perfect blend of texture and color, this sweater showcases layered stitching that creates delicate patterns while allowing room for individuality. Whether styled for chilly afternoons or paired with bold accessories for a modern look, this sweater makes every outfit stand out beautifully.

Color Layered Crochet Mesh Sweater
This crochet pattern is truly unique, featuring a seamless mesh aesthetic with alternating stitch techniques that give it depth and character. The interplay of colors, from striking dark shades to soft pastels, enhances its visual appeal, while freehand stitching encourages endless customization for any preference. The relaxed fit and versatile design make this project ideal for expressing creativity, letting every creator produce a piece that's both functional and artistic.
Credit Strawberry Sirens
Materials & Tools Needed
- Yarn
- Three colors of yarn: Dark pink, ivory, and light pink (use any yarn type and colors as desired).
- Choose yarn weight based on personal preference; medium or lightweight yarns work well for mesh designs.
- Crochet Hook
- Use a hook size suited to your yarn (typically a 4mm - 5mm hook for medium-weight yarns).
- Scissors
- For cutting excess yarn ends.
- Yarn Needle
- For sewing seams and weaving in loose ends.
- Used for creating seamless connections between panels and sleeves, especially at shoulder seams.
Finished Size & Customization Ideas
- Approximate Size
- The size depends entirely on your foundation chain length and stitch pattern repetition.
- For reference:
- Front/back panels should be as wide as desired for the width of the sweater.
- Sleeves should fit the armhole comfortably when folded in half.
- Customization Suggestions
- Adjust Size:
- To make the sweater wider or narrower, adjust the starting foundation chain length of the panels.
- For a looser fit, increase width; for a more fitted look, decrease width.
- Adjust Style:
- Use chunky yarns for a cozy winter sweater or lightweight yarns for a summer mesh piece.
- Modify strap width by working fewer or more rows for the shoulder.
- Adjust sleeve length to create short sleeves or longer ones based on preference.
- Experiment with color combinations and stripes for unique designs.
- Adjust Size:
Pattern Abbreviations & Terminology
- Abbreviations
- Ch: Chain
- Dc: Double Crochet
- Tr: Triple (or Treble) Crochet
- Sc: Single Crochet
- Terminology
- Foundation Chain: The initial chain length forming the base of your panel.
- Skip: Skip the next stitch or chain in the row.
- Puff Stitch: A textured stitch created by pulling multiple loops onto your hook.
- Back Loop: The loop farthest from you when looking at a stitch.

Step-by-Step Detailed Crochet Instructions
Panels (Front and Back)
- Foundation Chain
- Make a chain the width of your sweater (wrap the chain around yourself until the desired width is achieved).
- Row 1: Double Crochet (Dc)
- Dc into each chain across.
- Row 2: Triple Crochet (Tr)
- Yarn over twice, skip the next chain, and Tr into the following chain. Continue across, skipping every other chain.
- Row 3: Single Crochet (Sc)
- Work 2 Sc into each gap between stitches created by the Tr row.
- Switch Colors
- On the final stitch, loop the new color yarn through to switch colors (dark pink → ivory).
- Row 4: Sc in ivory
- Work one Sc into every chain across.
- Row 5: Tr in ivory
- Yarn over twice and Tr into every other chain, skipping one chain between stitches.
- Row 6: Dc in ivory
- Work 2 Dc into each gap created by the Tr rows.
- Repeat Rows for Additional Colors
- Add third color (light pink) following the alternate sequence (Dc, Puff, Sc, etc.). Puff stitches can be worked by pulling 5 loops onto your hook in one stitch.
- Continue Until Desired Length
- Alternate colors and stitch patterns, repeating rows in a mirrored sequence until the panel reaches sweater length.

Shoulders
- Shape Shoulder Panel
- Single crochet in the first 19 stitches (or adjust number based on preferred width for your neckline).
- Decrease Rows
- For Tr rows: Skip stitches when working Tr to reduce width slightly.
- For Sc rows: Work decreases by pulling through 3 loops over 2 stitches (see tutorial for detailed visual instructions).
- Repeat
- Mirror the shoulder section on the other end of the panel to complete the front/back panel.
Connecting Front and Back Panels
- Crochet Method
- Use a hook to connect panels by crocheting directly into aligned stitches (single crochet through both panel edges).
- Yarn Needle Method
- Align panels (right sides facing) and sew through the back loops of stitches using a yarn needle.

Sleeves
- Foundation Chain
- Create a shorter foundation chain matching the desired sleeve width.
- Follow Same Stitch Pattern as Panels
- Alternate (Dc, Tr, Sc, Puff, etc.) for the sleeve rows, mirroring the pattern used on the main panels. Adjust sleeve length as desired.
- Connect Sleeves
- Use crochet or yarn needle methods to attach sleeves to armholes.
Finishing Touches
- Collar
- Add single crochet rows around the neckline for a finished look. Work additional rows if you want a tighter fit or higher neckline.
- Weave in Loose Ends
- Secure loose yarn ends by threading them through with the yarn needle.
- Final Adjustments
- Check seams and edges for smooth connections. Add more rows if necessary for off-shoulder or fitted designs.
Tips & Notes:
- This pattern is freehand and does not require stitch counting; adjustments can be made based on your personal measurements.
- Always test fit pieces before sewing or connecting to ensure the sweater sits properly.
- Be creative with yarn choices, adding textures or self-striping yarn for variation.