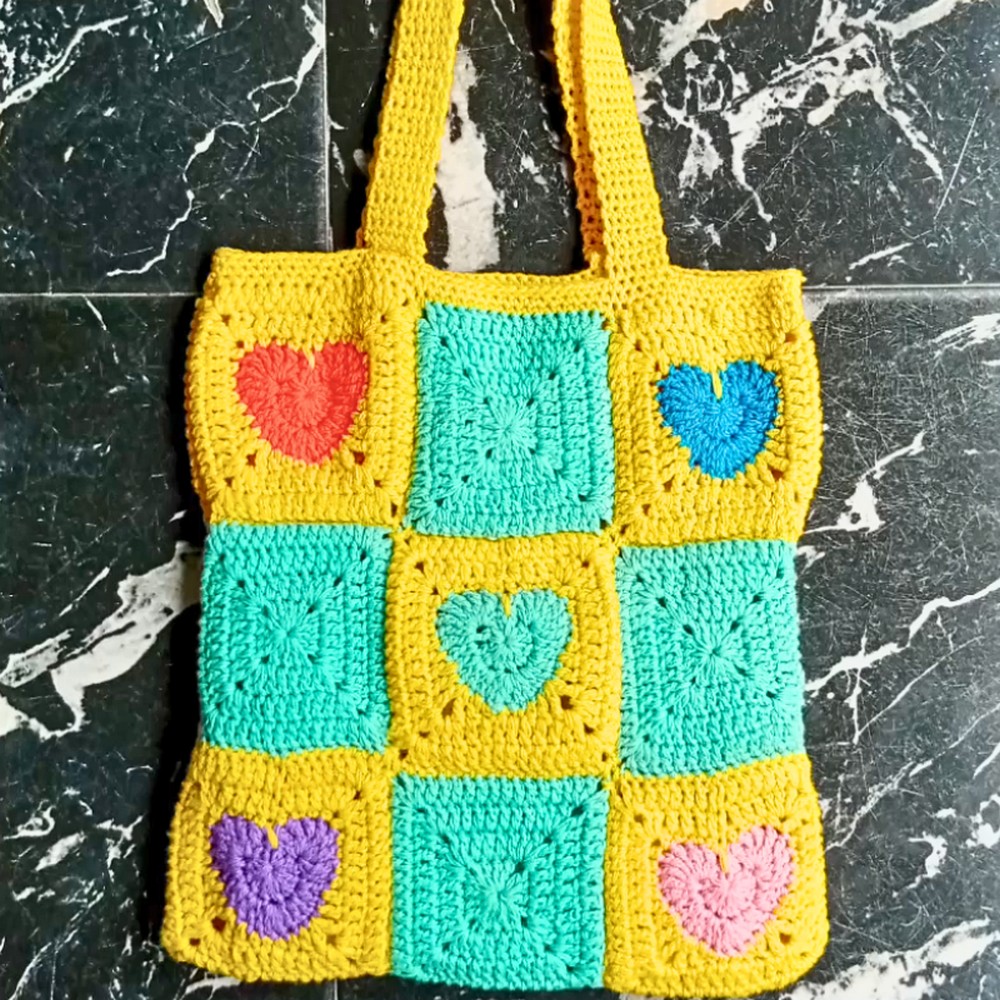
This Crochet Heart Granny Square Tote Bag is a lovely, stylish bag perfect for carrying your essentials. Its unique design features charming heart-shaped granny squares blended with simple squares, creating a delicate yet striking pattern. It’s not just a bag, it’s a statement piece that adds a personal and handmade touch to your wardrobe.

What makes this tote bag special is its versatility. You can use it as a daily tote, a reusable shopping bag, or as a cozy accessory for small trips. The process is simple and enjoyable—focusing on creating individual squares, joining them together, and finishing it with a sturdy handle, making it suitable even for beginners with basic crocheting skills.
The combination of colors and patterns lets you play around and match your personal style. Whether you prefer vibrant shades or neutral tones, this crochet bag can be customized effortlessly.
Credit Playful Regal
Materials & Tools Needed:
- Yarn: Size 3 acrylic yarn
- Crochet Hook: Size 3.5 mm.
- Tapestry Needle: For weaving in ends and sewing squares together.
- Stitch Markers: To mark placement of straps and specific stitches.
- Scissors: For trimming yarn ends.
Finished Size:
This tote bag will approximately measure 13.5 inches (length and width)
Customization Ideas:
- Experiment with different yarn colors for the heart squares, plain squares, and the border.
- Alter the size by adding more squares or making larger granny squares.
- Play with textures by using variegated yarn for hearts.
Pattern Abbreviations & Terminology:
- ch: Chain
- sc: Single Crochet
- Hdc: Half Double Crochet
- dc: Double Crochet
- tr: Treble Crochet
- sl st: Slip Stitch
- sp: Space
- sk: Skip
- RS: Right Side
- WS: Wrong Side
- Beg ch-3: Beginning Chain 3 (Counts as 1 dc)
Terminology: US crochet terms are used throughout.
Step-by-Step Detailed Crochet Instructions
Heart Granny Square
Round 1: Foundation Ring
- Start with a slip knot.
- Ch 4, then make a sl st into the first chain to form a ring.
- Ch 3 (counts as your first dc).
- Place 11 dc into the ring. Including the beginning ch-3, there should be 12 stitches total.
- Slip stitch into the top of the beg ch-3 to close the round.
Round 2: Forming the Heart Shape
- Start with ch 3 as your first dc. (Skip both the ch-3 and the next dc stitch.)
- In the next stitch, make 7 tr stitches (yarn over twice for treble crochet), all into the same stitch.
- Moving to the next stitch, place 1 dc.
- Into the next two stitches: Place 2 dc in each stitch (total of 4 stitches in these 2 spaces).
- To create the bottom point of the heart, perform the following:
- After the second set of 2 dc, pull up a loop, then insert your hook into the front loop of the last dc (from the same stitch).
- Pull through the front loop and finish the single crochet motion.
- Return to the same stitch as before and add 2 dc.
- Into the next two stitches: Place 2 dc in each stitch.
- Add 1 dc into the next stitch.
- Into the following stitch: Place 7 tr stitches.
- Skip the next stitch and sl st into the top of the Beg ch-3 to form the heart.

Round 3: Turning the Heart Into a Square
- Change yarn color and attach the new yarn to the space between the last double crochet and beg ch-3 from Round 1.
- Start with extended single crochet (pull the stitch slightly longer), then pull tight.
- Ch 2, and note that this extended single crochet + chain does not count as stitches.
- Work the corners and edges as follows:
- In the first tr stitch, place 1 hdc.
- In the next 2 stitches, place 1 sc in each stitch.
- In the next stitch, form a corner: Work 1 hdc, ch 2, 1 hdc.
- Place 1 sc into each of the next 3 stitches.
- Add 1 hdc into the stitch following the single crochets.
- Into the next 2 stitches, place 1 dc in each stitch.
- Create the next corner by working 1 tr, ch 2, 1 tr in the next stitch.
- Mirror the same stitch pattern on the other side to complete the square:
- 1 dc per stitch x 2
- 1 hdc
- 1 sc per stitch x 3
- 1 hdc, ch 2, 1 hdc (corner)
- 1 sc per stitch x 2
- 1 hdc on the last stitch.
- Join the round with a sl st into the first hdc.
Rounds 4 & 5: Adding Borders
- Round 4: Work 1 dc into each stitch with a shell stitch (2 dc, ch 2, 2 dc) in each corner.
- Round 5: Repeat the pattern for Round 4. You should have 16 stitches between each corner after this round.
- Fasten off and sew in loose ends.
Plain Granny Square
The plain square is simpler and starts with a foundation ring:
- Follow the same steps as Round 1 above, then continue adding more sc/dc rounds with shell stitches in the corner.
- Work a total of 4 rounds for each plain square.
Create 10 heart squares and 8 plain squares.

Bag Assembly:
- Arrange the squares: Follow the layout instructions in the transcript.
- Start with rows alternating heart squares with plain squares.
- Sew squares together:
- Use slip stitches or a tapestry needle to join the squares.
Working the Strap:
- Mark 6 stitches on either side of the bag (from the seam).
- Attach the yarn and work rows of single crochet until the strap length is to your preference (approx. 20 inches per strap).
- Attach straps securely to the seam using slip stitches or a tapestry needle.

Finishing Touches:
- Sew all loose ends neatly.
- Flip the bag to the right side.
- Enjoy your gorgeous tote bag!