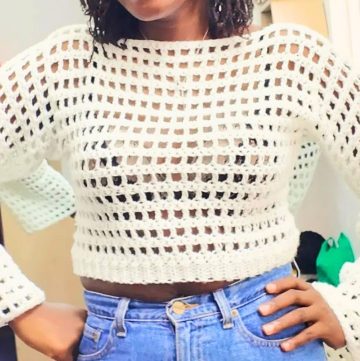
Turn heads with this stunning crochet t-shirt that effortlessly blends modern design with timeless craftsmanship. Made with creativity and care, this pattern transforms simple stitches into a work of art that captures both elegance and comfort, perfect for all seasons and occasions. Whether you're a seasoned crocheter or just beginning your journey, this top will inspire you to craft something special.

Top-Down Raglan Crochet T-Shirt Pattern
This top-down raglan t-shirt uses a unique combination of techniques to create a perfect fit. Starting with a V-stitch mesh neckline, transitioning to flowing rows of double crochet, and finishing with a striking ribbed border, every section is thoughtfully designed to shape and flatter the body. The lightweight yarn and seamless construction add to its charm, offering comfort and versatility. With options to customize sleeve length and fit, you can craft a piece that reflects your unique style.
Credit Veroknitcrochet
Materials & Tools Needed
- Yarn: Lightweight yarn (100% Lyocell, or similar). Approx. 400g total (200g skeins, 450m each). Adjust yarn type and quantity as needed for your project.
- Crochet Hook: 3.5 mm hook.
- Other Tools: Measuring tape, scissors, tapestry needle, four stitch markers.
Pattern Abbreviations & Terminology
- Ch: Chain
- Sl st: Slip Stitch
- DC: Double Crochet
- V-Stitch: (1 DC, Ch 1, 1 DC in the same stitch)
- FPDC: Front Post Double Crochet
- BPDC: Back Post Double Crochet
- DC2Tog: Double Crochet Two Together (Decrease)
- Rep: Repeat
- RS: Right Side
- WS: Wrong Side

Step-by-Step Instructions
Foundation: Neckline and Stitch Markers
- Create the neckline:
- Make a slip knot and crochet the foundation chain for the neckline, breaking it into sections:
- Back: 36 chains (start with 18 chains),
- Sleeve 1: 18 chains (place stitch marker in the 1st chain),
- Front: 36 chains (place stitch marker in the 1st chain),
- Sleeve 2: 18 chains (place a stitch marker at the 1st chain),
- Remaining back: 18 chains (place stitch marker in the 1st chain).
- Ensure the total number is 108 stitches (or adjust based on size).
- Make a slip knot and crochet the foundation chain for the neckline, breaking it into sections:
- Join in the round:
- Check to ensure the chain is not twisted.
- Sl st to the first chain to form the neckline.
Section 1: Raglan Yoke (Rounds 1–3)
Round 1 (V-Stitch Mesh):
- Ch 3 (counts as the first DC).
- Work into foundation chain:
- Skip 2 chains, make 1 V-stitch in the next chain (DC, Ch 1, DC in the same chain).
- Rep: Skip 2 chains, V-stitch in the next chain. Continue this pattern until you reach the first stitch marker.
- Corners:
- Remove the stitch marker. At the marked chain, make the increase:
- Work 1 V-stitch, Ch 1, 1 V-stitch into the same chain.
- Replace the stitch marker in the Ch-1 space between the V-stitches.
- Remove the stitch marker. At the marked chain, make the increase:
- Repeat process:
- Make V-stitches until reaching the next corner marker. At each corner, repeat the increase from Step 3.
- Continue working across the front, second sleeve, and back stitches until you finish the round.
- Join round:
- Sl st into the 3rd chain of the starting Ch 3.
Round 2 (V-Stitch Mesh with Corner Increases):
- Turn your work.
- Ch 3 (counts as first DC).
- Make 1 DC in the space between the last DC and the next V-stitch.
- Pattern continuation:
- Work 1 V-stitch into the spaces between V-stitches (skip the V-stitches from the previous row).
- Continue until reaching the first corner.
- Corners:
- Remove the stitch marker. In the Ch-1 space (corner), work the increase:
- 1 V-stitch, Ch 1, 1 V-stitch into the same space.
- Replace the stitch marker in the new Ch-1 space between V-stitches.
- Remove the stitch marker. In the Ch-1 space (corner), work the increase:
- Continue:
- Work V-stitches in the spaces between V-stitches across all sections of the yoke.
- Make corner increases in each of the four stitch marker spaces.
- At the end of the round, work 1 DC into the last space between the V-stitch and the starting Ch-3.
- Join the round with a Sl st into the 3rd chain of the starting Ch 3.

Round 3 (V-Stitch Mesh Continuation):
- Turn your work.
- Ch 3.
- Skip the last DC and make a V-Stitch into the space before the first V-Stitch.
- Continuation:
- Work V-stitches in the spaces between V-stitches as before.
- Corners:
Repeat the increase for corners as done in Rounds 1 and 2. - Join the round with a Sl st into the Ch 3.
Step 2: Separate Body and Sleeves
- Measure the yoke: Continue alternating Rounds 2 and 3 until the raglan section reaches the armpit measurement (~19 cm or as suited to your size).
- Create the armholes:
- Work one final row of DC across the back and front sections only.
- Chain 3 or more at each armhole to join front and back sections, skipping all sleeve stitches (more chains for larger armholes).
- Sl st at the end of the row to join.

Step 3: Body
- Work even rounds of DC until the shirt reaches the desired length.
- Add optional shaping at the waist (decreases with DC2Tog); space decreases evenly across rounds.
- Finish with a ribbed border at the hem using FPDC/BPDC stitches. Alternate these stitches to create the ribbing, working 3–5 rounds.
Step 4: Sleeves
- Attach yarn at the underarm seam.
- Work alternating rounds of DC and mesh (Ch 1, skip 1, DC) to create the sleeve.
- Include gradual decreases in DC rounds to taper the sleeve shape.
- Finish the sleeve with a ribbed cuff using FPDC/BPDC stitches. Repeat for the second sleeve.

Step 5: Finishing
- Weave in all loose ends using the tapestry needle.
- Block the finished shirt to smooth stitches and shape it as desired.
Optional Customization
- Adjust chain counts for larger or smaller sizes.
- Experiment with color changes or stripe patterns.
- Extend the length for a tunic or add shaping for a more fitted silhouette.