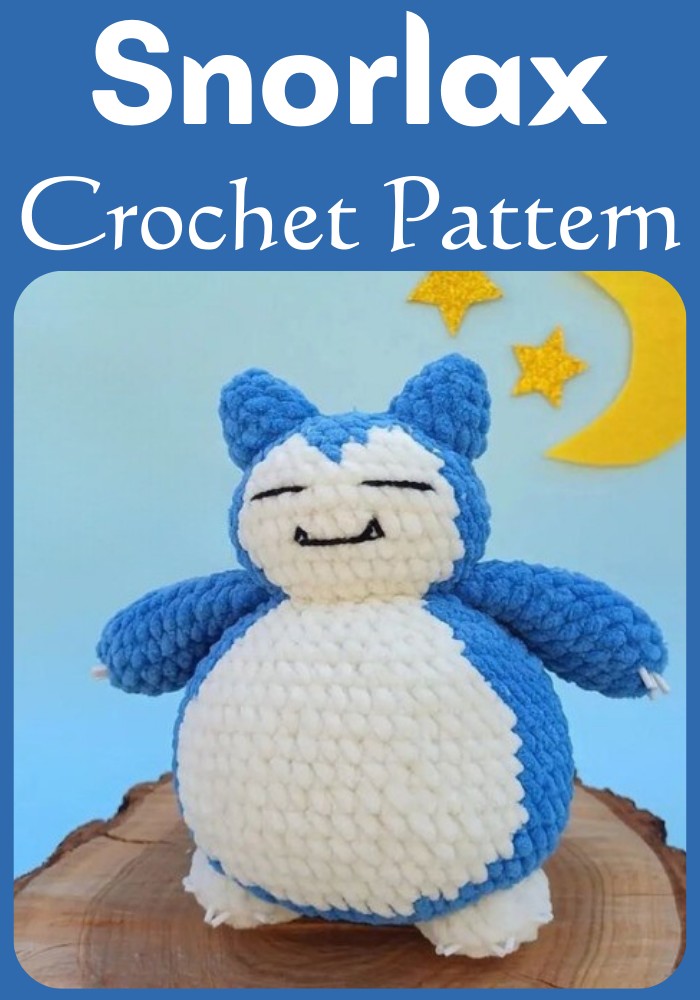
Create this cuddly Snorlax with this crochet pattern, a delightful version of the adored Pokémon. Using blue and white yarn, it's designed to mimic Snorlax's familiar hues. The pattern features the sleepy giant in a tranquil state, with its eyes shut, inviting a sense of calm. It's an ideal project for Pokémon lovers and anyone who enjoys making charming, plush creatures.

Tools And Materials:
- Plush yarn (Himalaya Dolphin baby - 100g/120m)
- navy blue # 341
- milky #308
- 1m of black cotton yarn for face
- hook #4
- glass beads, a sewing thread and a needle
Abbreviations:
- MR-magic ring
- sc-single crochet
- sl st - slip stitch
- inc - increase
- dec - decrease
Step By Step Pattern
Paws:
Start in brown:
- R1. 6sc in MR
Switch to milky
- R2. 6inc (12)
- R3. (1sc, inc)x5 This round isn't finished. Mark this place. Now it's the beginning of the round.
- R4. BLO: 21sc (21)
- R5. 10 dec, 1sc (11)
Sew the paws to the bottom. Sew the eyes and the mouth. And also Sew glass beads to make claws. I used two pieces for one claw.
Arms:
Start in blue:
- R1. 6sc in MR
- R2. 6inc (12)
- R3. (5sc, inc)x2 (14)
- R4-11.14sc-8rounds
Stuff only hands with holo-fibre. Fold in half and work 7sc through both halves.
Body&head:
Start in blue
- R1. 6sc in MR
- R2.6inc (12)
- R3. (1sc, inc)x6 (18)
- R4. 1sc, inc, (2sc, inc)x5, 1sc (24)
- R5. (3sc, inc)x6 (30)
- R6. 2sc, inc, (4sc, inc)x5, 2sc (36)
- R7. (5sc inc)x6 (42)
- R8. 3sc, inc, (6sc, inc)x2, (milky) 6sc, inc, (blue) (6sc, inc)x2, 3sc (48)
- R9. (blue) (7sc, inc)x2, 3sc, (milky) 4sc, inc, 7sc, (blue) inc, (7sc, inc)x2 (54)
- R10. (blue) 20sc, (milky) 16sc, (blue) 18sc (54)
- R11-16. (blue) 19sc, (milky) 18sc, (blue) 17sc (54) - 6 rounds
- R17. (blue) 20sc, (milky) 16sc, (blue) 18sc (54)
In the next rounds we will decrease the number of milky stitches only with the help of decreases inside the milky spot. Crochet according to the colour scheme of the rounds. Stitch blue above the blue stitches and switch to white above the white parts.
- R18. (7sc, dec)x6 (48)
So, in this round it actually would be like this: (blue) (7sc, dec)x2, 2sc, (milky) 5sc, dec, 7sc, dec, (blue) (7sc, dec)x2 (48)
- R19. 3sc, dec, (6sc, dec)x5, 3sc (42)
- R20. (5sc, dec)x6 (36)
- R21. 2sc, dec, (4sc, dec)x5, 2sc (30)
- R22. (3sc, dec)x6 (24)
- R23. In this round we attach the arms. Work (blue) sc, dec, sc, attach the arm and work (sc, dec)x2, sc through the arm and the body, (white) 5sc, attach the other hand (blue) (sc, dec)x2, sc through the arm and the body, sc (19)
- R24. FLO: (blue) 8inc, (milky) 5inc, (blue) 6inc (38)
- R25. (blue) 15sc, (milky) 12sc, (blue) 11sc (38)
In the next round I shifted the white spot so it has to be in the middle. Watch your spot. Keep it in the center.
- R26-29. (blue) 15sc, (milky) 13sc, (blue) 10sc (38) - 4rounds
- R30. (blue) 16sc, dec, (milky) 11sc, (blue) dec, 8sc (36)
- R31. (blue) (4sc, dec)x3, (milky)
Ears:
- R1. 6sc in MR
- R2. (1sc, inc)x3 (9)
- R3. (2sc, inc)x3 (12)
Add a little holo-fibre and sew the ears to the head.
Designer: Mamalinka_toys On Instagram


