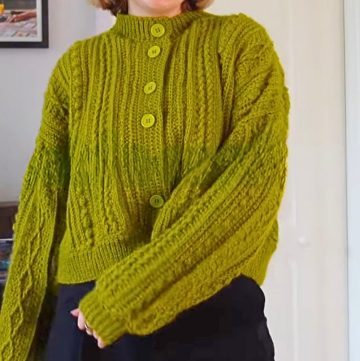
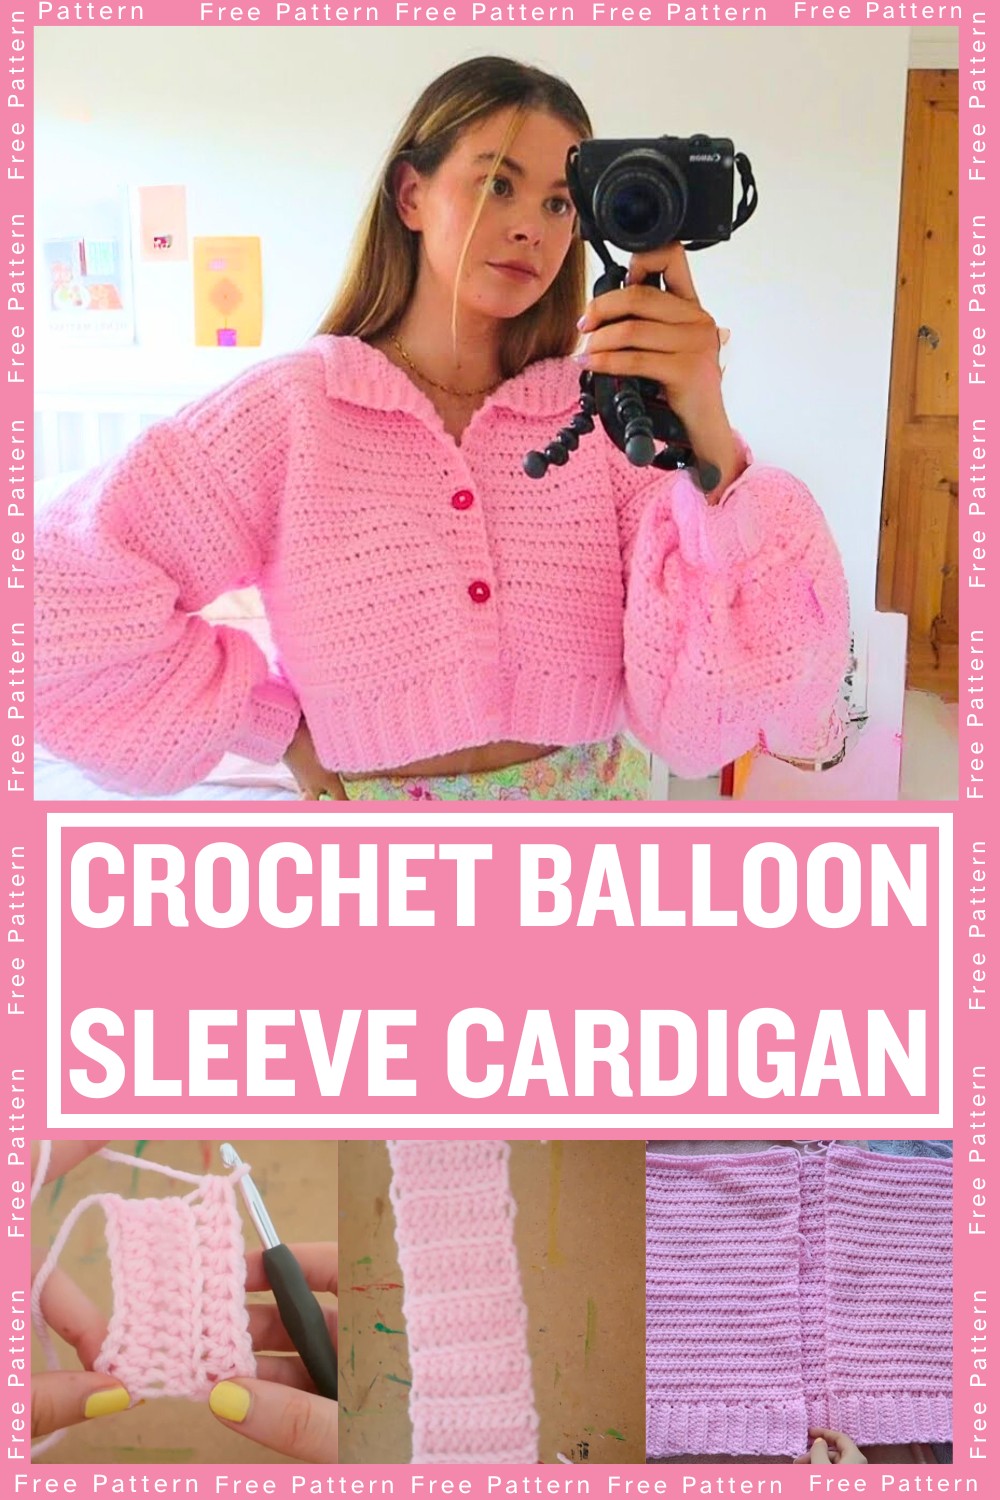
Create this elegant and cozy balloon sleeve cardigan—a versatile addition to any wardrobe. Perfect for layering in cooler weather, this stylish crochet piece combines beauty and functionality, making it a delightful project for crocheters of all skill levels.
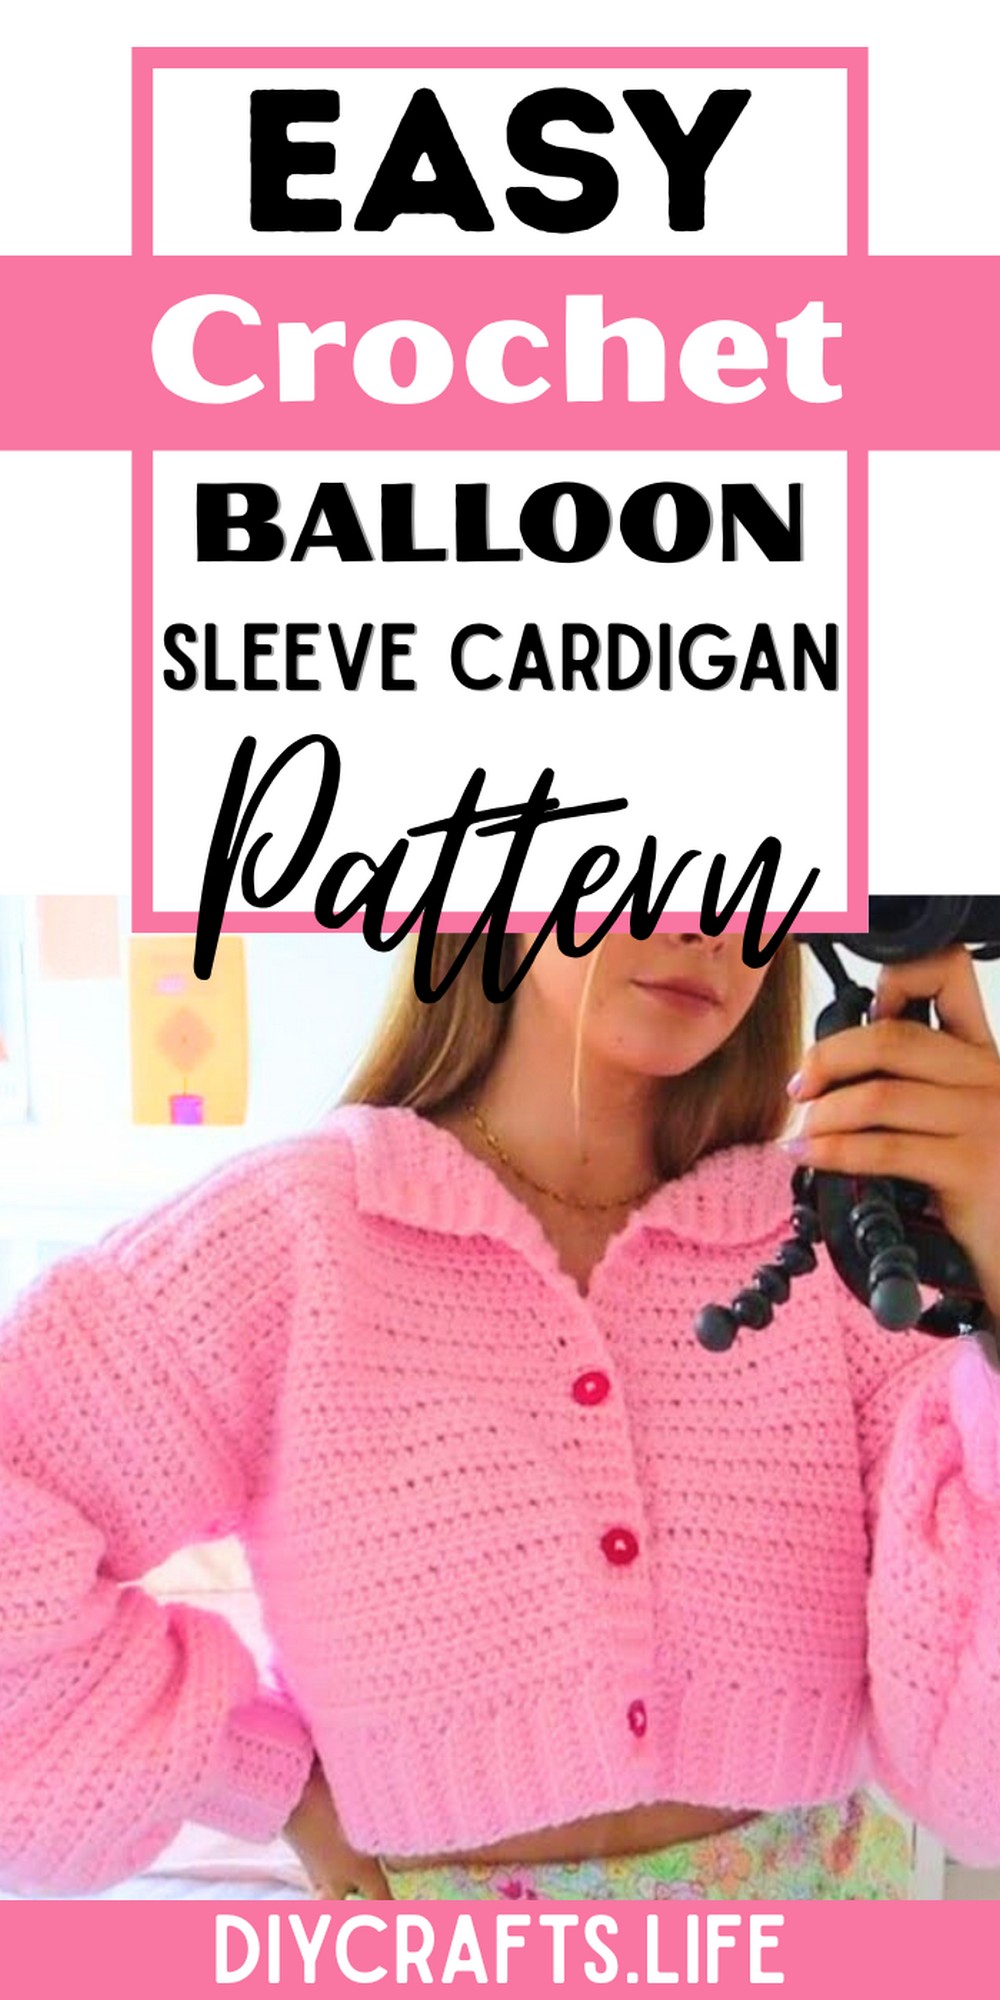
This cardigan stands out for its chunky texture and charming balloon sleeves. It is durable yet soft, lightweight yet warm, and completely customizable to size and color preferences. Whether worn casually or dressed up, its timeless look and practical button closure ensure usability year-round.
Crochet Balloon Sleeve Cardigan
Crafting this cardigan is approachable for beginners yet satisfying for advanced crocheters. With customizable measurements and a straightforward pattern focusing on half-double crochet and ribbing techniques, it’s a creative outlet that results in a project that’s uniquely tailored to you.
Materials and Preparation
To make this gorgeous pink balloon sleeve cardigan, you will need the following materials:
Materials
- Yarn: 700g (7 balls) of chunky acrylic yarn (Stylecraft Special for Babies Chunky in Baby Pink, or yarn of your choice).
- Crochet hooks: 5mm and 6mm.
- Tapestry needle (for sewing ends and attaching buttons).
- Scissors.
- Tape measure.
- Stitch markers.
- Buttons: 3 buttons of your choice for fastening the cardigan.
Yarn Weight Recommendations
While the tutorial uses chunky acrylic yarn, you can use other yarn types like cotton. Adjust the measurements based on your yarn weight and desired fit.
Abbreviations and Notes
Crochet Abbreviations:
- CH: Chain
- SC: Single Crochet
- HDC: Half Double Crochet
- BLO: Back Loop Only
- SL ST: Slip Stitch
Notes and Tips:
- Sizing Tips: This tutorial is for a cardigan sized to Emma's measurements, but you can adjust the length, width, and sleeve dimensions to fit your own body.
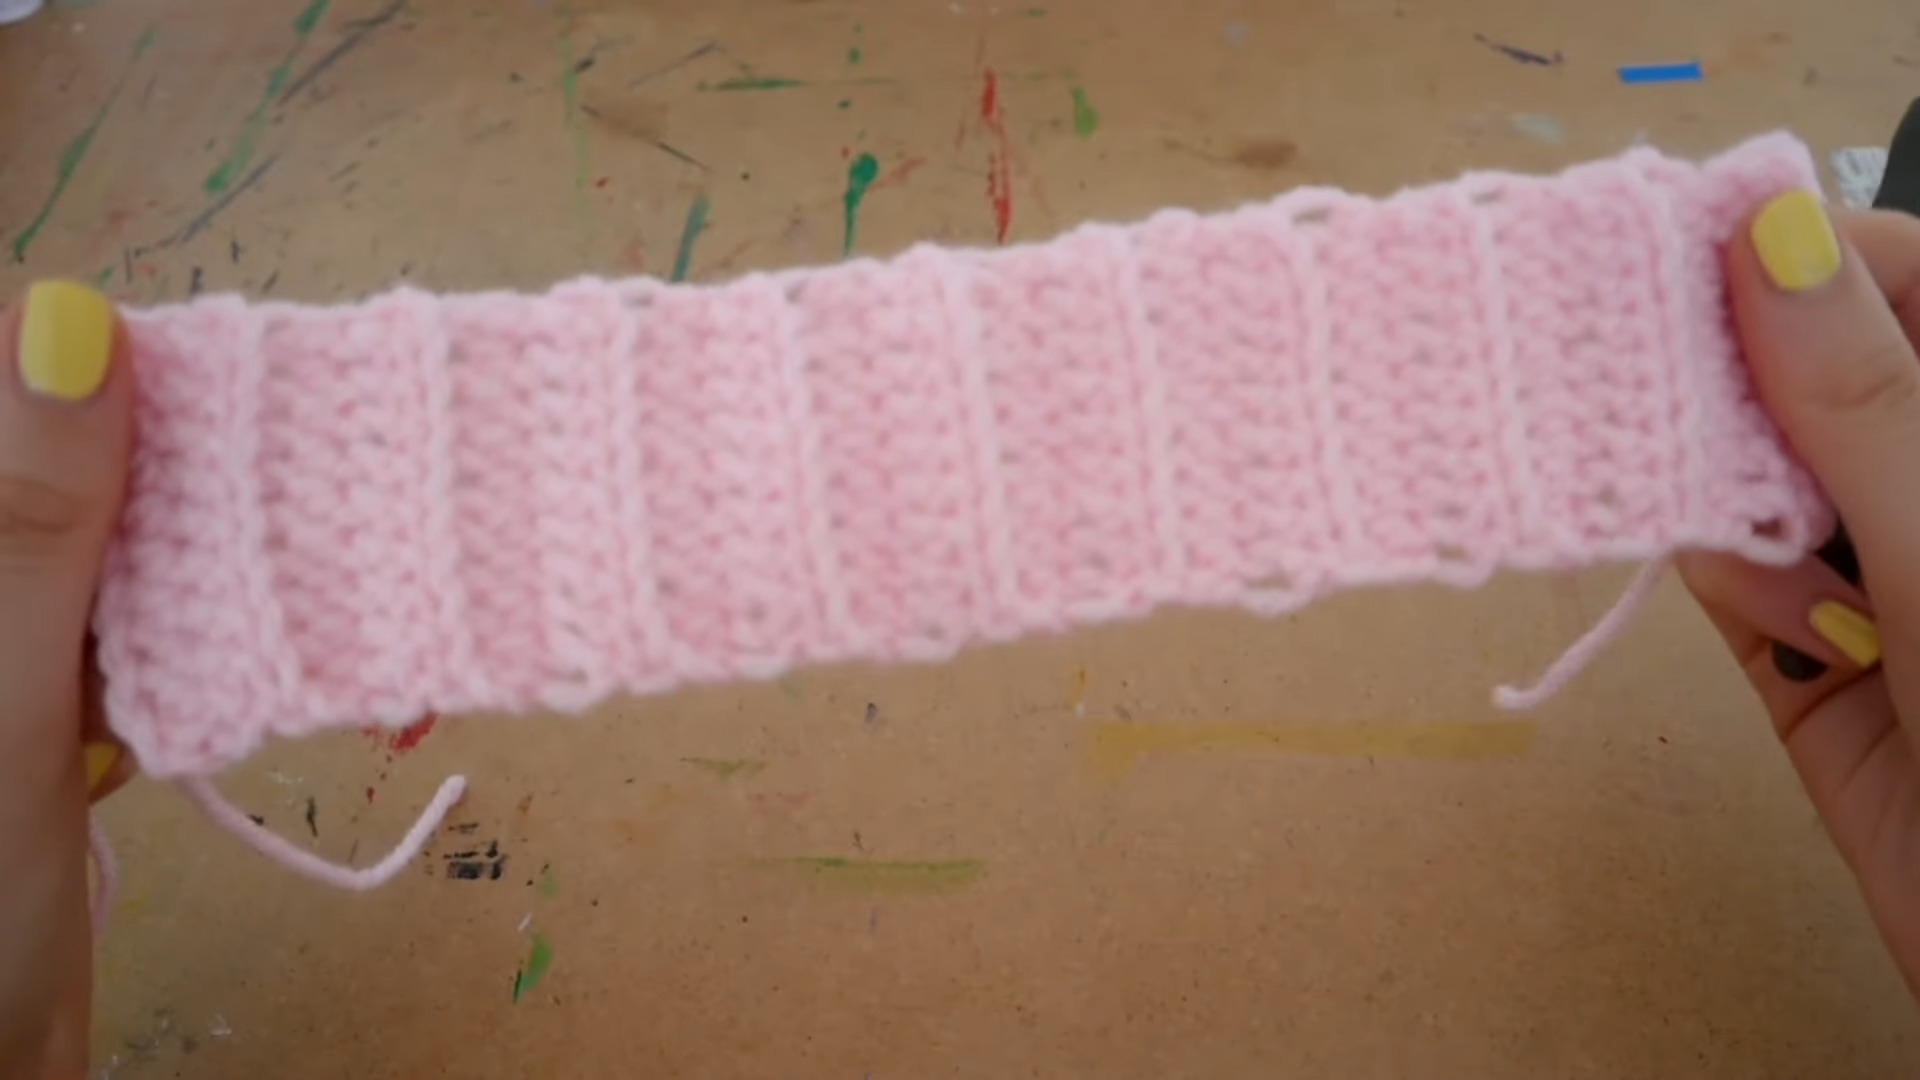
- Ribbing: The ribbing is done using the BLO SC technique, which gives the cardigan its stretchy ridged look, so pay attention to this step.
- Consistency: Ensure your stitches are even to avoid waviness or uneven edges.
- Gauge Check: If using a different yarn, ensure the ribbing reaches the specified width and height for proper proportions—make a gauge swatch as needed!
Gauge, Approximate Size, and Pattern Notes
Gauge:
For the ribbing: 11 CH = ~3 inches using chunky yarn and a 5mm hook.
For the main panels: aim for 56 HDC stitches = ~21 inches.
Finished Size:
Emma’s measurements (approximately size M):
- Back panel width: 21 inches
- Full cardigan height: 16 inches (including 2 inches of ribbing).
- Sleeve dimensions: 20 inches wide and 19 inches tall (excluding 2 inches of ribbing).
If you need a different size, measure accordingly and scale the number of rows and stitches to fit your desired measurements.
Special Techniques:
- BLO SC Ribbing Technique: Used for cuffs, edges, and middle panel details.
- Slip-Stitch Joining: Used to attach panels and seams.
- Buttonholes: Created during middle ribbing rows using CH spaces.

Step-by-Step Pattern
1. Ribbing Preparation
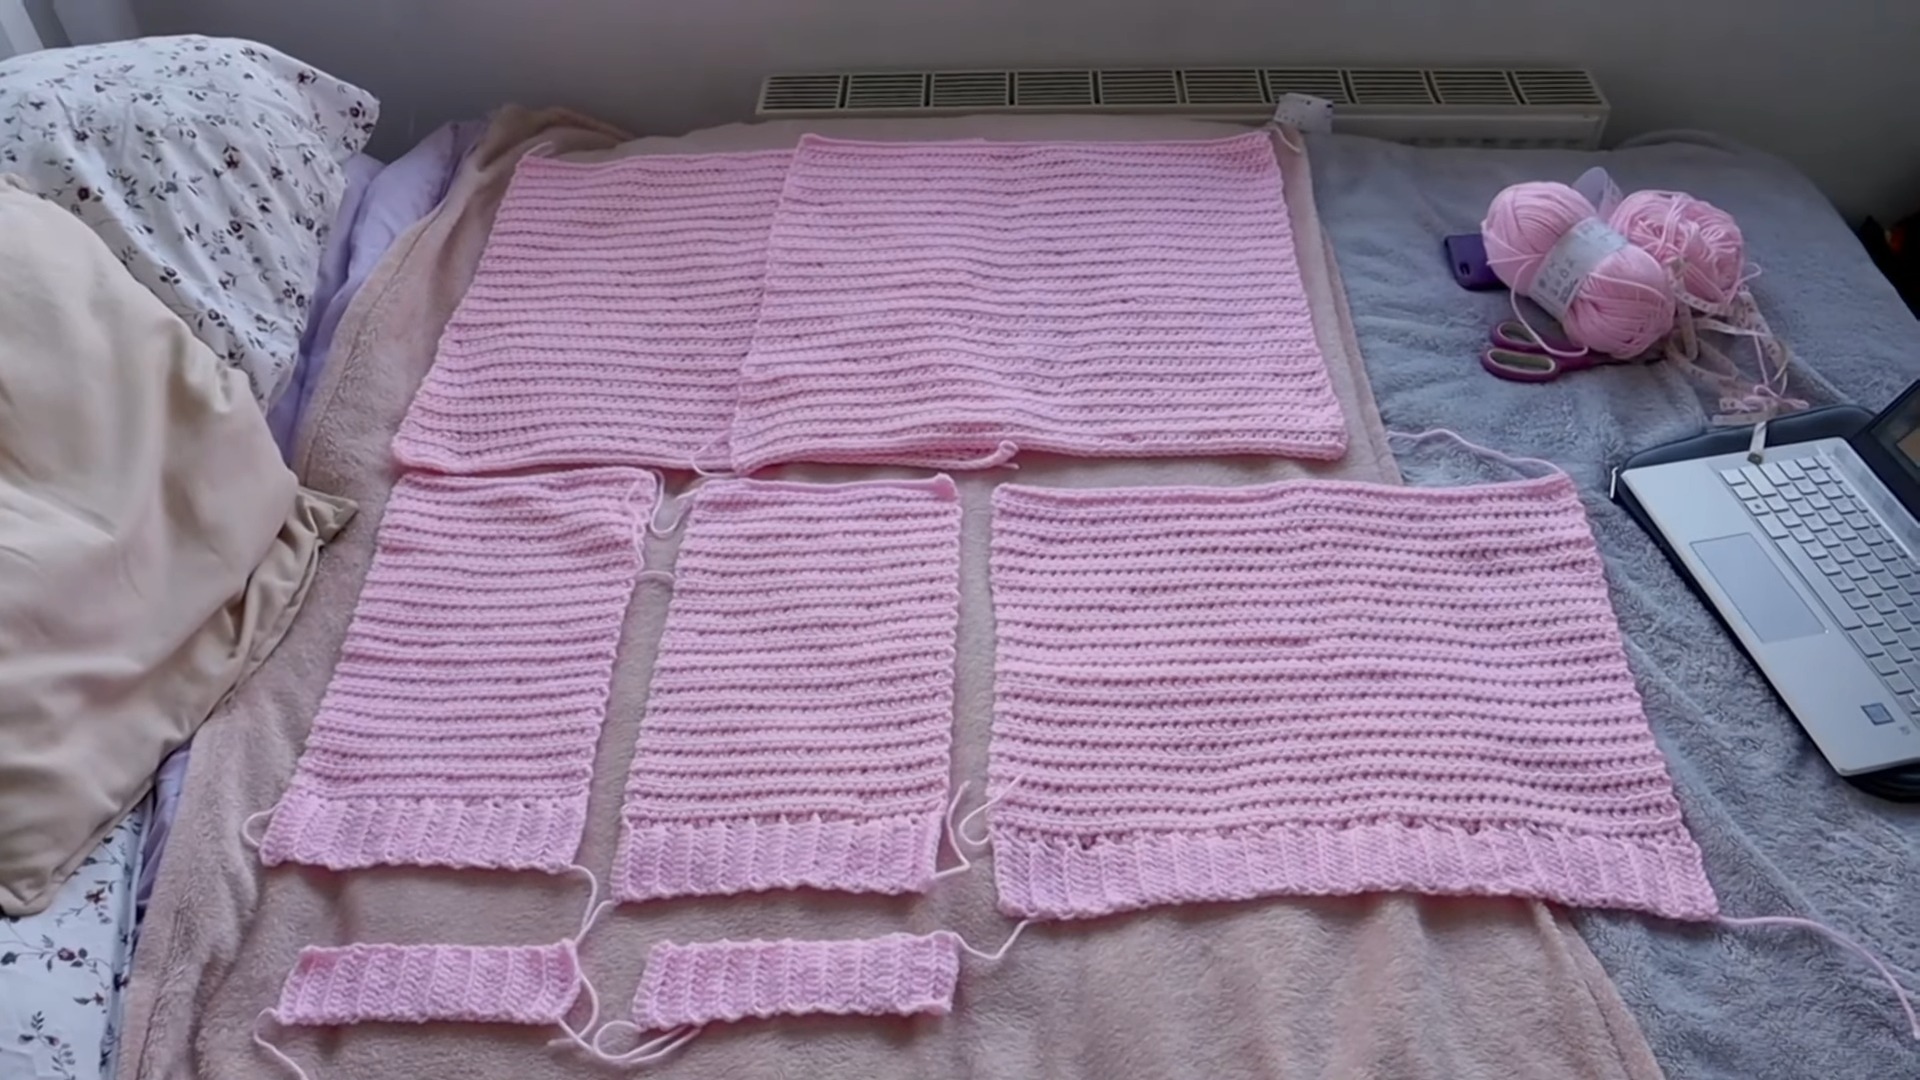
You’ll create five ribbing pieces:
- Back panel: 21 inches wide (approx. 56 rows).
- Front panels: Two ribbing pieces, 10 inches each.
- Sleeve cuffs: Two ribbing pieces, 8 inches each.
How to Crochet Ribbing (Basic Instructions):
- Start with a slip knot, then CH 11 (or as needed for ~3 inches).
- In the 2nd CH from the hook, work SC into each CH across (10 SC total).
- CH 1, turn, and work BLO SC across all stitches (10 BLO SC).
- Repeat until the ribbing reaches the desired width (e.g., 21 inches for the back panel). Tie off and set aside.
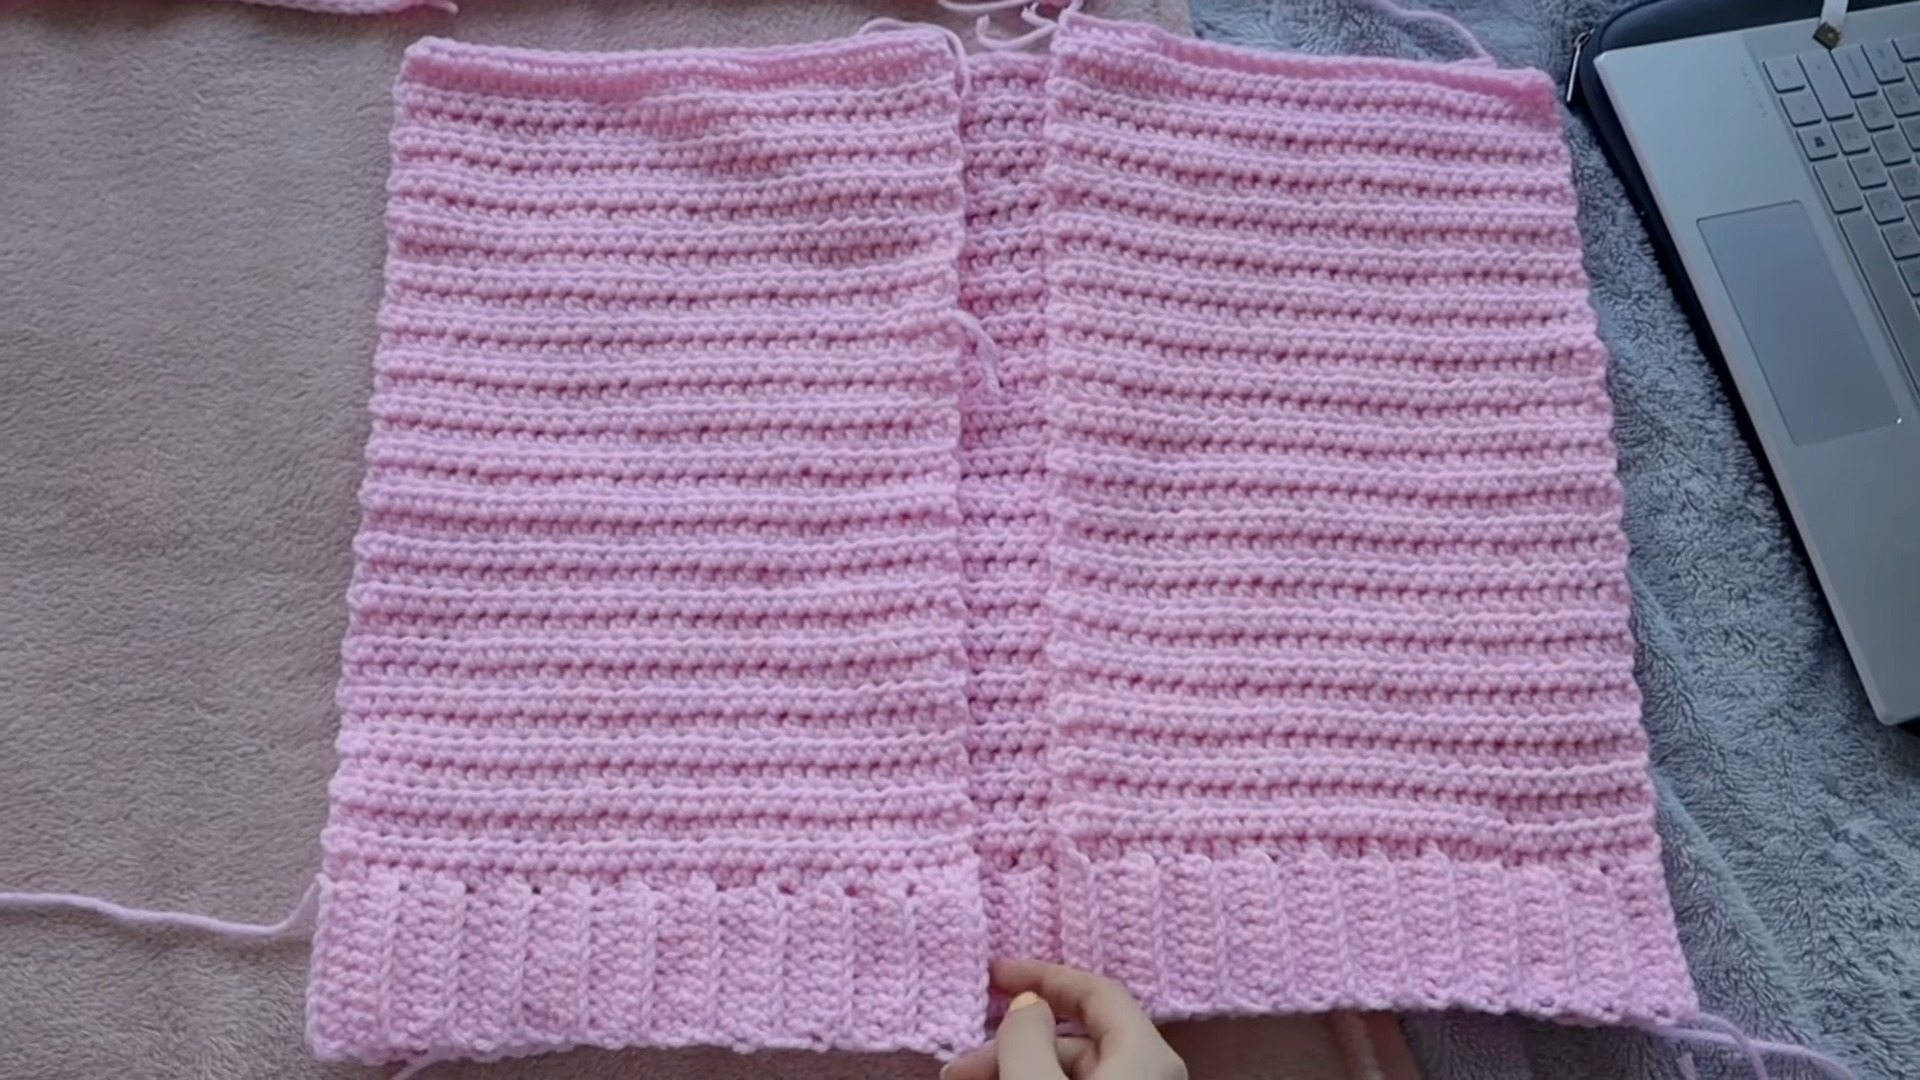
2. Back Panel
- Using your 6mm hook, attach yarn to one corner of the back panel ribbing.
- Work 56 HDC evenly along the top of the ribbing (ensure proper spacing to avoid stretch or wavy edges).
- CH 2, turn, and work HDC in each stitch across.
- Continue rows until the panel measures 16 inches tall (including the ribbing). Tie off and set aside.
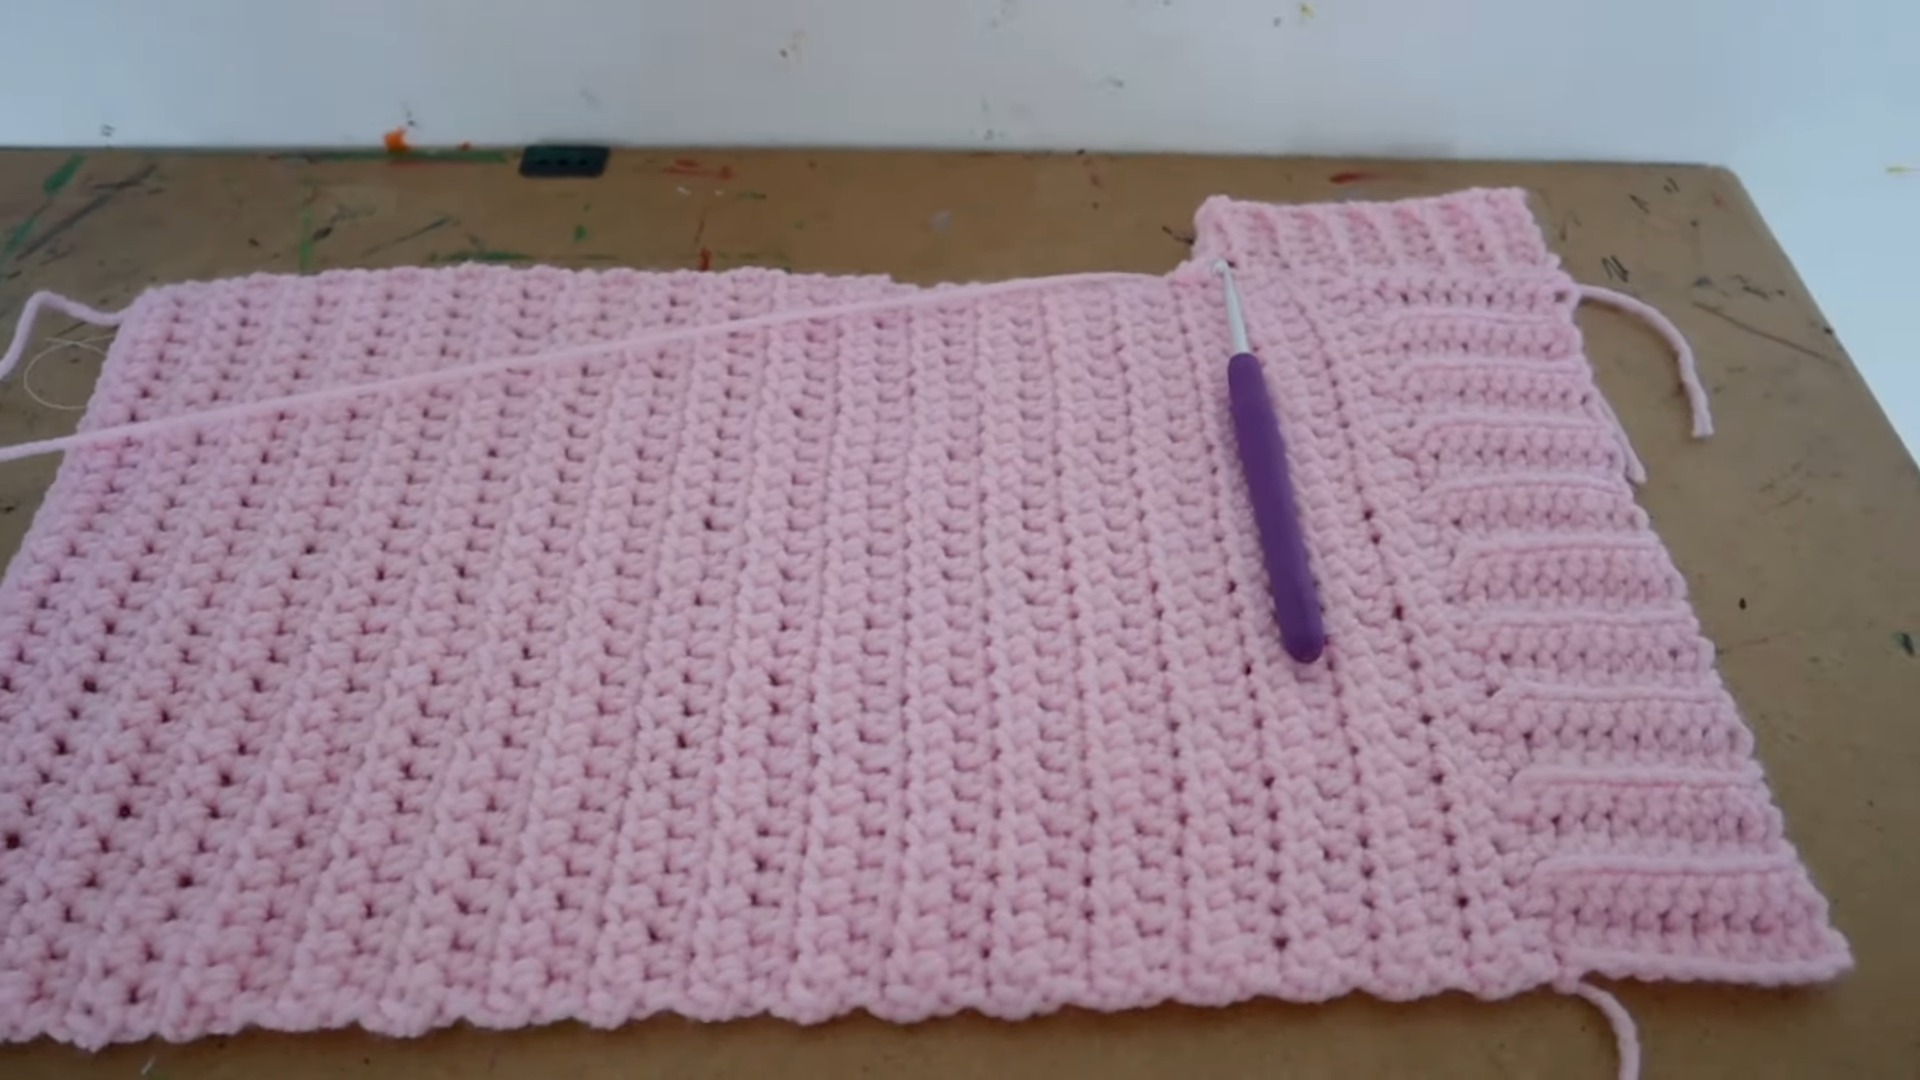
3. Front Panels (Left and Right)
- Repeat the same process as the back panel:
- Attach yarn to one corner of the front panel ribbing.
- Work 29 HDC evenly along the top edge of each front panel ribbing.
- Work rows of HDC until each panel reaches 16 inches tall. Tie off.
4. Sleeves
Create two balloon sleeves.
- CH 76 (or 20 inches wide) for the foundation chain.
- Starting in the 3rd CH from the hook, work HDC into each CH.
- CH 2, turn, and continue rows of HDC until the sleeve measures 19 inches tall.
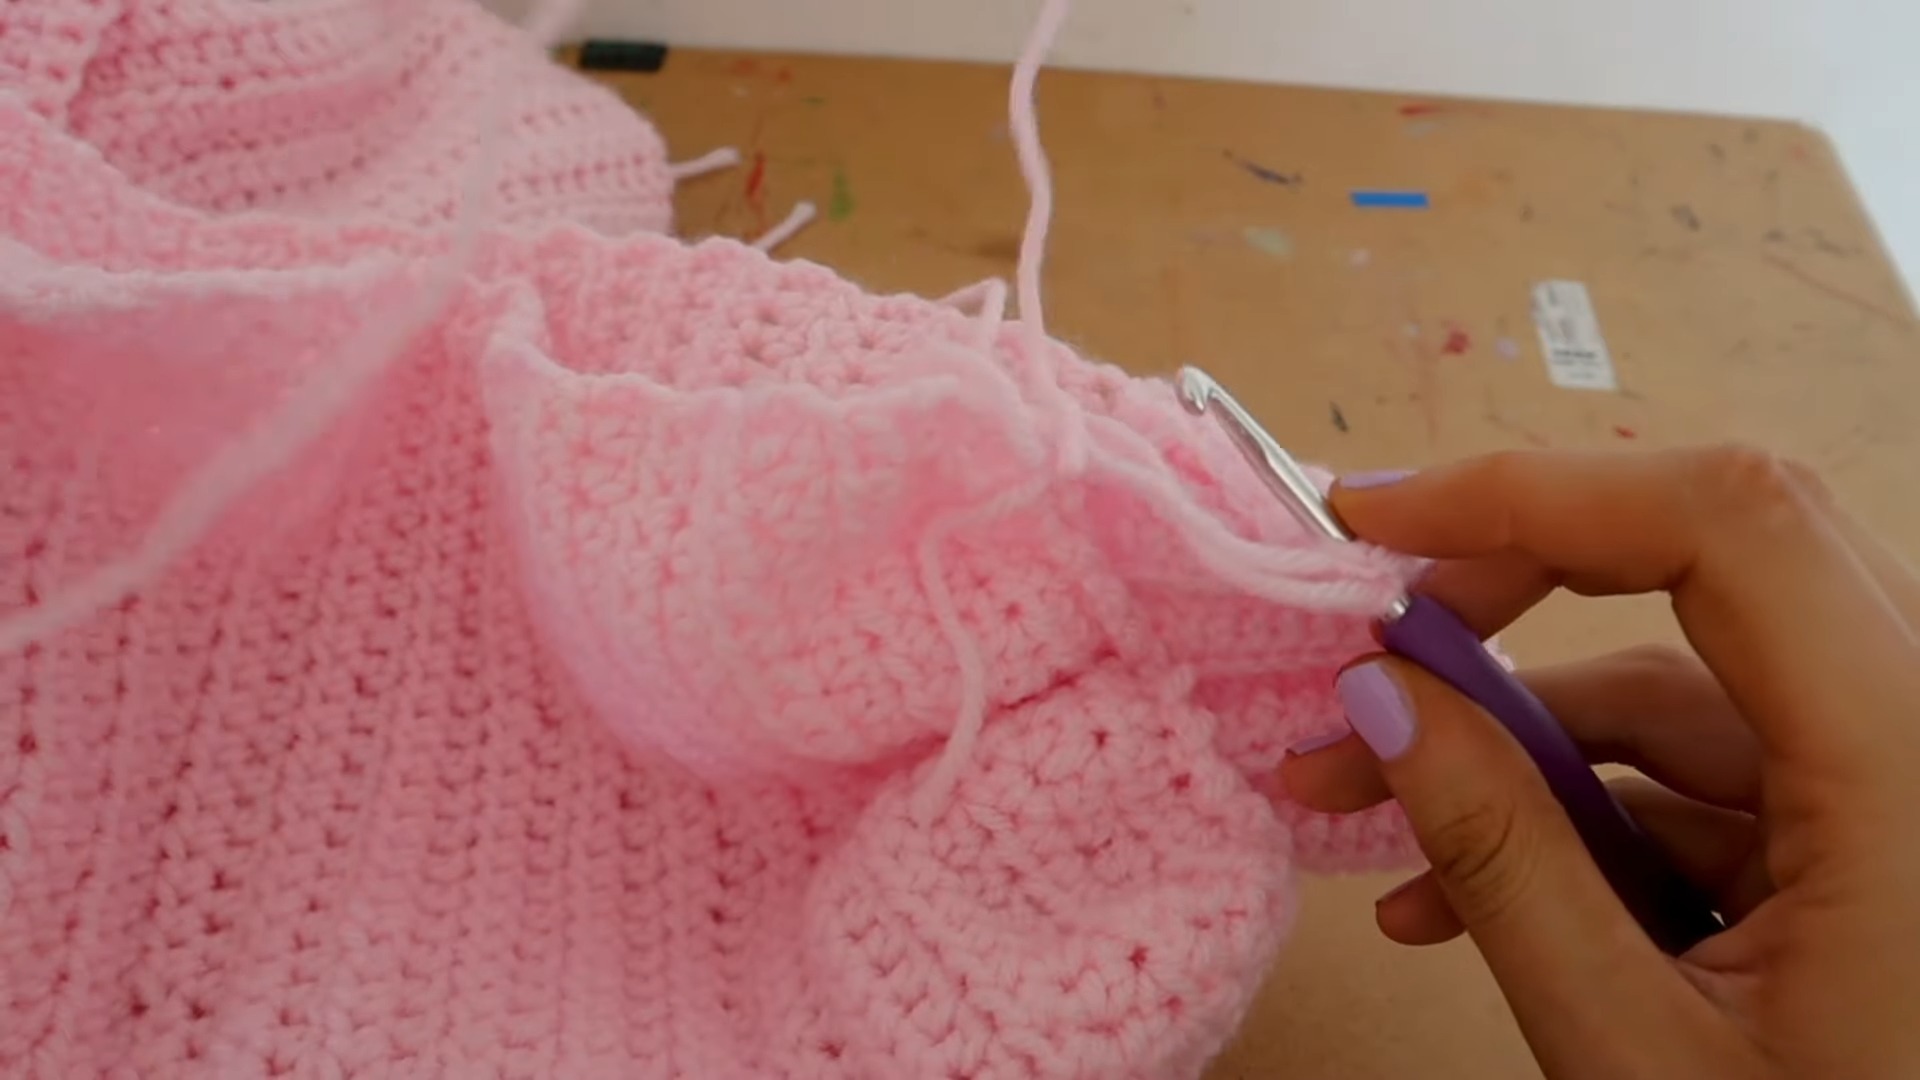
- Fold the ribbing and sleeve piece together (wrong sides facing) and join using SL ST while skipping 2-3 stitches on the sleeve edge to create a ruffled effect. Tie off.
5. Body Assembly
Attach Front Panels to Back Panel:
- Lay the two front panels over the back panel (wrong sides facing).
- Fold out the ribbing corners for the collar effect.
- Attach panels using SL ST along the sides from the corners to an inch below the collar fold.
Attach Sleeves:
- Open the sleeve and align the seam with the shoulder point on the assembled body.
- Use SL ST to attach the sleeve across the shoulder seam. Repeat for the other sleeve.
Side Seams:
- With all pieces wrong side out, fold the body so the sides and sleeves align.
- Use SL ST to join the side seams and sleeves into a continuous seam.
6. Middle Ribbing (Including Buttonholes)
- Attach yarn to the edge of one front panel. CH 6 (or ~1 inch) for the starting ribbing row.
- Work BLO SC in the second CH from the hook and all the way across (5 SC).
- Attach ribbing: Work 2 SL ST into the cardigan edge before turning to create ribbing rows.
- Continue ribbing rows until you reach the first stitch marker (for the buttonholes).
Buttonholes:
- In the appropriate ribbing row, create a buttonhole:
- SC into 1st stitch, CH 2, skip the next two stitches, SC into the last two.
- Continue ribbing rows until the full edge is completed (measure and adjust spacing for the next two buttonholes). Tie off.
7. Finishing Touches
Collar Edge Single Crochet:
- Attach yarn to the collar's edge and work 1 round of SC around the entire collar.
Buttons:
- Position buttons opposite the buttonholes and sew them securely using a tapestry needle and yarn.
Final Step:
Sew in all loose ends and turn the cardigan right-side out.
Pattern Question
Question: How can I adjust the pattern to fit my size?
Answer: Take precise measurements of your width, length, arm circumference, and sleeve length, and adjust the starting chains, rows, and ribbing accordingly. This ensures a custom fit, regardless of yarn thickness or personal sizing preferences.
Conclusion
Crocheting the balloon sleeve cardigan is a truly rewarding experience. Combining style, comfort, and practicality, it’s a project that offers endless customizability while yielding a chic, timeless garment you’ll love wearing again and again.