This tutorial showcases a delightful way to craft Easter crochet egg warmers inspired by a vintage pattern. From adorable bunny ears to a charming chick’s wings, this pattern is quick, simple, and packed with a personal touch. What makes it unique is its flexibility—you can make it to fit both real eggs and plastic eggs, and fill those plastic eggs with candies for gifts.

The design stems from a family heirloom, originally discovered in Auntie M's collection, reimagined for Easter festivities. Easter is about joyful traditions, and these handmade pieces add a cozy vibe paired with the season's charm. Whether as table accessories or thoughtful gifts, they tie perfectly into the holiday theme.
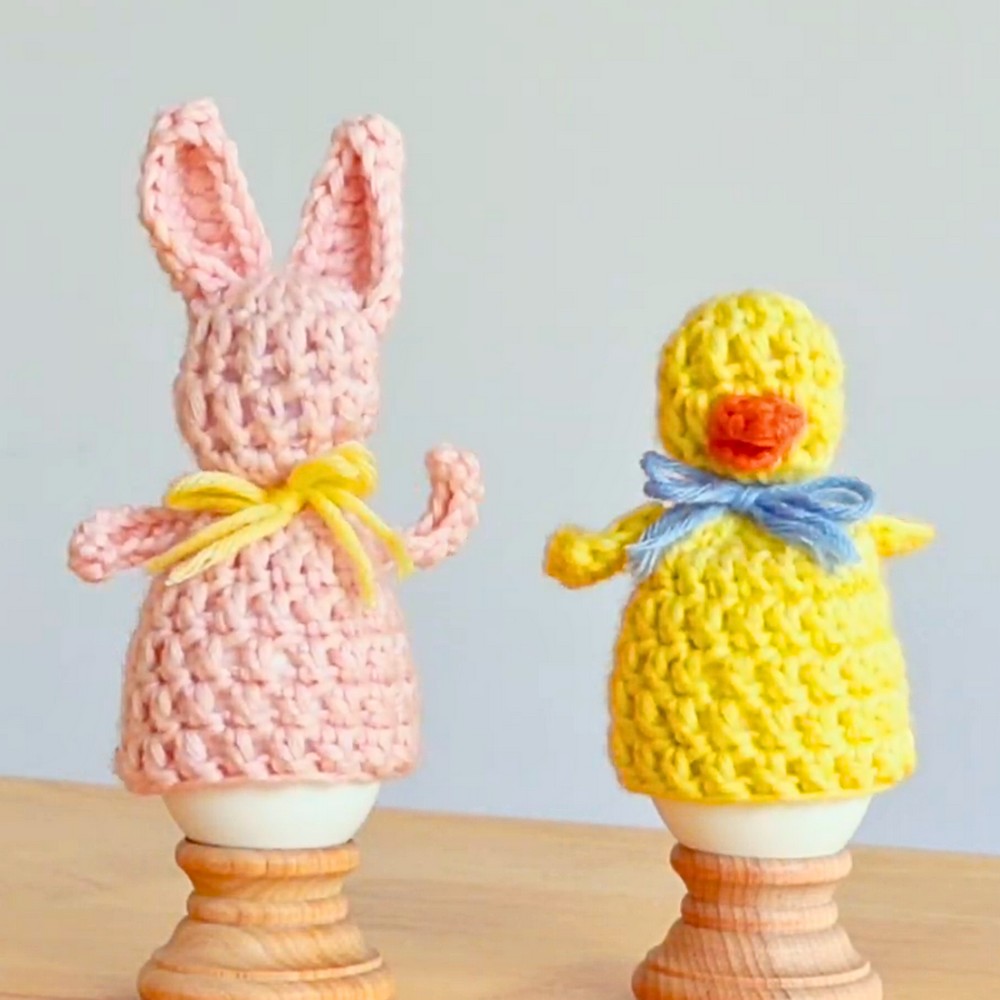
Stitch Pattern & Structural Elements
The pattern makes noteworthy use of double crochet, single crochet, and half double crochet stitches, subtly paired with magic circles for shaping. The bunny paws, ears, and even the chick's beak represent simple yet effective structural elements. Using acrylic yarn ensures the creations have stretch and adaptability to different egg sizes—whether decorative or functional.
Credit Made by Phia
Required Materials
To create the crochet Easter decorations (bunny & chick egg warmers), the following materials are needed:
- Yarn:
- Acrylic yarn in desired colors (purple for bunny, yellow & orange for chick).
- Crochet Hook:
- A 4.5 mm hook (adjustable based on your gauge and the egg size).
- Polyfill/Stuffing:
- For stuffing the head.
- Plastic or Real Eggs:
- Sized to fit inside the warmers (plastic eggs for gifting purposes).
- Pom Pom:
- For the bunny's tail (optional).
- Needle:
- For sewing the parts together.
- Scissors:
- For cutting yarn ends.
- Fabric Glue:
- For attaching decorations like pom poms.
Important Notes
- The patterns are based on a vintage design originally meant for a bunny, bear, and lion. You can adapt the designs to make other animals.
- The project primarily uses double crochet (DC), half double crochet (HDC), and single crochet (SC) stitches.
- The yarn used provides stretch, making the egg covers suitable for plastic or real eggs of varying sizes.
- Pay attention to your gauge. Tighter stitches reduce visible gaps in the crochet and make the piece look neater.
- Adjust the number of rows for the body depending on the size of the egg you're covering.
- Embellishments, like bows or embroidered details (e.g., a nose), can add a personal touch, but the minimalist, pastel-colored look is equally effective.
- For the bunny's tail, glue the pom pom last to allow it time to fully dry before handling.
Step-by-Step Instructions
Creating the Bunny & Chick Bodies
- Start with the Body (Bunny or Chick):
- Begin with a magic circle or chain 5 and slip stitch to join into a ring.
- Chain 2 (not counted as a stitch). Work 12 double crochets (DC) into the circle. Slip stitch to join.
- Create the Head:
- Rounds 2-4: Chain 2, work 1 DC into each stitch around, and slip stitch to join (12 stitches per round).
- Stuff the head lightly with polyfill for shape.
- Shape the Body:
- Round 5: Increase by doing 1 DC into the first stitch, 2 DC into the next, repeat around (18 stitches in total).
- Rounds 6-10: Chain 2, work 1 DC into each stitch to create the body (18 stitches per round). Adjust the number of rounds if needed for larger or smaller eggs.
- Fasten off and weave in ends.

Bunny Specific Features
Bunny Ears:
- Chain 10.
- Starting in the 3rd chain from the hook, work DC down the chain.
- Add 3 DC into the last chain to round the edge, then work DC down the back side of the chain.
- Taper the bottom of the ear with a slip stitch and fasten off, leaving a long tail for sewing.
- Make 2 ears and sew them onto the head.
- Pro tip: Scrunch the ear slightly while sewing to make it look more realistic.
Bunny Arms:
- Chain 8.
- Starting from the 3rd chain from the hook, work HDC down the chain.
- Slip stitch at the end, fasten off, and leave a long tail for sewing.
- Create 2 arms and attach them between the head and body.
Bunny Tail:
- Attach a small pom pom to the back of the body using fabric glue.
- Let it dry completely before handling.

Chick Specific Features
Chick Wings:
- Chain 6.
- Starting in the 3rd chain from the hook, work DC down the chain.
- At the last chain, work 4 DC into the space to make a rounded edge.
- DC down the back side of the chain.
- Finish with a chain 2 and fasten off, leaving a long tail for sewing. Make 2 wings and sew them onto the body.
Chick Beak:
- Using orange yarn, chain 3.
- Start in the 2nd chain from the hook and work 1 SC into each stitch (2 stitches total).
- Chain 1, turn, and work SC into both stitches. Repeat this process for three rows.
- On the final row, skip the first stitch and work only into the last stitch to taper the beak.
- Fold the beak in half and sew it to the chick's head.

Assembly
General Steps:
- Stuff the head with polyfill or another filling material. Do not stuff the body.
- Use a needle and yarn to sew the head and body together at the neck (between rows 4 and 5).
- Sew on the ears (bunny), wings (chick), arms (bunny), and beak (chick).
- For extra decoration, add optional features like bows or embroidery. Avoid adding too much detail if a minimalist look is preferred.
Final Touches
- Decorative Use: Place over real or plastic eggs as Easter decorations. Fill plastic eggs with candy as a gift!
- Customization: Experiment with yarn colors and details to make other animals (e.g., bear, lion) following the same basic approach.


