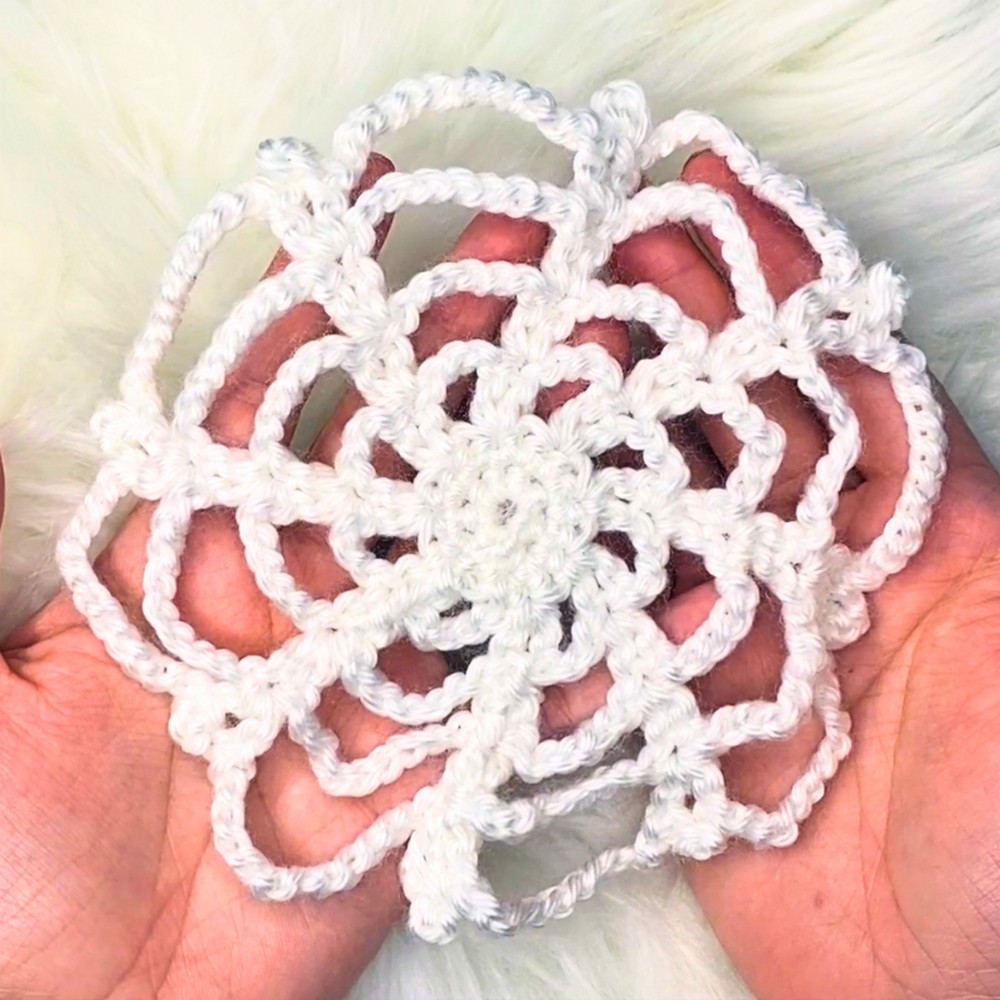
A crochet spider web doily brings a quiet Halloween touch that feels handmade from the very first glance. The open web design looks light and decorative, making it easy to place on a table, shelf, or under seasonal pieces. Instead of filling a space, it frames it in a simple and memorable way. The crochet pattern below shows how this familiar Halloween shape takes on a softer, handcrafted character.
Crochet Spider Web Doily Pattern

A special part of making this doily is seeing the web lines slowly connect into a complete crochet design. The tutorial keeps attention on that change and on the finished look that gives the piece its charm. By the final rounds, the spider web no longer feels like a decoration idea; it feels like something created especially for a handmade crochet Halloween setting.
Credit CrafteeManatee
Materials & Tools Needed
To crochet the Spider Web Doily, you will need:
- Yarn: Approximately 9 grams of worsted-weight yarn. For the original cobweb, white was used. However, purple is recommended in the tutorial for better visibility of stitches.
- Hook Size: 4 mm crochet hook (G hook).
- Needle: Tapestry needle for weaving in ends.
- Scissors: For cutting off the yarn tails.
No additional items such as stuffing or safety eyes are needed for this pattern.

Finished Measurements
Size: The finished doily size depends on the individual crochet tension, but as this is a doily pattern, it will be small and appropriate for use as a table display or a coaster.
Skill Level
- Intermediate. While the basic structure is simple, the loopy lace stitches (chains combined with double crochet and picot stitches) require careful attention to placement and stitch counts.
Abbreviations & Terminology
- sc = single crochet
- inc = increase (2 stitches worked into the same stitch)
- sl st = slip stitch
- dc = double crochet
- ch = chain
- picot = chain 3, slip stitch into the first chain
Gauge
No gauge is specified in the tutorial. However, as it's a decorative piece, dimensions are based more on individual tension rather than exact gauge requirements.
Step-by-Step Pattern
Follow these steps precisely as shown in the tutorial:
Round 1
- Begin with a magic ring.
- Work 6 single crochet (sc) into the ring.
- Pull the starting yarn tail tight to close the ring.
- Slip stitch (sl st) into the first single crochet to secure the ring.
Total stitches: 6.

Round 2
- Increase in every stitch around by working 2 single crochets (sc) in each stitch.
- Repeat 5 more times for a total of 12 stitches.
Total stitches: 12.
Round 3
- Single crochet 2 (sc 2) stitches, then work an increase by crocheting 2 single crochets in the next stitch.
- Repeat this sequence three more times.
- You should end with 16 stitches after this round.
Total stitches: 16.
Round 4: Loopy Lace Stitches
- Chain 3 (ch 3).
- Skip the next stitch, and then work 2 double crochet (dc) stitches in the following stitch.
- Repeat the sequence (ch 3, skip 1, 2 dc in next stitch) seven more times for a total of 8 loops.
Total loops: 8 loopy stitches.

Round 5
- Chain 6 (ch 6).
- Skip 4 stitches. (This skip includes skipping the chain from the previous round and the first double crochet from the prior round.)
- Work 2 double crochet (dc) stitches into the last double crochet stitch from the previous round.
- Repeat this sequence seven more times for a total of 8 larger loops.
Total loops: 8 larger loops.
Round 6
- Chain 9 (ch 9).
- Skip 7 stitches (similar to the previous round logic).
- Work 2 double crochet (dc) stitches into the last double crochet stitch from the prior round.
- Repeat this sequence seven more times for a total of 8 even larger loops.
Total loops: 8 largest loops.

Final Round
- Chain 12 (ch 12).
- Skip 10 stitches.
- Create a sequence:
- Work 1 double crochet (dc) into the next stitch.
- Create a picot as follows:
- Chain 3 (ch 3).
- Slip stitch (sl st) into the first chain to fold into a picot.
- Work another double crochet (dc) into the same stitch.
- Repeat this full sequence seven more times across the round for a total of 8 loops with picot points.
Fasten Off
- Fasten off by cutting the yarn and pulling the tail through.
- The doily is complete.

Assembly Instructions
The cobweb doily does not require assembly as it is crocheted continuously in rounds.
Finishing Techniques
After completing the doily:
- Weave in the ends:
- Use the tapestry needle to secure yarn tails by weaving them through the back of the stitches. For best results, weave in three different directions to ensure durability.
- Trim away any excess yarn.
- Blocking: While not directly mentioned, blocking can improve the shape and flatten the piece. Lightly pin the edges into place and steam it for definition.

Troubleshooting
- Piece curls: Check your stitch counts in each round. Missing increases may cause curling.
- Uneven shape: Ensure that you are skipping the correct number of stitches and aligning the increases properly in each round.
Styling & Display Ideas
- Use the cobweb as a shelf display by placing it alongside Halloween-themed decorations.
- Add the doilies to a seasonal centerpiece for a spooky table setup, pairing with candles or small pumpkins.
- Ideal for craft fairs, as an affordable item to sell during Halloween.

Why This Project is Special
Crocheting the Spider Web Doily brings a perfect spooky vibe to your Halloween season. The pattern is simple yet elegant, offering an impressive decorative piece for minimal effort. Whether it's for your home decor, a gift, or a festive craft sale, this project is versatile and highly satisfying!

Video Tutorial