Create adorable, squishy, and chubby crochet cats with no sewing involved! These three unique styles are soft, vibrant, and incredibly huggable. Perfect for décor, gifts, or stress-relieving toys, these whimsical creations add charm and warmth to any space with ease.
These no-sew crochet chubby cats are functional and fun, appealing to children, adults, and pet lovers alike. Their squishy design makes them perfect for cuddling while offering durability for extended use. The color customizability adds to their adorable appeal in any room.
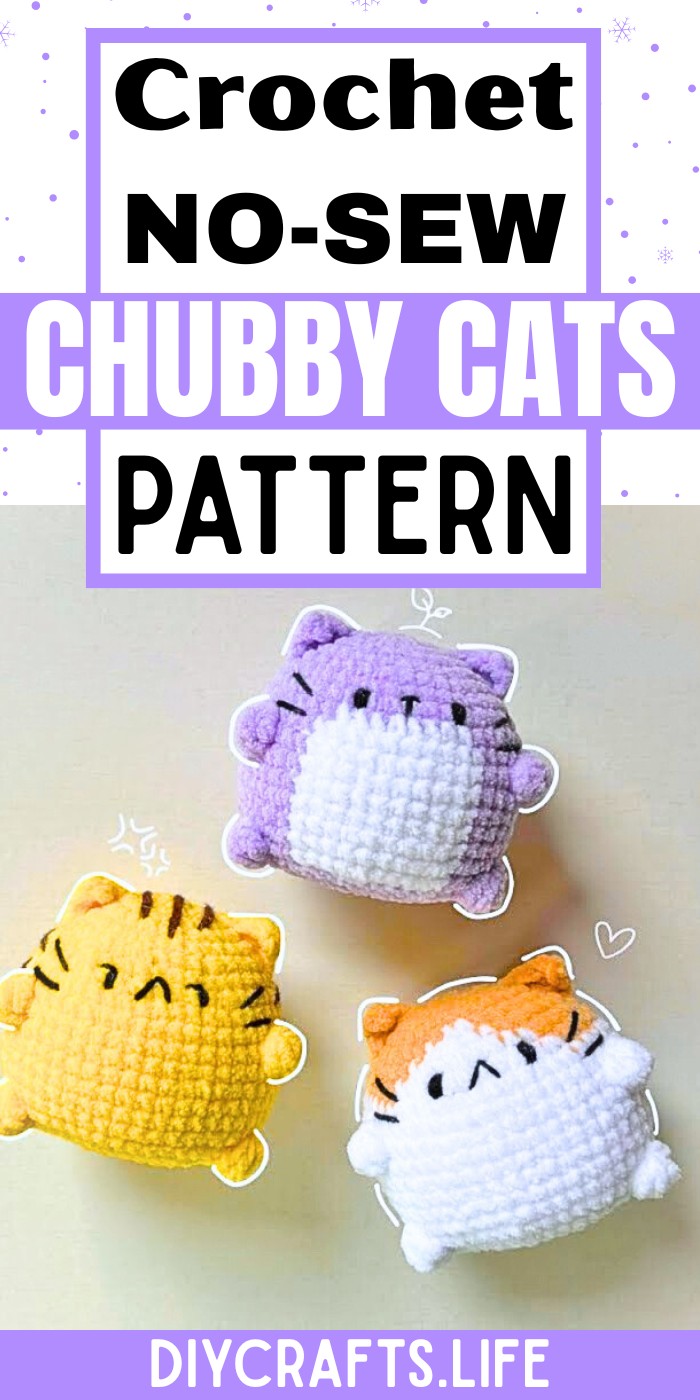
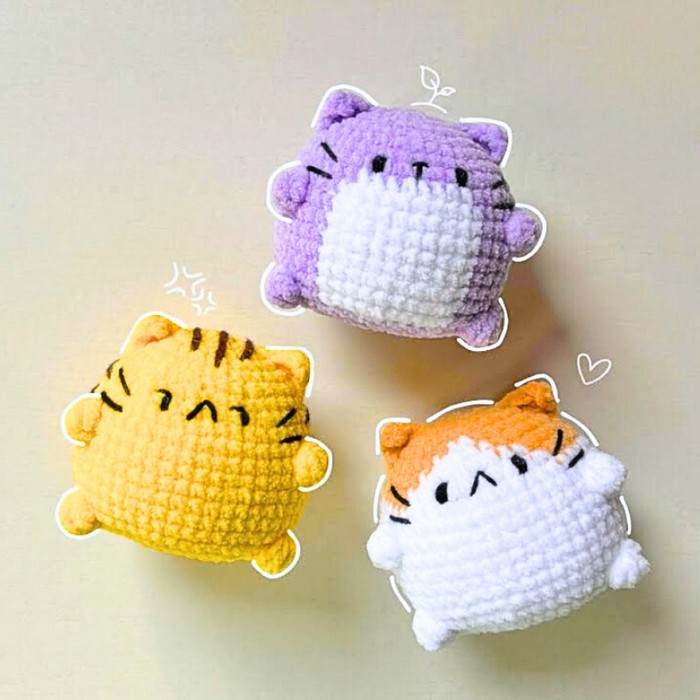
Crochet Squishy Chubby Cats
This crochet project is beginner-friendly, creative, and flexible, allowing you to play with colors to make your custom cats. With easy-to-follow instructions, it suits all skill levels and includes step-by-step guidance to ensure your squishy cats are beautifully crafted.
Credit Chubby Cheeks
Materials and Preparation
- Yarn:
- 2-3 colors for each cat (e.g., brown, white, yellow, purple, black for details like the eyes, nose, whiskers, and stripes).
- Yarn type not explicitly mentioned but suggests soft and malleable yarn (use medium-weight yarn).
- Hook:
- 2.5mm crochet hook.
- Additional Tools:
- Fiberfill for stuffing.
- Stitch marker.
- Tapestry needle for weaving in ends and attaching details like the facial features, ears, and tail.
- Scissors.
- Yarn Weight Recommendation:
- Light (DK) or worsted weight yarn is suggested for squishy, soft results.

Abbreviations and Notes
Abbreviations:
- MR: Magic Ring
- CH: Chain
- SC: Single Crochet
- HDC: Half Double Crochet
- DC: Double Crochet
- INC: Increase (2 SCs in the same stitch)
- DEC: Decrease (2 SCs together)
- Sl St: Slip Stitch
- 4-TC cluster: Four Treble Crochet Cluster (refer to special stitches below)
Pattern Notes:
- All rows begin by marking the first stitch with a stitch marker for accuracy.
- The body of the cats is made in one piece, NO SEW construction for the main body.
- Stripes, whiskers, and facial details are embroidered after the body is stuffed and completed.
Special Techniques:
- Magic Ring (MR): Used to start the project.
- Invisible Decrease (DEC): For cleaner shaping, only work into the outer loops of two stitches for decreases.
- 4-TC Cluster:
Wrap the yarn twice, insert the hook in the same stitch, yarn over, pull up a loop, yarn over, pull through first two loops, yarn over, pull through next two loops. Repeat 4 times in the same stitch, leaving multiple loops on your hook. Finally, yarn over and pull through all loops on the hook.
Gauge, Approximate Size, and Pattern Notes
- Gauge: Not specified, but tight, evenly spaced stitches are recommended, as the cats need to hold their stuffing without gaps. No specific gauge swatch was mentioned. Adjust hook size to achieve the preferred size if necessary.
- Finished Size: Approximately 3-5 inches tall depending on yarn and stuffing used.
- Special Notes:
- Follow along with the color variations for each cat provided in the tutorial.
- The pattern is NO SEW for the body, but you’ll sew on ears, tails, and add features (eyes, nose, stripes).
- Brown, yellow, and purple cats differ slightly due to color changes and stripe placements.
Step-by-Step Pattern
Body
- Foundation:
- Begin with MR, CH 1.
- Work 8 SC into the MR. Pull to close the ring. (8 stitches total).
- Round 2:
- INC in every stitch (2 SCs in each stitch). (16 stitches total).
- Round 3:
- (1 SC, INC) repeat 8 times. (24 stitches total).
- Round 4:
- (2 SC, INC) repeat 8 times. (32 stitches total).
- Round 5 (Color Variations Start):
- Brown Cat: 15 SC in brown, switch to white for 2 SC, then back to brown for 15 SC.
- Purple and Yellow Cats: Work 32 SC in round without color change.

- Round 6:
- (3 SC, INC) repeat around. (40 stitches total).
- Rounds 7-16 (Shaping):
- Maintain 40 stitches per round, creating a uniform cylinder.
- Colorwork differs: Purple cat has alternating 19 SC in purple, 10 in white, and 19 SC in purple.
- Round 17:
- Add shaping details with the 4-TC cluster (for belly and other textures). Spacing varies depending on the specific cat.
Decreasing and Stuffing
- Rounds 18-22:
- Gradual decreases to close the top.
- Round 18: (4 SC, DEC) repeat 8 times.
- Round 19: (3 SC, DEC) repeat 8 times.
- Round 20: (2 SC, DEC) repeat 8 times.
- Stuff the body with fiberfill carefully after Round 20.
- Round 21: (1 SC, DEC) repeat 8 times.
- Round 22: DEC in every stitch. (Close the hole using a tapestry needle and weave the tail securely).
Ears
- Attach yarn to Round 2-Round 7 area.
- CH 4.
- Starting from the 2nd chain:
- 1 SC, 1 HDC, 1 DC.
- Sl St to anchor in place.
- Make a second ear on the opposite side and secure both.

Tail
- Attach yarn near the bottom middle of the back.
- CH 7.
- Starting in the 2nd chain, work 6 SC down the row
- Sl St to attach and secure.

Face Details
- Eyes:
- Use black yarn. Place on Round 8, about 6 stitches apart between the eyes.
- Nose:
- Embroider with black yarn between the eyes on Round 8.
- Whiskers:
- Embroider whiskers slightly below the eyes, at Round 9. Place each whisker 3 stitches apart from eyes.
Stripes and Final Touches
- Add stripes to the back and sides of the yellow and purple cats as desired, about 3 rounds above the eyes. Use a contrasting color (like brown).
- Hide loose ends by securely weaving them into the project’s body.

Pattern Question
Q: How do I change the yarn color neatly during the pattern?
A: When changing colors, switch to the new yarn during the final pull-through of the last stitch. Keep the tension even and carry the unused yarn along for a neat finish.
Conclusion
Crocheting these no-sew squishy chubby cats is a fun and rewarding experience. Their versatility, ease of creation, and cute design make them engaging for crocheters of all levels. Start crafting yours today and enjoy the squishy joy they bring to your life!


